TF-100 Chlorine Cylinder Losing Markings?

Funny enough, I can do a full barrage of testing in about 7 minutes with my process. The test kit sits on the kitchen bar, along with the 2 cup measuring container. I just grab the container, dunk in the pool upside down, then turn it over about 18" below the surface, and fill it up.

Then I bring it inside, flip open the TF-100 case, and grab the syringe. It's easy to run each test and rinse the tools at the sink after each one. I dry them simply because I'm putting it all back inside the TF-100 case after each test. It's a quick and efficient process due to using the syringe and 2-cup measuring container. I can pull out the exact amount I need for the test, so there's no overshooting a fill line.
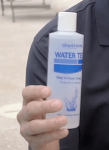
I like my Leslie's free sample squirt bottle for both sampling and dispensing into vials.

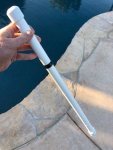
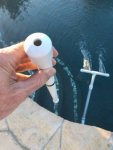
Come winter, you might appreciate this tip. A tube of PVC to grab your pool water from down below without getting more than your fingers wet. The trick is to cover the top with your thumb before submerging, and only let go at depth, so you only collect the deeper water. I go twice, once to rinse both the tube and the sample container, then collect the sample the second time. Caps with drilled holes on each end make it work a bit better than a pipe alone. The length of the pipe I cut holds just the amount I need for a suite of tests. Less stooping, too, for these ol' bones.
sample pipe 1.jpgsample pipe 2.jpg
 
I like my Leslie's free sample squirt bottle for both sampling and dispensing into vials.

Come winter, you might appreciate this tip. A tube of PVC to grab your pool water from down below without getting more than your fingers wet. The trick is to cover the top with your thumb before submerging, and only let go at depth, so you only collect the deeper water. I go twice, once to rinse both the tube and the sample container, then collect the sample the second time. Caps with drilled holes on each end make it work a bit better than a pipe alone. The length of the pipe I cut holds just the amount I need for a suite of tests. Less stooping, too, for these ol' bones.

View attachment 161380View attachment 161381
Is there a hole drilled in side of the pipe or is that just a reflection?
 
Only two, one in each cap, none in pipe. I ended up with a 3/8" hole in the top and a 1/4" hole in the bottom. I tried the same in each, but I ended up going to 1/4" below. Even with my thumb over the top, I was losing too much water out the bottom before I could aim it at the sample container I use. 1/4" seemed to solve that. Any smaller and it takes too long to fill/empty the pipe. Without caps I think I remember the spillage and loss was even worse. YMMV.

Back in TFP Kindergarten I was being crazy meticulous about my testing MO. The black stripe was to ensure I took water from the exact depth every day. I now just submerge all but the cap so I can get enough water for the suite, and, as you've read, have loosened up considerably with the MO.
 
  • Like
Reactions: CTFocusST
Only two, one in each cap, none in pipe. I ended up with a 3/8" hole in the top and a 1/4" hole in the bottom. I tried the same in each, but I ended up going to 1/4" below. Even with my thumb over the top, I was losing too much water out the bottom before I could aim it at the sample container I use. 1/4" seemed to solve that. Any smaller and it takes too long to fill/empty the pipe. Without caps I think I remember the spillage and loss was even worse. YMMV.

Back in TFP Kindergarten I was being crazy meticulous about my testing MO. The black stripe was to ensure I took water from the exact depth every day. I now just submerge all but the cap so I can get enough water for the suite, and, as you've read, have loosened up considerably with the MO.

Thanks! Going to build one of these with some scrap pvc I have around
 
  • Like
Reactions: Dirk
This is the Leslie's sampler that I like to use.

That's what I use too. Works great and I've got squirting 10 ml and 25 ml into my vials down to an art.
As far as the CL cylinder, I admit to drying mine with a paper towel after rinsing with tap water. I dry it because right after testing, I put the kit away, plus I"m a bit OCD.

Meanwhile, my CYA bottle is turning purple at the top. This is the second one it's happend to. The thought on the first one was maybe it was from some sort of reaction storing it inside the kit. But this second one is stored by itself.
 

Enjoying this content?

Support TFP with a donation.

Give Support
I like my Leslie's free sample squirt bottle for both sampling and dispensing into vials.

Come winter, you might appreciate this tip. A tube of PVC to grab your pool water from down below without getting more than your fingers wet. The trick is to cover the top with your thumb before submerging, and only let go at depth, so you only collect the deeper water. I go twice, once to rinse both the tube and the sample container, then collect the sample the second time. Caps with drilled holes on each end make it work a bit better than a pipe alone. The length of the pipe I cut holds just the amount I need for a suite of tests. Less stooping, too, for these ol' bones.

View attachment 161380View attachment 161381
I love this idea. Going to make one for sure. Thanks!

As for the vial, I’ve been drying mine with a paper towel. However, I don’t really rub it dry, just roll up some paper towel and use that like a swab. Reason being, I stuck my finger and a wad of paper towel in the other vial that I got with my FT-100 kit and the pressure cracked the vial. Therefore I’ve been more careful with the chlorine only vial.
 
Maybe I'm testing my new pool too often, or is this common for the chlorine cylinder's markings to wear off this quickly?

On the left is the TF-100 cylinder for all the non-chlorine tests, and on the right is the TF-100 chlorine only cylinder. The pool was filled on Aug 28th, and I've been testing multiple times a day, as I learn my pool's cycle. So 9 days of testing on this cylinder.

My test process is to fill a 2-cup measuring container with pool water, and bring it inside. Then I have a 25ml syringe I use to extract water from the 2-cup container, and fill the appropriate graduated cylinders for each test. I fill the chlorine one to 10ml, drop in the speedstir pill, and test away.

I dry each component before putting it away as well.

View attachment 161307
Both mine did the same thing. They sent me two new ones and I covered them with scotch tape.
 
Just chiming in to say my vials are doing the same thing and I dont dry them off often. Sounds like maybe the newer test kits have different vials that wear out quicker?
 
None of the vials I got with the 2006C kit or the ones I subsequently ordered on Amazon have painted markings.
 
Adding another voice, mine is also doing this. I swirl by hand and don't dry it off. I have owned the kit for almost exactly 1 month. I think it is rubbing off where I hold it in my fingers. Not exactly inspiring for it's longevity.

There was a note in the box about providing different size tube due to supply issues. I wonder if that has anything to do with it?
 
Add me to the list. I just got mine this summer and my numbers are wearing off as well. I use a speed stir and I've never done anything other than air dry.

For others who are experiencing this, do you all have newer kits as well? I wonder if they got a bad batch?
 
^^^^^--- What I was going to say. You'll only ever use the 10 ml marking anyway, so scratch a line into it and go 6 more years.... If you are that touchy about it, start ebaying Taylor cylinders... they are molded in but at much harder to see (and you'll end up etching a 10 ml line into because of that)..... It's not rocket science....
 
^^^^^--- What I was going to say. You'll only ever use the 10 ml marking anyway, so scratch a line into it and go 6 more years.... If you are that touchy about it, start ebaying Taylor cylinders... they are molded in but at much harder to see (and you'll end up etching a 10 ml line into because of that)..... It's not rocket science....
I took a Sharpie to a couple of the raised lines on my Taylor vial. Can redo as wear happens. Mostly I just put the vial on top of the SpeedStir and turn on the light, which pretty much lights up all the raised lines well enough.
 

Enjoying this content?

Support TFP with a donation.

Give Support
Thread Status
Hello , This thread has been inactive for over 60 days. New postings here are unlikely to be seen or responded to by other members. For better visibility, consider Starting A New Thread.