
*Started build* Cape Coral, FL pool/spa Build
- Thread starter JonathanD
- Start date
You are using an out of date browser. It may not display this or other websites correctly.
You should upgrade or use an alternative browser.
You should upgrade or use an alternative browser.


Rocky home! I am guessing they are done digging. It is time for your first job for your pool. Go out there with a tape measure and the plans. Is it wide, deep, long, etc enough??? Add about 8" for the steel, shell, and plaster. NOW is the time to fix or tweak as needed.
Kim
Kim
Thanks, just measured and everything looks spot on so far.Rocky home! I am guessing they are done digging. It is time for your first job for your pool. Go out there with a tape measure and the plans. Is it wide, deep, long, etc enough??? Add about 8" for the steel, shell, and plaster. NOW is the time to fix or tweak as needed.
Kim

They shot the shell today. Looks like a pool! Asked the builder if I needed to water it, he said no. It seems the best practice is to water it, but should I follow my builders instructions for warranty purposes?
Attachments


- Jul 21, 2013
- 65,407
- Pool Size
- 35000
- Surface
- Plaster
- Chlorine
- Salt Water Generator
- SWG Type
- Pentair Intellichlor IC-60
They shot the shell today. Looks like a pool! Asked the builder if I needed to water it, he said no. It seems the best practice is to water it, but should I follow my builders instructions for warranty purposes?
You need to decide how you handle Builder advice different then ours. There will be a lot of it I think.
Watering New Gunite and Concrete - Further Reading
 www.troublefreepool.com
What Allen said! Me? I would be watering that bad boy!! You cannot hurt it!
Now it is time for YOUR set of links!!!
Plaster links:
Ten Guidelines for Quality Pool Plaster Best one of all
All Plaster Finishes Should Last 20 Years
Not All Color Pigments are Good for Pools How to pick a good color for plaster.
A Plastering 'Watch List' | Professional Watershaping | Watershapes
Trouble Free Pool
Trouble Free Pool
Pool care links:
Print these out:
Pool School - Basic Pool Care Schedule
Pool School - Recommended Levels
Bookmark these:
Pool School - Recommended Pool Chemicals
Trouble Free Pool
Pool School - ABCs of Pool Water Chemistry
Now is also a good time to ask what test kit your PB will be providing so we can fill in any holes.
Kim
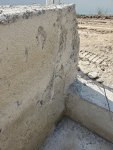
So they took the forms off and backfilled a few days after shooting. Found a few minor issues that I am awaiting an answer for remedy. A piece of rebar is about half way exposed where the spa will be tiled over. Also a good amount of the horizontal piping is exposed in the spa from the shoot. I assume it was pushed back from shotcrete but you could not see until the form was taken off. They gave been very responsive with any issues and I dont doubt they will make it right, but what would a build thread be without a little drama?
Attachments
Yeah I have not see a build without some kind of problem......what makes is great build is how the PB handles it! Lets hope they stay the course with the good communication!
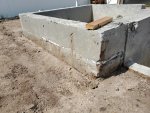
Coping and tile are in! Tile still needs grout, which will be charcoal colored. Next step after that for them is trenching and plumbing. Loving it so far. The tile/coping guy (yes 1 guy aka machine!) was amazing to watch, his craftsmanship is fantastic.
Attachments


A lot has been done since the last update. Birth of our daughter has taken up my pool write up time. Waiting on electrical, plaster, and then its water time.
Attachments


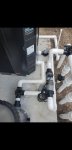
I do have a bone to pick about the heater bypass valve. With this plumbing I cannot stop the water going to the heater bypass. I can only stop the water going to the heater or coming from the filter. Any plumbing experts available to pass on their input before I bug the pool people again. Thank you.
Attachments


Last edited:
- Jul 21, 2013
- 65,407
- Pool Size
- 35000
- Surface
- Plaster
- Chlorine
- Salt Water Generator
- SWG Type
- Pentair Intellichlor IC-60
I do have a bone to pick about the heater bypass valve. With this plumbing I cannot stop the water going to the heater bypass. I can only stop the water going to the heater or coming from the filter. Any plumbing experts available to pass on their input before I bug the pool people again. Thank you.
You never want to stop the water coming from the filter. That will stop your flow and damage your system.
What do you want to do that you cannot with your current configuration?
In the current configuration. If am running the heater (normal operation") the valve is also "open" to the bypass pipe. I can shut off the heater pipe, but not the bypass. I don't know how much flow I am losing to the heater given the water is flowing to both the heater and the heater by pass. The "inlet" is now the heater bypass pipe, 3 way valves don't allow you to turn off the inlet.
NICE! Do the Dad thing! We will be here when you are ready!Birth of our daughter has taken up my pool write up time.
LOVE the pics especially little man sitting on the big toy!!! His grin says it all!
That decking looks great and it is not even cleaned up yet!
Kim
- Jul 21, 2013
- 65,407
- Pool Size
- 35000
- Surface
- Plaster
- Chlorine
- Salt Water Generator
- SWG Type
- Pentair Intellichlor IC-60
In the current configuration. If am running the heater (normal operation") the valve is also "open" to the bypass pipe. I can shut off the heater pipe, but not the bypass. I don't know how much flow I am losing to the heater given the water is flowing to both the heater and the heater by pass. The "inlet" is now the heater bypass pipe, 3 way valves don't allow you to turn off the inlet.
There is no fixed inlet in the 3 way valve. Remove the screws on the top of the valve and reposition it so the inlet is properly positioned and you can move the valve between closing the heater inlet or the heater bypass line.
Last edited:
I believe you but I have only ever replaced existing 3 ways and have never had to adjust the guts for proper flow. Thanks! This is why I came here before bugging them. Every time I bring something up, they are already in the process of doing the "right" thing lol.
- Jul 21, 2013
- 65,407
- Pool Size
- 35000
- Surface
- Plaster
- Chlorine
- Salt Water Generator
- SWG Type
- Pentair Intellichlor IC-60
3 ways come assuming inlet is middle port. But no reason you can't use one of the end ports and reposition the valve assembly. An installer should be aware of that.
Awesome build so far! Question, can you share the price of your build (feel free to PM if you don't want to disclose). Thanks!
Thread Status
Hello , This thread has been inactive for over 60 days. New postings here are unlikely to be seen or responded to by other members. For better visibility, consider Starting A New Thread.