| (38 intermediate revisions by the same user not shown) | |||
| Line 14: | Line 14: | ||
Raypak heaters have a traditional burner tube geometry like a BBQ or hot water heater. Gas is injected into a manifold of burner tubes with the heat driving the flow of exhaust out the stack. This design is susceptible to wind and atmospheric issues causing flame roll out problems and dirty combustion tubes.<ref>https://www.troublefreepool.com/threads/pool-heater-recommendations.201196/post-1775559</ref> | Raypak heaters have a traditional burner tube geometry like a BBQ or hot water heater. Gas is injected into a manifold of burner tubes with the heat driving the flow of exhaust out the stack. This design is susceptible to wind and atmospheric issues causing flame roll out problems and dirty combustion tubes.<ref>https://www.troublefreepool.com/threads/pool-heater-recommendations.201196/post-1775559</ref> | ||
| + | |||
| + | == Raypak Manufacturing Defects== | ||
| + | |||
| + | The following was posted in June, 2022 by a Pool Industry Professional.<ref> https://www.troublefreepool.com/threads/raypak-manufacturing-defects.255238/post-2231152 </ref> | ||
| + | |||
| + | At one point I only installed Raypak and loved them for years. Minimal rat problems easy to work on, very responsive warranty work(in my area) and this still hasn’t changed. | ||
| + | |||
| + | I just want to forewarn this lovely community that over the last year Raypaks assembly line has been a bit shotty. I refuse to install any more Raypak heaters going forward until the problems have been addressed. | ||
| + | |||
| + | The problems being, leaking header, and or sensors leaking into cabinet. | ||
| + | Return header and plug leaking into cabinet. They are not always apparent upon installation and can form over time resulting in extensive rusting of cabinet and firewall and burners. | ||
| + | |||
| + | If you are considering Raypak please do your own research and inspect the headers regularly. If you have installed one in the last year, please open both side panels and make sure you don’t have a leak. Usually they are very slow and unnoticeable unless you look inside. | ||
| + | |||
| + | If there is a leak and any signs of rust I would contact Raypak. | ||
| + | |||
| + | |||
| + | ==Raypak Avia Heaters== | ||
| + | |||
| + | ===Resetting Raypak Avia IGN Lockout=== | ||
| + | |||
| + | If the Raypak Avia heater will not ignite after three tries it will lockout with a Call Service message. The manual says the heater is locked for 60 minutes. | ||
| + | |||
| + | A member said the proper reset procedure is to hit the button on the control board that says SETUP next to it (only button on the control board) for 15 seconds, then hit the MODE button for 5 seconds and that will clear the "call service" code which had the heater disabled.<ref>https://www.troublefreepool.com/threads/raypak-heater-help.255537/post-2234054</ref> | ||
| + | |||
| + | Another member said this can be found in the Raymote app (but not real easy). Click on the head emoji in the upper left. Then go to error codes. Hold "service" button for 15 seconds. Then press and hold "MODE" for 5 seconds. This worked on his new Avia. It also says that some 1st production units require that you (instead) push the "set up" button located on the main circuit board.<ref>https://www.troublefreepool.com/threads/raypak-heater-help.255537/post-2393626</ref> | ||
| + | |||
| + | [[File:Raypak Avia Heater Board.jpg|thumb]] | ||
==Digital Model Gas Heaters== | ==Digital Model Gas Heaters== | ||
| Line 30: | Line 58: | ||
*Designation for a Millivolt heater using propane gas is "MP"; a Millivolt heater using natural gas is "MN". | *Designation for a Millivolt heater using propane gas is "MP"; a Millivolt heater using natural gas is "MN". | ||
*Prefix "P" is for plastic (polymer) headers. | *Prefix "P" is for plastic (polymer) headers. | ||
| + | *Prefix “B” is for brass headers. | ||
*Suffix "X" is for cupro-nickel tubing; "C" is for copper tubing. | *Suffix "X" is for cupro-nickel tubing; "C" is for copper tubing. | ||
*Example: P-M406A-EN-X = Plastic headers, 406 model size, digital, natural gas, cupro-nickel. | *Example: P-M406A-EN-X = Plastic headers, 406 model size, digital, natural gas, cupro-nickel. | ||
| Line 59: | Line 88: | ||
Propane is heavier than NG when its in gas form and it likes to sink to the floor and pool, making for some lively outcomes if it happens to pool in the right place. The designers at Raypak found a way around this. When the tab is broken off, the system will only try to light one time before it locks out, instead of the three tries for NG.<ref>https://www.troublefreepool.com/threads/raypak-conversion-professional-series-propane-to-natural-gas.213820/post-1872757</ref> | Propane is heavier than NG when its in gas form and it likes to sink to the floor and pool, making for some lively outcomes if it happens to pool in the right place. The designers at Raypak found a way around this. When the tab is broken off, the system will only try to light one time before it locks out, instead of the three tries for NG.<ref>https://www.troublefreepool.com/threads/raypak-conversion-professional-series-propane-to-natural-gas.213820/post-1872757</ref> | ||
| − | + | You can convert a propane heater to NG by installing NG orifices, NG gas valve regulator, and a new pilot burner assembly since they have the NG orifice installed in them. You will need to disconnect power from the heater to reset it and then try again if it does not light. Use a conversion kit for millivolt heaters.<ref>https://www.troublefreepool.com/threads/raypak-propane-ng-heater-question.266374/post-2330983</ref> | |
| + | |||
| + | ===Raypak Heater Bonding Lug=== | ||
| + | |||
| + | The heater bond lug comes in the parts bag (along with an attaching screw) and has to be attached to the cabinet by the installer at the lower left or right side of the heater. There will be a small hole in the cabinet to accept the screw. | ||
| + | |||
| + | If you don't have the screw and bond lug, they can be purchased at most hardware stores for very little. I believe the screw size is #10 sheet metal. Get stainless steel if you can. Just force the screw in as it will make its own threads. | ||
| + | |||
| + | [[File:Raypak Heater Bonding Lug.png|thumb]] | ||
===Maintenance=== | ===Maintenance=== | ||
| Line 65: | Line 102: | ||
[https://www.royalswimmingpools.com/rp2100manual.pdf Raypak Digital Heater Installation and Operation Instructions] | [https://www.royalswimmingpools.com/rp2100manual.pdf Raypak Digital Heater Installation and Operation Instructions] | ||
| − | ====SNS Error==== | + | ====SNS Error/Sensor Failure==== |
| − | SNS error is a bad water sensor. | + | SNS error or Sensor failure is a bad water sensor. |
| + | |||
| + | The Rayapk temperature sensor has two thermistors and if they disagree by more then 2F(1C) it gives a Sensor Failure. | ||
Page 46 in http://cdn.globalimageserver.com/FetchDocument.aspx?ID=c404f1c5-ac50-4209-9457-56246d010b20 | Page 46 in http://cdn.globalimageserver.com/FetchDocument.aspx?ID=c404f1c5-ac50-4209-9457-56246d010b20 | ||
| Line 79: | Line 118: | ||
When automation is controlling the heater the automation temperature and the Raypak heater temperature can be different and the heater can hit its maximum temperature while the water is not yet to that temperature.<ref>https://www.troublefreepool.com/threads/raypak-propane-heater-has-wide-temperature-swing.195671/post-1725147</ref> | When automation is controlling the heater the automation temperature and the Raypak heater temperature can be different and the heater can hit its maximum temperature while the water is not yet to that temperature.<ref>https://www.troublefreepool.com/threads/raypak-propane-heater-has-wide-temperature-swing.195671/post-1725147</ref> | ||
| − | The default maximum temperature for the pool and spa can be raised. | + | The default maximum temperature for the pool and spa can be raised. Note that raising the max temperature may cause High Limit 2 Errors. |
See page 28 of the [http://cdn.globalimageserver.com/FetchDocument.aspx?ID=c404f1c5-ac50-4209-9457-56246d010b20 Raypak INSTALLATION AND OPERATION MANUAL] | See page 28 of the [http://cdn.globalimageserver.com/FetchDocument.aspx?ID=c404f1c5-ac50-4209-9457-56246d010b20 Raypak INSTALLATION AND OPERATION MANUAL] | ||
| Line 88: | Line 127: | ||
=====Pool Max Temp – Pool Setpoint Maximum Adjustment===== | =====Pool Max Temp – Pool Setpoint Maximum Adjustment===== | ||
Refer to step one on page 28 to access into the program screen. Press the MODE button until POOL MAX TEMP appears on the digital display. Using the UP and DOWN buttons will change the Maximum Temperature Setting to your desired value. The control can be set for a maximum of 107°F (42°C). | Refer to step one on page 28 to access into the program screen. Press the MODE button until POOL MAX TEMP appears on the digital display. Using the UP and DOWN buttons will change the Maximum Temperature Setting to your desired value. The control can be set for a maximum of 107°F (42°C). | ||
| + | |||
| + | ====Cleaning Gas Orifices==== | ||
| + | |||
| + | Spiders like to nest in the gas burners and block the gas flow. That causes gas burners to burn yellow, when proper gas mixture flame is blue, or not light. | ||
| + | |||
| + | Use 14ga copper wire cut at a sharp angle and put a little hook to pull spider web out. On a Ray Pak the heater tray usually has to be pulled out to get to the orifices.<ref> https://www.troublefreepool.com/threads/raypak-206a-heater-issue.251344/post-2200286 </ref> | ||
| + | |||
| + | Disconnect it from the gas line and all the wiring to the valve, etc. Take pictures. After that the tray, has to be dis-assembled to access the orifices. There is a bar across the back of the tray that keeps the burners in place. Remove that and they will pull of the orifices. They will pop back into place with a little push. Its not hard, just tedious. If you do it, take your time and be sure to use some new pipe dope on the fittings to re-assemble. If not familiar with gas plumbing, do a lot of research. Lots of sheet metal screws that use a 5/16 nut driver. Put them all back.<ref> https://www.troublefreepool.com/threads/raypak-206a-heater-issue.251344/post-2200317 </ref> | ||
| + | |||
| + | This may not be the best DIY project. You will be dealing with an expensive appliance that can be dangerous if not done correctly. | ||
| + | |||
| + | When you get it cleaned, be sure to fire it for a couple of minutes at least once a month to keep the spiders out. They love heaters. | ||
| + | |||
| + | ====Raypak Protek Shield==== | ||
| + | |||
| + | Raypak has added a sacrificial zinc anode that they call Protek Shield to their latest heaters. The Protek Shield Assembly is located under the inlet connection on polymer headers and in the ProTek Shield Adapter assembly shipped loose | ||
| + | in the accessory carton for field-installation on bronze ASME headers. | ||
| + | |||
| + | [[File:Raypak Protek Shield Assembly.jpg|thumb]] | ||
| + | |||
| + | The Protek Shield provides protection to the heat exchanger against galvanic corrosion, when properly bonded to the heat exchanger. It should be replaced when the weight of the ProTek Shield is reduced to about 40% of the original | ||
| + | weight of 1.46 lbs. About 14 oz. | ||
| + | |||
| + | <Gallery> | ||
| + | File:Raypak Protek Shield Assembly Used.jpg | ||
| + | File:Raypak Protek Shield Assembly Used1.jpg | ||
| + | </gallery> | ||
| + | |||
| + | Cautions on replacing the Protek Shield: | ||
| + | |||
| + | *STOP the pool pump before attempting to remove ProTek Shield Assembly. Failure to do so may result in damage to ProTek Shield Assembly, loss of pool water, or personal injury | ||
| + | *Do not use tools to remove (twist) the ProTek Shield Assembly or the wing nut on the stud of the ProTek Shield Assembly | ||
| + | *Use a strap wrench to loosen the assembly if yoru hand cannot do it. Do not tighten it with a strap wrench.<ref>https://www.troublefreepool.com/threads/raypak-protek-shield-when-to-replace.264901/post-2324112</ref> | ||
| + | *While the manual says "Rotate ProTek Shield Assy clockwise (by hand) to unscrew it from the assembly" it is a standard right hand thread that turns counter clockwise (as viewed from the bottom looking up) | ||
| + | |||
| + | If you want a sacrificial anode in your system, it is less expensive to use Pool Tools skimmer anode. They bolt to the bottom of your basket and keep it in place as well as sacrifice themselves. Online, 3 for $30.00 +/-. | ||
| + | |||
| + | Both do what an anode does, corrode. There are thousands of heaters in service for decades without them. Be sure to lube that O ring when reassembling. | ||
| + | |||
| + | ====High Limit 2 Error==== | ||
| + | |||
| + | Things you can try... | ||
| + | |||
| + | *replace both high limit sensors and add thermal paste | ||
| + | *replace unitherm governor | ||
| + | *replace internal bypass | ||
| + | *add a heat shield | ||
| + | |||
| + | Some folks have added a heat shield above the HLS sensors.<ref>https://www.troublefreepool.com/threads/raypak-high-2-limit-fault-checked-unitherm-governor-now-what.164872/post-2111464</ref> | ||
| + | [https://www.troublefreepool.com/threads/new-raypak-lp-heater-issue-high-limit-fault.231817/#post-2088249 This thread] describes how the high limit fault was fixed by insulating the header around the sensors. | ||
| + | |||
| + | [[File:Raypak Heater HLS Heat Shield.jpg|400px|thumb]] | ||
| + | |||
| + | ====Internal Bypass==== | ||
| + | |||
| + | This is what a rusted internal bypass looks like that can cause HLS errors.<ref>https://www.troublefreepool.com/threads/raypak-high-2-limit-fault-checked-unitherm-governor-now-what.164872/post-2108784</ref> | ||
| + | |||
| + | [[File:Raypak Heater Internal Bypass Rusted.jpg|400px|frameless]] | ||
| + | |||
| + | ====Unitherm Governor==== | ||
| + | |||
| + | This is what a corroded unitherm governor looks like: | ||
| + | |||
| + | [[File:Raypak Heater Unitherm Governor Rusted.jpg|400px|frameless]] | ||
| + | |||
| + | ====Flame Rectifcation Errors==== | ||
| + | |||
| + | The heater does not have a separate flame sensor. The pilot assembly acts as the flame sensor. | ||
| + | |||
| + | You can check the Flame Strength indicator on the Service Menu. | ||
| + | |||
| + | In general problems could be a loose ground, bad high tension wire, sooted pilot, loose pilot. Check to make sure that the ground down by the pilot assembly is OK. | ||
| + | |||
| + | Check there is no corrosion around the pilot assembly. | ||
| + | |||
| + | Page 34 of the [http://cdn.globalimageserver.com/FetchDocument.aspx?ID=c404f1c5-ac50-4209-9457-56246d010b20 Raypak Installation and Operation Manual] describes how to remove and clean the Pilot Assembly.<ref>https://www.troublefreepool.com/threads/raypak-406a-burner-wont-fire-but-do-get-pilot.217928/#post-1909699</ref> | ||
| + | |||
| + | [[File:Raypak Digital Heater Pilot Assembly.png|thumb]] | ||
| + | |||
| + | If you do not have a millivolt system look at the bottom pilot assembly. Start cleaning by turning off heater and and gas supply shut off. Remove pilot bracket screw and green ground wire at bottom right of burner manifold bracket. Remove pilot tubing at gas valve. Remove pilot assembly and pilot tubing as one piece. | ||
| + | |||
| + | Clean all metal pieces where pilot assembly bracket was attached to the burner manifold bracket including the screw and the metal termination of the green wire with a small stainless steel wire brush and/or small diamond file (available at Harbor Freight). | ||
| + | |||
| + | On the pilot assembly itself (page 34) you need to clean the underside of the pilot hood (above the pilot tubing attachment) with a dental pick (Harbor Freight) until the metal is clean. Also gently clean the spark rod with a small diamond file or steel wool all the way around to get bare metal, being careful to support the ceramic insulator so that it doesn't crack. | ||
| + | |||
| + | Clean the underside of the ground hood (opposite the pilot hood with the 2 extended tabs on the outside edges) with small stainless brush and/or diamond file to get to bare metal. Clean any screws and metal points of attachment at the grounding hood side of the pilot assembly at the pilot bracket and burner frame that the pilot bracket is attached to. | ||
| + | |||
| + | Reassemble in reverse order making sure to tighten the pilot tubing to the gas valve. Turn on gas shut off and power to heater. Put a small amount of dawn dish detergent mixed with a little water on the pilot tubing attachment at the gas valve. | ||
| + | |||
| + | Fire up heater. Check for any bubbles at pilot tubing attachment at gas valve (indication of a leak). | ||
====Service Menu and Fault History==== | ====Service Menu and Fault History==== | ||
| Line 111: | Line 240: | ||
'''Lo NOx heaters:''' Rated inputs are suitable for up to 5,000 feet elevation. For elevations above 5000 feet, consult the factory. | '''Lo NOx heaters:''' Rated inputs are suitable for up to 5,000 feet elevation. For elevations above 5000 feet, consult the factory. | ||
| + | |||
| + | ====Below or Above Pool Installation==== | ||
| + | |||
| + | The water flow switch ensures that the heater operates only when the filter pump is in operation. It is located on the In/Out header. It is factory-set at 1.75 PSI for deck-level installations. The standard Raypak pressure switch set to 1.75 psi can be triggered by 4 feet of standing water pressure with no flow.<ref>https://www.troublefreepool.com/threads/unitherm-governor-blowout.266395/post-2331160</ref> | ||
| + | |||
| + | When the heater is located below the level of the spa or pool, it may be necessary to adjust the pressure switch to | ||
| + | compensate for the no-flow static head. See the Installation Manual for Water Pressure Switch Adjustment Procedure. | ||
| + | |||
| + | [[File:Raypak Heater Pressure Switch Limitations.png|thumb]] | ||
| + | |||
| + | If the heater is installed outside of the limits shown, heater installed 5 feet below or above the pool water level, a switch rated for a higher pressure (11 psi / 76 kPa) may be used. Raypak has an 11 psi Water Pressure Switch kit. | ||
| + | |||
| + | A flow switch, mounted and wired adjacent to the heater, may be used in place of the factory-mounted pressure switch, and is a better choice if the heater is not at pool level. | ||
==== Raypak LP heater high limit fault==== | ==== Raypak LP heater high limit fault==== | ||
| Line 123: | Line 265: | ||
You can find a YouTube video on the installation. | You can find a YouTube video on the installation. | ||
| + | |||
| + | ====RV1 Displayed==== | ||
| + | |||
| + | A member had "RV1 000" on the display instead of the temperature when the heater was turned on.<ref> https://www.troublefreepool.com/threads/raypak-error-rv1.276122/#post-2426255 </ref> | ||
| + | |||
| + | He went thru the process of disconnecting everything on the circuit board and discovered the keypad is malfunctioning or has a short. Once the keypad was disconnected the temp display shows up. | ||
====Millivolt Trouble Shooting==== | ====Millivolt Trouble Shooting==== | ||
| Line 170: | Line 318: | ||
[http://cdn.globalimageserver.com/FetchDocument.aspx?ID=0decde59-051d-4179-b8ce-c094929e24b3 R185A, R265A, R335A, R405A (ATMOSPHERIC, LOW NOx) Replacement Parts] | [http://cdn.globalimageserver.com/FetchDocument.aspx?ID=0decde59-051d-4179-b8ce-c094929e24b3 R185A, R265A, R335A, R405A (ATMOSPHERIC, LOW NOx) Replacement Parts] | ||
| + | |||
| + | ===RP2100 Pilot Assembly=== | ||
| + | |||
| + | The RP2100 has a Pilot Assembly that contains the ignitor, pilot flame, and flame sensor. | ||
| + | |||
| + | [[File:Raypak RP2100 Pilot Assembly.jpg|thumb]] | ||
| + | |||
| + | Try to see if the pilot is actually lit even though the ignitor continues to spark. If so, get a new pilot burner assembly. | ||
| + | |||
| + | You can try cleaning the small "fork" above the actual pilot flame, that is the flame-sense area but on a heater that old a replacement is best. | ||
| + | |||
| + | Also, be sure there is a good ground between the burner tray and the cabinet, even if it means adding a small wire between one of the screws that hold the tray in place and a clean screw in the cabinet. | ||
==Raypak Heat Pumps== | ==Raypak Heat Pumps== | ||
| + | |||
| + | Models numbers beginning with: | ||
| + | *R = Raypak branded | ||
| + | *M = Rheem branded | ||
| + | |||
| + | Ti = Titanium heat exchanger. | ||
| + | |||
| + | The same models are sold under Raypak and Rheem brands with slightly different model numbers. | ||
===Raypak Heat Pump High Pressure Trip Lockout=== | ===Raypak Heat Pump High Pressure Trip Lockout=== | ||
Latest revision as of 20:05, 2 December 2023
Raypak Heaters
Raypak Model Number History can help understand the various current and previous Raypak product lines and model numbers.
Raypak has a few product lines of heaters. Raypak residential pool and spa gas heaters include above ground heater models; in-ground heater models from 200K to 400K BTU; and low NOX versions of the in-ground heatrs from 200K to 400K BTU.[1]
Raypak also has a product line of residential pool and spa heat pumps with five models from 48K BTUs to 140K BTUs.[2] The higher BTU heat pumps are available in a model with heating and cooling.
The Raypak Professional series heat pump pool heaters, from 140K BTUs to 170K BTUs, are designed specifically for commercial properties such as apartments, condos, hotels, motels, schools, parks, community and high-end private pools.[3] It’s also appropriate in tough coastal weather conditions where salt air challenges durability.
Raypak also has a wide range of commercial gas pool heaters with BTUs up to 2,340,000 BTUs.[4]
Rapak is a Rheem company and most HVAC companies know their way around the units and can get parts. You are not locked into installation and service through pool store channels. Raypak has a good warranty for heaters purchased separately and installed by a professional contractor, not necessary a pool company.
Raypak heaters have a traditional burner tube geometry like a BBQ or hot water heater. Gas is injected into a manifold of burner tubes with the heat driving the flow of exhaust out the stack. This design is susceptible to wind and atmospheric issues causing flame roll out problems and dirty combustion tubes.[5]
Raypak Manufacturing Defects
The following was posted in June, 2022 by a Pool Industry Professional.[6]
At one point I only installed Raypak and loved them for years. Minimal rat problems easy to work on, very responsive warranty work(in my area) and this still hasn’t changed.
I just want to forewarn this lovely community that over the last year Raypaks assembly line has been a bit shotty. I refuse to install any more Raypak heaters going forward until the problems have been addressed.
The problems being, leaking header, and or sensors leaking into cabinet. Return header and plug leaking into cabinet. They are not always apparent upon installation and can form over time resulting in extensive rusting of cabinet and firewall and burners.
If you are considering Raypak please do your own research and inspect the headers regularly. If you have installed one in the last year, please open both side panels and make sure you don’t have a leak. Usually they are very slow and unnoticeable unless you look inside.
If there is a leak and any signs of rust I would contact Raypak.
Raypak Avia Heaters
Resetting Raypak Avia IGN Lockout
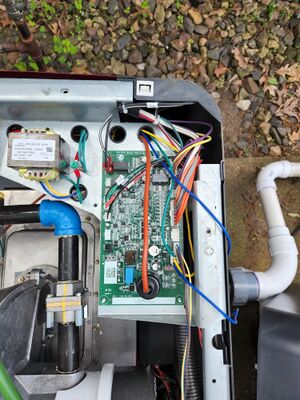
If the Raypak Avia heater will not ignite after three tries it will lockout with a Call Service message. The manual says the heater is locked for 60 minutes.
A member said the proper reset procedure is to hit the button on the control board that says SETUP next to it (only button on the control board) for 15 seconds, then hit the MODE button for 5 seconds and that will clear the "call service" code which had the heater disabled.[7]
Another member said this can be found in the Raymote app (but not real easy). Click on the head emoji in the upper left. Then go to error codes. Hold "service" button for 15 seconds. Then press and hold "MODE" for 5 seconds. This worked on his new Avia. It also says that some 1st production units require that you (instead) push the "set up" button located on the main circuit board.[8]
Digital Model Gas Heaters
Since 2004 Raypak has manufactured the Digital models MODELS 206A, 266A, 266, 336A, 399 and 406A; and since September 2011 the LOW NOx HEATER POOL MODELS 207A, 266L, 267A, 337A, 399L and 407A.
Low NOx Heater Model
Low NOx heaters normally have somewhat higher efficiencies and exhibit much lower NOx emissions.
They were developed to satisfy low NOx emissions requirements as first imposed by the South Coast Air Quality Management District in California. Your area might require a low NOx heater. You should consider a low NOx heater in any case.
Raypak Model Numbers
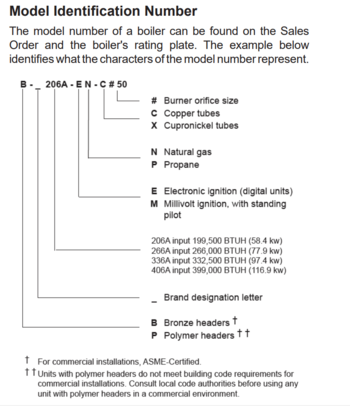
- Designation for a Digital heater using propane gas is "EP"; a Digital heater using natural gas is "EN".
- Designation for a Millivolt heater using propane gas is "MP"; a Millivolt heater using natural gas is "MN".
- Prefix "P" is for plastic (polymer) headers.
- Prefix “B” is for brass headers.
- Suffix "X" is for cupro-nickel tubing; "C" is for copper tubing.
- Example: P-M406A-EN-X = Plastic headers, 406 model size, digital, natural gas, cupro-nickel.
Raypak Serial Numbers
Before 1995, it was month (first 2 digits) and then year (digits 3 and 4).
Beginning in 1995, they changed to year and month. The first 2 are the year and the next 2 are the month.
Serial number 1604304448 was made in April 2016.
Cupro-nickel Heat Exchangers
The cupro-nickel heat exchanger is 25% NICKEL AND 75% COPPER (denoted by an “X” at the end of the model number.) The other unit is 100% copper (denoted by a “C” at the end of the model number.) The copper heat exchanger is the most efficient material for heat transfer, so the cupro-nickel is derated.[9]
The purpose of the cupro-nickel is to give additional protection to the heat exchanger that can be attacked with poor water chemistry. That is the advantage, but it also has less ability to transfer heat.
The input BTUH accounts for the heat exchanger material, and the heater efficiency is 82%.
How to Locate the Raypak Heater Model and Serial Number
The heater’s model and serial numbers are located on the rating plate found on the inside of the unit. To locate the rating plate, first loosen the door screw. Remove the door(s), pull up and out. The rating plate will be either a gold or silver color with the Raypak logo. The serial number will have 10 digits. The date code is found in the first four digits of the serial number, for example, a unit made in April of 2001 will have the first four digits read as 0104.
Propane Heaters
The board on the propane heater, depending on the age, will have a tab that has been broken off.
Propane is heavier than NG when its in gas form and it likes to sink to the floor and pool, making for some lively outcomes if it happens to pool in the right place. The designers at Raypak found a way around this. When the tab is broken off, the system will only try to light one time before it locks out, instead of the three tries for NG.[10]
You can convert a propane heater to NG by installing NG orifices, NG gas valve regulator, and a new pilot burner assembly since they have the NG orifice installed in them. You will need to disconnect power from the heater to reset it and then try again if it does not light. Use a conversion kit for millivolt heaters.[11]
Raypak Heater Bonding Lug
The heater bond lug comes in the parts bag (along with an attaching screw) and has to be attached to the cabinet by the installer at the lower left or right side of the heater. There will be a small hole in the cabinet to accept the screw.
If you don't have the screw and bond lug, they can be purchased at most hardware stores for very little. I believe the screw size is #10 sheet metal. Get stainless steel if you can. Just force the screw in as it will make its own threads.
Maintenance
Raypak Digital Heater Installation and Operation Instructions
SNS Error/Sensor Failure
SNS error or Sensor failure is a bad water sensor.
The Rayapk temperature sensor has two thermistors and if they disagree by more then 2F(1C) it gives a Sensor Failure.
Page 46 in http://cdn.globalimageserver.com/FetchDocument.aspx?ID=c404f1c5-ac50-4209-9457-56246d010b20
Part 6C.
P/N 009577F
Heater Hits Max Temperature before Actual Temperature
When automation is controlling the heater the automation temperature and the Raypak heater temperature can be different and the heater can hit its maximum temperature while the water is not yet to that temperature.[12]
The default maximum temperature for the pool and spa can be raised. Note that raising the max temperature may cause High Limit 2 Errors.
See page 28 of the Raypak INSTALLATION AND OPERATION MANUAL
Spa Max Temp – Spa Setpoint Maximum Adjustment
Refer to step one on page 28 to access the program screen. Press the MODE button until SPA MAX TEMP appears on the digital display. Using the UP and DOWN buttons will change the Maximum Temperature Setting to your desired value. The control can be set for a maximum of 107°F (42°C).
Pool Max Temp – Pool Setpoint Maximum Adjustment
Refer to step one on page 28 to access into the program screen. Press the MODE button until POOL MAX TEMP appears on the digital display. Using the UP and DOWN buttons will change the Maximum Temperature Setting to your desired value. The control can be set for a maximum of 107°F (42°C).
Cleaning Gas Orifices
Spiders like to nest in the gas burners and block the gas flow. That causes gas burners to burn yellow, when proper gas mixture flame is blue, or not light.
Use 14ga copper wire cut at a sharp angle and put a little hook to pull spider web out. On a Ray Pak the heater tray usually has to be pulled out to get to the orifices.[13]
Disconnect it from the gas line and all the wiring to the valve, etc. Take pictures. After that the tray, has to be dis-assembled to access the orifices. There is a bar across the back of the tray that keeps the burners in place. Remove that and they will pull of the orifices. They will pop back into place with a little push. Its not hard, just tedious. If you do it, take your time and be sure to use some new pipe dope on the fittings to re-assemble. If not familiar with gas plumbing, do a lot of research. Lots of sheet metal screws that use a 5/16 nut driver. Put them all back.[14]
This may not be the best DIY project. You will be dealing with an expensive appliance that can be dangerous if not done correctly.
When you get it cleaned, be sure to fire it for a couple of minutes at least once a month to keep the spiders out. They love heaters.
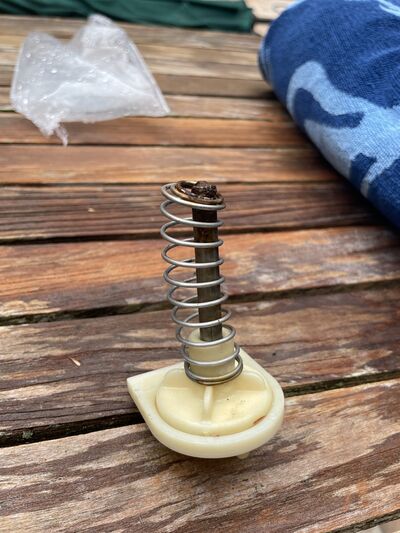
Raypak Protek Shield
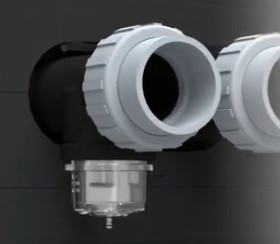
Raypak has added a sacrificial zinc anode that they call Protek Shield to their latest heaters. The Protek Shield Assembly is located under the inlet connection on polymer headers and in the ProTek Shield Adapter assembly shipped loose in the accessory carton for field-installation on bronze ASME headers.
The Protek Shield provides protection to the heat exchanger against galvanic corrosion, when properly bonded to the heat exchanger. It should be replaced when the weight of the ProTek Shield is reduced to about 40% of the original weight of 1.46 lbs. About 14 oz.
Cautions on replacing the Protek Shield:
- STOP the pool pump before attempting to remove ProTek Shield Assembly. Failure to do so may result in damage to ProTek Shield Assembly, loss of pool water, or personal injury
- Do not use tools to remove (twist) the ProTek Shield Assembly or the wing nut on the stud of the ProTek Shield Assembly
- Use a strap wrench to loosen the assembly if yoru hand cannot do it. Do not tighten it with a strap wrench.[15]
- While the manual says "Rotate ProTek Shield Assy clockwise (by hand) to unscrew it from the assembly" it is a standard right hand thread that turns counter clockwise (as viewed from the bottom looking up)
If you want a sacrificial anode in your system, it is less expensive to use Pool Tools skimmer anode. They bolt to the bottom of your basket and keep it in place as well as sacrifice themselves. Online, 3 for $30.00 +/-.
Both do what an anode does, corrode. There are thousands of heaters in service for decades without them. Be sure to lube that O ring when reassembling.
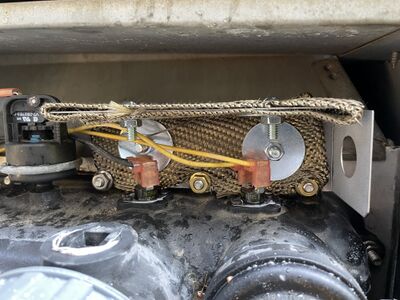
High Limit 2 Error
Things you can try...
- replace both high limit sensors and add thermal paste
- replace unitherm governor
- replace internal bypass
- add a heat shield
Some folks have added a heat shield above the HLS sensors.[16] This thread describes how the high limit fault was fixed by insulating the header around the sensors.
Internal Bypass
This is what a rusted internal bypass looks like that can cause HLS errors.[17]
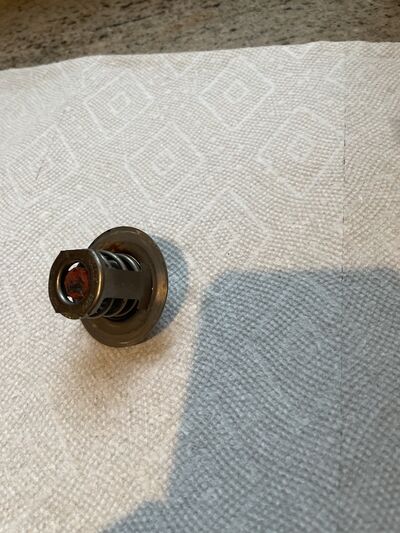
Unitherm Governor
This is what a corroded unitherm governor looks like:
Flame Rectifcation Errors
The heater does not have a separate flame sensor. The pilot assembly acts as the flame sensor.
You can check the Flame Strength indicator on the Service Menu.
In general problems could be a loose ground, bad high tension wire, sooted pilot, loose pilot. Check to make sure that the ground down by the pilot assembly is OK.
Check there is no corrosion around the pilot assembly.
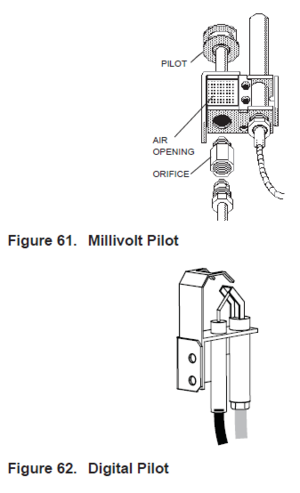
Page 34 of the Raypak Installation and Operation Manual describes how to remove and clean the Pilot Assembly.[18]
If you do not have a millivolt system look at the bottom pilot assembly. Start cleaning by turning off heater and and gas supply shut off. Remove pilot bracket screw and green ground wire at bottom right of burner manifold bracket. Remove pilot tubing at gas valve. Remove pilot assembly and pilot tubing as one piece.
Clean all metal pieces where pilot assembly bracket was attached to the burner manifold bracket including the screw and the metal termination of the green wire with a small stainless steel wire brush and/or small diamond file (available at Harbor Freight).
On the pilot assembly itself (page 34) you need to clean the underside of the pilot hood (above the pilot tubing attachment) with a dental pick (Harbor Freight) until the metal is clean. Also gently clean the spark rod with a small diamond file or steel wool all the way around to get bare metal, being careful to support the ceramic insulator so that it doesn't crack.
Clean the underside of the ground hood (opposite the pilot hood with the 2 extended tabs on the outside edges) with small stainless brush and/or diamond file to get to bare metal. Clean any screws and metal points of attachment at the grounding hood side of the pilot assembly at the pilot bracket and burner frame that the pilot bracket is attached to.
Reassemble in reverse order making sure to tighten the pilot tubing to the gas valve. Turn on gas shut off and power to heater. Put a small amount of dawn dish detergent mixed with a little water on the pilot tubing attachment at the gas valve.
Fire up heater. Check for any bubbles at pilot tubing attachment at gas valve (indication of a leak).
Service Menu and Fault History
To access the Service Menu and fault history, press the MODE and UP buttons simultaneously for 3 to 5 seconds. The heater will continue to operate normally while in the Service Menu. The first screen displayed is the Flame Strength indicator, which indicates the pilot flame current using a bar graph and numerical display. A signal of less than 4 indicates a weak flame signal and may require service. Refer to Section 5 Troubleshooting for possible causes and corrections.[19]
Press the DOWN button. The Supply Voltage screen indicates the voltage supplied to the control board. Normal readings range from 24 to 29 volts.
Press the DOWN button. The Run Time indicates the total hours of operation for the pool heater, as measured by the amount of time that the main gas valve has been powered. The Cycle count indicates the number of on/off cycles of the heater, as measured by the number of times the pilot valve has been powered.
Press the DOWN button. The Fault History can display up to ten faults in memory. The order of the faults begins with “Fault Last,” which is the most recent fault, and proceeds through ten most recent messages in chronological order. The second line of the display shows the fault message. If there are no faults in the history buffer, the second line reads “All Faults Clear.”
Altitude Adjustments
Air is thinner and less dense as the altitude increases. A natural gas or propane heater needs an optimum mixture of air and gas. If the air/gas mixture is incorrect you will have an orange yellow flame instead of a good blue flame.
At higher latitudes the gas needs to be adjusted for the proper air/gas mixture.[20]
- The Raypak Standard Digital is good to 2,000 feet.
- The Raypak Digital low NOx is good to 5,000 feet.
Atmospheric heaters: Rated inputs are suitable for up to 2,000 feet elevation. For elevations above 2000 feet, reduce gas input 4% for each 1,000 feet above sea level, as high elevation reduces combustion performance.
Lo NOx heaters: Rated inputs are suitable for up to 5,000 feet elevation. For elevations above 5000 feet, consult the factory.
Below or Above Pool Installation
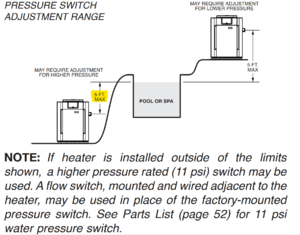
The water flow switch ensures that the heater operates only when the filter pump is in operation. It is located on the In/Out header. It is factory-set at 1.75 PSI for deck-level installations. The standard Raypak pressure switch set to 1.75 psi can be triggered by 4 feet of standing water pressure with no flow.[21]
When the heater is located below the level of the spa or pool, it may be necessary to adjust the pressure switch to compensate for the no-flow static head. See the Installation Manual for Water Pressure Switch Adjustment Procedure.
If the heater is installed outside of the limits shown, heater installed 5 feet below or above the pool water level, a switch rated for a higher pressure (11 psi / 76 kPa) may be used. Raypak has an 11 psi Water Pressure Switch kit.
A flow switch, mounted and wired adjacent to the heater, may be used in place of the factory-mounted pressure switch, and is a better choice if the heater is not at pool level.
Raypak LP heater high limit fault
This thread describes how the high limit fault was fixed by insulating the header around the sensors.
Rollout Switch Failures
If high winds are blowing out the rollout switch consider installing the Raypak Outdoor (High Wind) Stack for Gas Fired Heaters.
The stack hood can help alleviate problems caused by excessive winds interfering with the flow of flue gas because the construction of the stack hood allows for dilution air to the flue gas which acts similar to a vacuum breaker on a water system by reducing/eliminating backflow.[22]
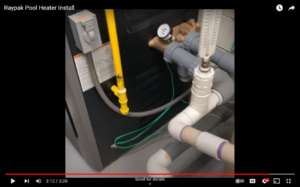
You can find a YouTube video on the installation.
RV1 Displayed
A member had "RV1 000" on the display instead of the temperature when the heater was turned on.[23]
He went thru the process of disconnecting everything on the circuit board and discovered the keypad is malfunctioning or has a short. Once the keypad was disconnected the temp display shows up.
Millivolt Trouble Shooting
Check for 500 mv dc coming from the pilot generator. Red and white wires. Red pilot generator wire goes to the TP terminal. White pilot generator wire goes to the TP/TH terminal.[24]
If that's good, check for 500 mv dc from the TP terminal to the TH terminal with the violet wire.
If that's not good, you have something open on the limit string.
The limit string is a series of on/off switches that all have to be on for the voltage to get from the TH/TP terminal to the TH terminal.
The red wire connected to the TH/TP goes to the roll out switch, you should measure 500 mv dc between the TP terminal and the other side of the roll out switch. The red wire leaving the roll out switch should go to the water pressure switch. You should measure 500 mv dc to the orange wire leaving the pressure switch.
The orange wire leaving the pressure switch should go to the first high limit. You should measure 500 mv to the out terminal of the first high limit switch.
From the first high limit switch, there should be a black wire to the second high limit switch. You should measure 500 mv to the out terminal of the second high limit switch.
Leaving the second high limit switch should be a black wire going to the thermostat. You should measure 500 mv on the out terminal of the thermostat.
Leaving the thermostat, there should be a yellow wire going to the on/off switch. You should measure 500 mv on the out terminal of the on/off switch.
Leaving the on/off switch should be a violet wire going to the TP terminal.
So, basically, the voltage needs to get through the entire string in series to power the gas valve.
You can remove the red wire from the TH/TP terminal and remove the violet wire from the TH terminal and check the resistance of the entire limit string.
The entire limit string should be closed and show low ohms.
If open, you can go in series as described above checking to see which limit is open.
If high ohms, a limit might be bad or a connector might be bad.
Note: TP means thermopile. TH means thermostat.
The gas valve has two solenoids. It has a pilot valve solenoid and a main gas valve solenoid.
The pilot valve solenoid is powered by the TP and TH/TP terminals. The resistance of the pilot valve solenoid should be about 9 to 11 ohms.
The main gas valve solenoid is powered by the TP and TH terminals. The resistance of the main gas valve solenoid should be about 1.5 to 1.7 ohms.
RP2100 Model Gas Heaters
The RP2100 models of gas heater were manufactured from 1998-2004 and were replaced by the current Digital model. Models are R185A, R265A, R335A, R405A (ATMOSPHERIC, LOW NOx)
R185A, R265A, R335A, R405A (ATMOSPHERIC, LOW NOx) Replacement Parts
RP2100 Pilot Assembly
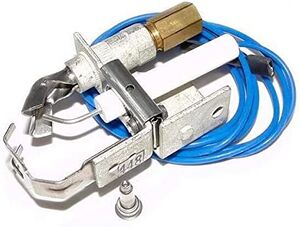
The RP2100 has a Pilot Assembly that contains the ignitor, pilot flame, and flame sensor.
Try to see if the pilot is actually lit even though the ignitor continues to spark. If so, get a new pilot burner assembly.
You can try cleaning the small "fork" above the actual pilot flame, that is the flame-sense area but on a heater that old a replacement is best.
Also, be sure there is a good ground between the burner tray and the cabinet, even if it means adding a small wire between one of the screws that hold the tray in place and a clean screw in the cabinet.
Raypak Heat Pumps
Models numbers beginning with:
- R = Raypak branded
- M = Rheem branded
Ti = Titanium heat exchanger.
The same models are sold under Raypak and Rheem brands with slightly different model numbers.
Raypak Heat Pump High Pressure Trip Lockout
The high pressure refers to the refrigerant pressure from the compressor, not the pool system pressure. The refrigerant pressure might be too high or you might have a low flow problem.[25]
There have been reports of a few newly installed Heat Pumps where Raypak needed to send out service under warranty to adjust the high pressure switch.
High Pressure Switch Lockout
If the high pressure switch opens, the control de-energizes the compressor output and the fan continues to run for 15 minutes after the HPS opened and the display will show “Hi Press Trip”.
If the high pressure switch trips 7 times in a single cycle, the display will show “Hi Press Lockout” and the unit will be locked out of operation for 4 hours.
The unit will automatically reset after 4 hours or the lockout can be manually reset by pressing the MENU button or cycling the power.
The high pressure switch must close for 3 seconds for the control to recognize it as closed.
Raypak Heat Pump Water Pressure Switch Adjustment-
The Raypak HP Installation Manual says "If the location of the HPPH is below the water line of the pool, the Water Pressure Switch (WPS) or Water Flow Switch (WFS) might need to be adjusted or an external WFS might be needed."
If your HP tries to turn on when your pump is off then the Water Pressure Switch requires adjustment or you need a Flow Switch. This can happen when the pool water level is more then a few feet above or below the HP. This will be the case when the HP is used with an Above Ground Pool.[26]
The Water Pressure Switch has a locking feature on the bottom. You reach under the switch and move a piece of plastic to unlock it, then rotate the dial and test until it works correctly. Once you have the best setting, lock the switch and replace the cover. Don't accidentally remove the sensor from the tube when making the adjustment.
Raypak 5450/6450/8450 Heat Pumps No Longer Have the Internal Automatic Bypass
There is an April, 2020, report that the newest Raypak 5450 / 6450 / 8450 heat pumps no longer have the internal automatic bypass. It has been removed, though their website, data sheets, etc. still advertise this feature. The member has a new 5450 and the water flow is terrible - not enough to drive the Polaris cleaner.[27]
- ↑ https://www.raypak.com/pool-and-spa/residential-pool-spa-gas-heaters/
- ↑ https://www.raypak.com/pool-and-spa/residential-pool-spa-heat-pumps/
- ↑ https://www.raypak.com/product/Professional-Heat-Pumps-PS9350ti-PS10355ti/
- ↑ https://www.raypak.com/pool-and-spa/commercial-pool-heaters/
- ↑ https://www.troublefreepool.com/threads/pool-heater-recommendations.201196/post-1775559
- ↑ https://www.troublefreepool.com/threads/raypak-manufacturing-defects.255238/post-2231152
- ↑ https://www.troublefreepool.com/threads/raypak-heater-help.255537/post-2234054
- ↑ https://www.troublefreepool.com/threads/raypak-heater-help.255537/post-2393626
- ↑ https://www.troublefreepool.com/threads/replacing-my-21-year-old-propane-pool-heater-raypak-options.225892/post-1982890
- ↑ https://www.troublefreepool.com/threads/raypak-conversion-professional-series-propane-to-natural-gas.213820/post-1872757
- ↑ https://www.troublefreepool.com/threads/raypak-propane-ng-heater-question.266374/post-2330983
- ↑ https://www.troublefreepool.com/threads/raypak-propane-heater-has-wide-temperature-swing.195671/post-1725147
- ↑ https://www.troublefreepool.com/threads/raypak-206a-heater-issue.251344/post-2200286
- ↑ https://www.troublefreepool.com/threads/raypak-206a-heater-issue.251344/post-2200317
- ↑ https://www.troublefreepool.com/threads/raypak-protek-shield-when-to-replace.264901/post-2324112
- ↑ https://www.troublefreepool.com/threads/raypak-high-2-limit-fault-checked-unitherm-governor-now-what.164872/post-2111464
- ↑ https://www.troublefreepool.com/threads/raypak-high-2-limit-fault-checked-unitherm-governor-now-what.164872/post-2108784
- ↑ https://www.troublefreepool.com/threads/raypak-406a-burner-wont-fire-but-do-get-pilot.217928/#post-1909699
- ↑ https://www.troublefreepool.com/threads/raypak-model-407a-new-p-c-control-board-display-reads-flame-w-o-cfh.208668/post-1831408
- ↑ https://www.troublefreepool.com/threads/gas-pool-heater-and-elevation-altitude.39163/post-327562
- ↑ https://www.troublefreepool.com/threads/unitherm-governor-blowout.266395/post-2331160
- ↑ https://www.troublefreepool.com/threads/raypak-206a-millivolt-trouble-shooting.210274/post-1874620
- ↑ https://www.troublefreepool.com/threads/raypak-error-rv1.276122/#post-2426255
- ↑ https://www.troublefreepool.com/threads/raypak-206a-millivolt-trouble-shooting.210274/#post-1845054
- ↑ https://www.troublefreepool.com/threads/new-raypak-5450-heat-pump-worked-for-a-day-now-high-pressure-trip-lockout.198863/post-1755643
- ↑ https://www.troublefreepool.com/threads/raypak-5450-water-pressure-switch.228725/post-2006217
- ↑ https://www.troublefreepool.com/threads/new-raypak-5450-heat-pump-worked-for-a-day-now-high-pressure-trip-lockout.198863/post-1776165


