Zinc anode placement help

mmesqc1578

Well-known member
Jul 3, 2020
111
Chicago, IL
Pool Size
26000
Surface
Vinyl
Chlorine
Salt Water Generator
SWG Type
Pentair Intellichlor IC-40
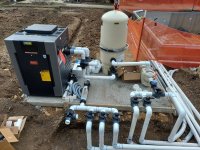
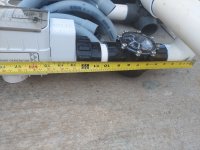
Hi, I have a CMP POOL DEFENDER INLINE SACRIFICIAL ZINC ANODE. I am getting mixed opinions on where to install it on my equipment pad. My heater already has a zinc anode built in, so that takes place for one between filter and heater. I was told by pool store to install my CMP POOL DEFENDER before our pump. Does it matter if I install it before my pump or between my pump and filter?? Thank you!
 
What are you trying to protect?

If you electrically connect an anode to the metal you’re trying to protect, the corrosion caused by the electrolysis will attack the anode first. In a sense, the anode acts as a sacrifice to the more critical metal components. Zinc anodes have a more active voltage than other metals, therefore, it will erode instead of the other metals.

A zinc anode simply in the water flow will provide no protection.

Connect it to your autocover. It may protect it.
 
Last edited:
My understanding is that "the in-line zinc anode is attached to the bonding wire, thereby protecting all metal parts(heaters,lights,rails,etc.) from galvanic corrosion. Zinc anodes will sacrifice themselves and corrode before all other metals in the pool." To answer your question, I am trying to protect all the metal parts of the pool from galvanic corrosion.
 
It is an inline anode. How do I attach to autocover? They are marine grade stainless steel. The railings are not in the pool, on the deck.
 
Return it to the pool store if you can and tell them you don't need an inline anode. It protects nothing you have and just transfers money from your wallet to the pool store.

If the railings are not in contact with the pool water the anode will not do anything for it.
 
I have an in-line anode that my PB installed. It’s between my pump and heater and connected to the bonding grid. It also is an acceptable bond for the water.
 
  • Like
Reactions: mmesqc1578
How does my pad look? The couplings before the heater were bc I thought needed inline anode to protect heater but then realized my heater has one built in. Should I attempt to remove them? Not even sure if possible at this point or worth the effort. Thoughts appreciated.
 

Attachments

  • 20210806_173854.jpg
    20210806_173854.jpg
    825.4 KB · Views: 61
  • Like
Reactions: BigPapaSmurf

Enjoying this content?

Support TFP with a donation.

Give Support
The Intellichlor flow switch may not be real happy with that check valve just before it. No need for that check valve. Intellichlor likes some straight pipe run before the flow switch, manual says 12 inches. As you have it set up it may take a few hundred rpm higher flow rate to get the flow switch to close.
 
What do u suggest....remove check valve completely from system? See photo attached. Don't need check valve after heater?
 

Attachments

  • 20210807_083215.jpg
    20210807_083215.jpg
    530 KB · Views: 21
This is an incredibly inefficient layout -

1C23A25E-6E3C-4E55-8E4D-F45FE6F9EF30.jpeg

If you move the 3-way valve and rotate it, you can eliminate at least 2 elbows. I would honestly have that entire section after the filter and heater redone. As @mknauss said, there shouldn’t even be a check valve behind the IC.
 
  • Like
Reactions: mmesqc1578
This is an incredibly inefficient layout -

View attachment 362266

If you move the 3-way valve and rotate it, you can eliminate at least 2 elbows. I would honestly have that entire section after the filter and heater redone. As @mknauss said, there shouldn’t even be a check valve behind the IC.
Would you be able to upload a quick drawing of what you mean by move 3 way valve and rotate it? He was trying to put a heater bypass in system. Thanks. @JoyfulNoise
 
image.jpg
Eliminates 3 90deg elbows. If it’s too tight to squeeze it in, then use a sweep elbow on one of the heater connections to add room. 90 deg elbows can add several feet of head loss to plumbing setup.
 
You can cut the pipes close to joint. I believe 2-1/2” pvc pipe can be glued around the outer diameter of the valve connectors. Also, you can find a pipe cutting tool online that will ream out the PVC from inside connection.

 
  • Like
Reactions: mmesqc1578
@JoyfulNoise Do you see any benefit to putting a 3-way valve at the "T" you have drawn? Or is it overkill?
If you have a spare valve then it’s fine. Normally you wouldn’t put a $100 valve in the place of a $5 tee but if it’s not being used then there’s no reason to waste it.
 
@JoyfulNoise Do you see any benefit to putting a 3-way valve at the "T" you have drawn? Or is it overkill?

Save the 3-way valve so you can cannibalize it for parts when one of your other valves has a problem.
 
  • Like
Reactions: mmesqc1578

Enjoying this content?

Support TFP with a donation.

Give Support
Thread Status
Hello , This thread has been inactive for over 60 days. New postings here are unlikely to be seen or responded to by other members. For better visibility, consider Starting A New Thread.