What did you do to your pool today?

JOB 1

I'm grateful for a natural gas valve right where I want my outdoor BBQ, but it stuck out way too far (which governed the exact location for my BBQ, without any side-to-side leeway) and was way too low behind my BBQ to make it easy to get at. I like to shut the gas valve off after each use of the BBQ, which was kinda a pain.

So I moved it. I raised the valve and pointed the connector straight down to relieve all the stress on the gas hose leading to the BBQ. Then I painted it, just 'cuz. I was all done before I started wondering if a gas valve and outlet are supposed to be a certain height off the ground. Oh well.

gas valve.jpg gas valve 2.png

The whole chunk from the valve to the connector used to come straight out from that 4" of pipe coming out of the wall, so it was pretty much always in the way of something. And the hose would stick straight out off the end of that, making it protrude even further into my patio space, and stressing the hose hanging horizontally off of the connector. Now it all tucks in nicely behind my BBQ. Yah, it's ugly, but it's behind the BBQ. And the valve is now very easy to reach.

I added another "cam mirror" in the rafters above the valve, so now I can verify that the valve is off while doing my nightly video check of all my door locks and gates and hose bibbs. This image is cropped from a still from my PTZ pool cam. The mirror is quite a ways away from the cam, but I still have enough zoom and resolution to see if the gas valve handle is horizontal or vertical (off or on).

JOB 2

The white blotches in the cam image are me treating the grease stains on my stone. You can see a "before" stain in the lower-right corner of the valve pic. There were some under the BBQ, and a bunch all over my deck, left over from my July 4 party.

I used Pour-N-Restore (that's the white stuff). It works OK. It lifts out some stains right away, others need a few applications. By the time I'm done they'll be hard to see if not gone altogether. This stuff. I've done two coats so far. Probably have to do one more tomorrow on a couple stubborn stains.

Our fellow TFPer/stone expert @mcleod taught me the correct MO. Pour-N-Restore seeps into stone while wet, and draws grease up and out as it dries. It's best applied in the shape of a shallow bubble, at least 1/8" thick, not painted on flat. That gives it enough "drawing power." It's very easy to use, but not cheap anymore. That 32oz bottle I linked is 20 bones.
 
Last edited:
Found the SWG off for low salt for the second time in 2 weeks. I did fill a couple inches 2 days ago and didn't check the system yesterday so it's plausible the fresh fill tripped the alarm.

A reboot cleared it.

Then I confirmed the salt was fine @3200 with the K1766.

Protip: when gathering the supplies and filling the vial, just keep repeating 'to 10 ml' over and over. Long story but you'll thank me one day. 😁
Crisis averted.
 
I have been paying alot of attention to the new pool. Mostly I want an excuse to walk around or hang out on the 1800 sq ft patio. Lol.

So I'm quickly seeing all the glitches that fail most folks. There's no telling what I missed at the old place when I didn't touch it for 2 weeks at a clip each time. The system could have been off for 3 days in each stretch and by the time I checked the FC it was back to normal.
 
  • Like
Reactions: Mdragger88
I was gone for a week and returned late afternoon yesterday. Checked chlorine levels yesterday. SWCG performed as expected and kept FC well above minimum. Vacuumed and ran most of the tests today. Didn’t check CH. All are where I left them. 👍
 
This project started with an air leak. My filter was filling with air overnight, when the pump was off. But not leaking water. Very odd. The pump stayed full of water, so I think that means the filter itself had to be leaking. Anywho, I changed out the filter pressure release valve. I think I had cracked the threads of the old one when I overtightened the installation of a new pressure gauge a while back. It leaked water for a while, then stopped, but the crack might have still been drawing air due to gravity on the weight of the water in the filter. Or the valve itself was no longer sealing properly, because it was very hard to close. Or both.

I didn't realize how bad the old valve had gotten until I first turned the new one open and closed. Like butta!

Then I installed a hose, clamped to the new valve, to divert water away from my pad. I cannot believe it took me this long to figure out either of these solutions. The air leak seems to be fixed, the new valve is now super easy to turn, and I no longer have to hose down my entire pad when I bleed the filter.

Most of that new hose is shielded from the sun. I may cover it with some loom to keep the sun off that one section atop the filter. I don't know how UV resistant that type of hose is, but it's the only one I could find in the size I needed to fit that valve port. The new valve came with a clamp that seemed to be for adding a hose like this. So I'm assuming there is no downside to the hose and its function. I replaced the provided plastic clamp with a stainless steel hose clamp, to make it easier to disconnect the hose when I need to access the cartridges.

A couple of simple, affordable solutions, that only took me a few minutes to execute. Gotta love that!

filter valve.jpg


PS. Why did I mount my gauge like that, you ask? Oh, wouldn't you like to know. I'm saving that for an upcoming thread I've yet to write: "Pool Cams." Coming soon to a forum near you.
 
Last edited:
I see your I Spy mirror but it's a bit dirty to see anything, isn't it?
It is! It works (when it's clean), but it can't see enough of the FlowVis dial to be helpful all the time. I can see the indicator from the side when the flow is elevated, like for my solar heater, but not when the flow is lower. So I have to find a better spot for the mirror. Problem B is, the best spot for it would be in the way of reading the dial in person. Problem C is, the proper spot from which to read a FlowVis indicator is very small. You have to align your eye perfectly. And that spot moves as the indicator does! So you kind'a move your eye up and down until it's aligned correctly with the indicator, which again, is in a different spot for every flow rate, (a higher flow means that spot is higher than it is during low flow). Which, of course, is not conducive to viewing with a fixed mirror shooting into a fixed cam! I thought I could solve that by viewing the indicator from the side, but there is some internal components inside the FlowVis that block that view when the flow gets below about 30GPM, which is most of the time.

More than you needed to know, but that's the dilemma. So I haven't been cleaning the mirror because of that, and because the water release from my filter was spraying it all the time anyway. It was a losing battle. I've now fixed the latter issue, but still have to figure out the other ones. It's a project for another day!

I used to have a second mirror for the filter pressure gauge, which worked, but the dial appeared backward in the cam view. And it was crazy ugly. It dawned on me at some point that angling the gauge was a more elegant solution than the mirror. Now I see this from the cam, and I can read the gauge easily at the pad, too:

2024-09-08 19-40-59 Filter.jpg

That's not even full zoom, and the sun set almost a half hour ago! It's dark outside, and there are no lights on out there, not even the cam's infrared LEDs. The camera is amazing. I'll write all this up some other day, in my eagerly awaited "Pool Cam" thread.*

* I'm the only one eagerly awaiting it, but still... 😝
 
Last edited:
This project started with an air leak. My filter was filling with air overnight, when the pump was off. But not leaking water. Very odd. The pump stayed full of water, so I think that means the filter itself had to be leaking. Anywho, I changed out the filter pressure release valve. I think I had cracked the threads of the old one when I overtightened the installation of a new pressure gauge a while back. It leaked water for a while, then stopped, but the crack might have still been drawing air due to gravity on the weight of the water in the filter. Or the valve itself was no longer sealing properly, because it was very hard to close. Or both.

I didn't realize how bad the old valve had gotten until I first turned the new one open and closed. Like butta!

Then I installed a hose, clamped to the new valve, to divert water away from my pad. I cannot believe it took me this long to figure out either of these solutions. The air leak seems to be fixed, the new valve is now super easy to turn, and I no longer have to hose down my entire pad when I bleed the filter.

Most of that new hose is shielded from the sun. I may cover it with some loom to keep the sun off that one section atop the filter. I don't know how UV resistant that type of hose is, but it's the only one I could find in the size I needed to fit that valve port. The new valve came with a clamp that seemed to be for adding a hose like this. So I'm assuming there is no downside to the hose and its function. I replaced the provided plastic clamp with a stainless steel hose clamp, to make it easier to disconnect the hose when I need to access the cartridges.

A couple of simple, affordable solutions, that only took me a few minutes to execute. Gotta love that!

View attachment 608917


PS. Why did I mount my gauge like that, you ask? Oh, wouldn't you like to know. I'm saving that for an upcoming thread I've yet to write: "Pool Cams." Coming soon to a forum near you.
What size hose did you end up using? I've been considering adding one but haven't taken the time to find the right size yet.

--Jeff
 

Enjoying this content?

Support TFP with a donation.

Give Support
I have 5 pressure gauges that each point in a different direction so that you can see the pressure from any angle.

This is also good for when you have multiple people who are all fighting over who gets to look at the pressure gauge.

As an added bonus, the multiple gauges are more reliable than just one.
I had originally tried that. How did you solve for the pressure split? I tried four gauges, North, South, East and West. But they each only read 1/4 of the pressure, so I would have to look at each one, and add the four readings together. And that was working OK, except I would always forget which gauge I started with first, and then couldn't remember if I had read three or four gauges. I think I sometimes would read five gauges! It all just became unmanageable. Plus, it made me dizzy.

images.png
 
What size hose did you end up using? I've been considering adding one but haven't taken the time to find the right size yet.

--Jeff
This stuff, at Lowes.
3/4" ID
1" OD
The hose cost more than the valve did!* Because I had two valves "in hand," I had taken the new one with me to Lowes, before I installed it, to make sure I got a good fit.

There are much cheaper hoses, I'm sure, but I liked that this one was clear, thick, tough, and in stock (nothing else in the store fit). And then I took hose and gauge over to the hose clamp section to find the smallest that would go around the hose while it was attached to the valve.

Actually, there was a non-reinforced version in stock. But the one I got had better specs (chemical resistant, etc), than the all-clear one. I think they were both PVC. And the clear one was even more expensive. Crazy prices we're livin' with these days.

* I'm not sure if the sale was fake or not, but the valve is marked down on Amazon just now. 57% off. It came in a Pentair-labeled sealed plastic bag. If this was a knock-off, it was very well done.

 
Last edited:
  • Like
Reactions: Turbo1Ton
Thank goodnesss we dont have to move the dropper bottle while counting drops. None of us would make it.

@Dirk did you ever consider a pressure transducer on your filter that you just look at through your HA automation? They are fairly cheap and easy.
 
Thank goodnesss we dont have to move the dropper bottle while counting drops. None of us would make it.

@Dirk did you ever consider a pressure transducer on your filter that you just look at through your HA automation? They are fairly cheap and easy.
I did. It was tempting, back when I read about it here in some thread. But even then I had plans for a cam over my pad, so I didn't go that way. I'll write it up shortly, but the new cam can monitor everything on my pad, not just filter pressure. To recreate that via electronics would have been significantly more complicated, if even possible. And the cam is "real," and all but eliminates the possibility of false alerts from faulty sensors. Can I call it more dependable? It's nice to get feedback from ScreenLogic that my pump is running, but my cam assures me it is actually running, etc. Assuming the cam doesn't fail, of course, at which point I'd lose all "telemetry!"

The downside is that this approach is passive. I have to act to go get the status. Where an electronic HA solution could trigger warning lights and emails and texts, etc. Though the system would have to know somehow what is an alert event and what is not. When there is pressure? When there isn't? Of the several "normal," but different, pressure readings throughout the day, (SWG mode, solar mode, vac mode, skimmer mode, etc), the pressure alert algorithm would have to coordinate somehow with what the pressure is supposed to be at any given time, and also account for the filter getting dirtier throughout the year. It would be a challenge, for sure, for the alerts to be meaningful and not just annoying. So in reality, I'd probably still have a passive system, I'd have to check it myself and reconcile the reading with what I know about my EasyTouch schedules.

So both ways have their advantages and disadvantages. Now, neither precludes using both solutions... hmmm. 😜

Bottom line, I can check the status of my entire pad without having to be at the pad, from anywhere on the planet, and that was the primary goal.
 
Last edited:
  • Like
Reactions: Mdragger88
It is! It works (when it's clean), but it can't see enough of the FlowVis dial to be helpful all the time. I can see the indicator from the side when the flow is elevated, like for my solar heater, but not when the flow is lower. So I have to find a better spot for the mirror. Problem B is, the best spot for it would be in the way of reading the dial in person. Problem C is, the proper spot from which to read a FlowVis indicator is very small. You have to align your eye perfectly. And that spot moves as the indicator does! So you kind'a move your eye up and down until it's aligned correctly with the indicator, which again, is in a different spot for every flow rate, (a higher flow means that spot is higher than it is during low flow). Which, of course, is not conducive to viewing with a fixed mirror shooting into a fixed cam! I thought I could solve that by viewing the indicator from the side, but there is some internal components inside the FlowVis that block that view when the flow gets below about 30GPM, which is most of the time.

More than you needed to know, but that's the dilemma. So I haven't been cleaning the mirror because of that, and because the water release from my filter was spraying it all the time anyway. It was a losing battle. I've now fixed the latter issue, but still have to figure out the other ones. It's a project for another day!

I used to have a second mirror for the filter pressure gauge, which worked, but the dial appeared backward in the cam view. And it was crazy ugly. It dawned on me at some point that angling the gauge was a more elegant solution than the mirror. Now I see this from the cam, and I can read the gauge easily at the pad, too:

View attachment 608933

That's not even full zoom, and the sun set almost a half hour ago! It's dark outside, and there are no lights on out there, not even the cam's infrared LEDs. The camera is amazing. I'll write all this up some other day, in my eagerly awaited "Pool Cam" thread.*

* I'm the only one eagerly awaiting it, but still... 😝

I was expecting the cut edges of the shroud to be finished better. Dressed with a file at least. :)
 
I was expecting the cut edges of the shroud to be finished better. Dressed with a file at least. :)
Ha! Pretty good zoom though, right? 😛 That's an experiment in progress. I may refine the fab' if it proves itself. I'm on my third gauge. The lenses cloud up. I'm thinking it's the UV, at least in part. Made worse now by the fact that I've got the lens facing right into the sun. The shroud keeps the sun off the gauge for all but about a half hour a day, mid-summer. All the time the rest of the year. Time will tell if it makes any difference in the gauge's lifespan.

PS. I did try to find a gauge with a glass lens, but I couldn't settle on a gauge that I liked.
 
Got the wire loom installed. I decided to "loom" the entire length of hose, as it was only about $7 for 10'. That's about 25% of what that darn hose cost me, so it was worth protecting at those prices.

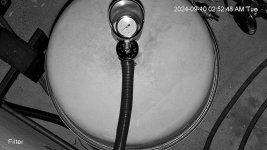
Here it is at night. First shot is my outdoor flood light, 2nd is the cam's built-in LED lighting, and the 3rd is the cam's built-in infrared lighting. The shot in post #5529 above was 30 minutes after sunset, with no lighting. Nice to have the options to see my pad at any time of day or night.

loomed flood light.jpg

loomed cam light.jpg

loomed ir light.jpg

I got the disco ball installed today, too. The next-door neighbor didn't care for that.

loomed disco light.jpg
 

Enjoying this content?

Support TFP with a donation.

Give Support