Waterfall boulder structural design

jalapenopopper

Well-known member
Jul 21, 2020
124
Austin, TX
Pool Size
20000
Surface
Plaster
Chlorine
Liquid Chlorine
Hello, Everybody.

We are planning to build a pool and apparently are not alone, as the demand is up there with hand sanitizer and TP. After meeting with many PBs, very few got back to us with a quote or seemed knowledgeable about permitting, electrical clearances, protected tree critical root zones and narrow access excavation. The few estimates we did receive were over $80K for a simple pool and spa build. After lining up some subs on my own to find the answers for excavation, gas plumbing, and communicating with the permitting and electric company, I realize going owner builder will be the way to go. I enjoy this stuff anyway.

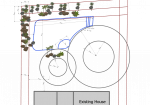
The image is my rough site plan for how big the pool can be, though, we may downsize it some. Not sure yet.

Can anyone recommend a consultant company that is familiar building pools in Austin, TX? There are a few, however, i'd like to know if they have good recommendations Austin, or just try to have some basic guidance for all cities. I can draft the permitting docs and application, and other drawing and mapping material, and run the electrical myself, but think hiring out most of the work would be best.

If you can recommend subs, mainly a plumber and shotcrete contractor, I should be able to estimate the costs and get going soon. If anyone is willing to recommend any and all subs in the Austin area, i'd be extremely grateful.

Any and all guidance is appreciated, and thank you to everyone who has contributed to this forum, it's really great.
 

Attachments

  • Pool proposed site plan.png
    Pool proposed site plan.png
    75.9 KB · Views: 56
I’m designing my pool and like the natural limestone waterfalls, but I wonder if it would make maintenance more difficult? Would it increase algae, CYA or alkalinity?

I could consider build a pond on the side. Not sure If that would look nice though and you wouldn’t be able to join terrace with it as closely.
 
I like the idea of having a limestone, which is cheap and local to my area, Austin, but am uncertain if I’ll build it with the pool or design the structure so it can be added later.

is the proper design to have the concrete of ties into the pool bond beam, like a cantilever on the side? I imagine that would stress the bond beam and probably would be a better idea to isolate and build separate pad.

part 2: should a pond liner be within or behind the boulder stack? Or gunite the bottom and back side of it? I’ve heard of waterfalls leaking and softening the ground. How do you build it so water always flows into the pool?
Thanks for any pointers
 
I am not an expert. Our neighbor is having a pool put in that has a grotto, so I think it is a similar application to what you are after. For the grotto, they basically made a gunite shelf where all of the natural stones would sit. From looking at the gunite shell, it physically looks very much just like a small tanning deck. It has a flat bottom to set the rocks on, with the gunite backing so that all of the water end up back into the main body of the pool.
 
  • Like
Reactions: jalapenopopper
That makes sense. I need to figure out the water level of the shelf for the boulders. Then I could always build a shelf, and down the road add the water feature.
thanks for the insight.
 
All great questions. When I was trying to figure out what I wanted for a pool and water feature I knew I wanted to use full size boulders that tied into a retaining wall. Clearing and excavating our site produced a large amount boulders so we wanted to use those in the pool area for our retaining walls to save money. I wanted the boulders to be in the water and not sitting on the deck as well as have a small grotto that my wife and I could hang out in and be a cool spot for the kids. I also wanted the grade behind the boulders to be elevated so the water fall did not look like a pile of rocks, the entire site was designed around the pool and water fall. Searching around I found the most popular way to make the boulders appear to be under water was to use a small shelf (about 1-2' wide and 1-2' below water level) inside the pool with a large Boulder shelf poured behind it at 'top of pool beam' hight. To prevent water leakage you could just have them shoot another small wall around the entire back of the boulders and water proof that shelf as well. I really wanted the full size Boulder going under water and not sitting on a smaller rock below. My entire design idea for all the walls around the house and pool was to have what what I called "1 setters" just all the same size boulders set next to each other with no stacking involved. It is just the look that I liked.

When I told the pool salesman what I was looking for I let him know I had been in the excavation industry for over 30 years and had no problem figuring out the boulders I wanted and had the equipment to set them my self but had no pool building experience at all. I have built a few small ponds with liners before but never a pool. A submerged Boulder shelf was substantially more money than a standard boulder shelf at pool beam hight. So we decided to just submerge the waterfall-grotto and have 6 boulders sit at 'top of pool beam' hight to complete the wall.

Fortunately I was able to dry build the water fall on site before excavation so I could give them the correct measurements for the submerged shelf.

I had assumed I would be setting the boulders on the gunnite then they would grout (seal) the face of the boulders then plaster to the face of boulders. They wanted to plaster the entire shelf first so it would simply be a extension of the pool with boulders basically sitting in the pool. At the time I did not consider what happens when the plaster fails behind and under the boulders. I still had not grasped the concept that the gunnite is porous and it is only the plaster that seals the pool and plaster has a shelf life. I do feel if it ever does start leaking behind the boulders I can then seal to the face of them so that let's me sleep at night for now... :)

We ended up building the entire wall and waterfall on the gunnite to make sure it all fit and figure out the transitions in and out of the water. Then we removed the waterfall so they could plaster.

I only wish I had found this site before my build to get better advice on the best approach for the boulders. I would imagine @bdavis466 would be able to give you some great advice on this.

I have a bunch of pics of the Build but here are a few to give you a idea. Let me know if you have any questions.. :)IMG_20171021_135704.jpg


IMG_20170904_131201_169.jpgIMG_20170910_182431.jpgIMG_20170819_132104_220.jpgIMG_20190804_184747.jpg
 
Last edited:
  • Like
Reactions: jalapenopopper
Popper,

You can look through our construction pics and I think you will notice that they is a very fine line between a great looking waterfall and a pile of rocks.

In my mind, Rich's post above shows a great example of how to make a waterfall look more natural and like it should be there. He has the advantage of a large lot with a natural background where you just might find such a waterfall.. Also, it blends into the yard and is just not all piled up in one spot with a wood fence three feet away.

Whatever you do, make sure your water feature appears as it is supposed to be there, otherwise it will just be a pile of rock.

Keep in mind that a waterfall is not a requirement. :mrgreen:

Thanks,

Jim R.
 
  • Like
Reactions: jalapenopopper

Enjoying this content?

Support TFP with a donation.

Give Support
We have a 3-ton water fall in our plan, with dimensions of 8ft wide, 2.5ft high, and 3ft deep. Here is what the steel looks like for the gunite support. We also have boulder coping on the sides, so notice the bond beam is steel'ed in such a way to provide a lip for the boulders to dip down.

1595772159614.png
 
We have a 3-ton water fall in our plan, with dimensions of 8ft wide, 2.5ft high, and 3ft deep. Here is what the steel looks like for the gunite support. We also have boulder coping on the sides, so notice the bond beam is steel'ed in such a way to provide a lip for the boulders to dip down.

View attachment 155072
Did they explain how they will be waterproofing under and behind the waterfall ?
 
Did they explain how they will be waterproofing under and behind the waterfall ?

Not sure, as I didn't ask. I've added this to my list of questions for the next time the construction manager is here though.

Here is a waterfall from one of my PB's demo pools. Ours is supposed to be very much like this, although I plan to backfill to raise the grade behind and on the side of the waterfall, to allow it to blend more with the surrounding.

1595777653749.png
 
  • Like
Reactions: jalapenopopper
Stoop,

Anything looks good when you just see the waterfall itself.. The key, in my mind, is how it looks from farther back..

A pile of rocks is just a pile of rocks, if that is what it looks like when done.. :mrgreen:

I like your idea of back-fill and raising the grade behind the waterfall to make it look more natural..

Thanks,

Jim R.
 
Not sure, as I didn't ask. I've added this to my list of questions for the next time the construction manager is here though.
Please do. I would be very interested to see if they plaster first. My suspicion is that they will set the rocks on the gunnite after sealing the gunnite with a water proof coating then plaster up to the face of rock.

Could you also ask what the life expectancy of whatever they use to waterproof under the rocks is.

Thanks, Rich..
 
All great questions. When I was trying to figure out what I wanted for a pool and water feature I knew I wanted to use full size boulders that tied into a retaining wall. Clearing and excavating our site produced a large amount boulders so we wanted to use those in the pool area for our retaining walls to save money. I wanted the boulders to be in the water and not sitting on the deck as well as have a small grotto that my wife and I could hang out in and be a cool spot for the kids. I also wanted the grade behind the boulders to be elevated so the water fall did not look like a pile of rocks, the entire site was designed around the pool and water fall. Searching around I found the most popular way to make the boulders appear to be under water was to use a small shelf (about 1-2' wide and 1-2' below water level) inside the pool with a large Boulder shelf poured behind it at 'top of pool beam' hight. To prevent water leakage you could just have them shoot another small wall around the entire back of the boulders and water proof that shelf as well. I really wanted the full size Boulder going under water and not sitting on a smaller rock below. My entire design idea for all the walls around the house and pool was to have what what I called "1 setters" just all the same size boulders set next to each other with no stacking involved. It is just the look that I liked.

When I told the pool salesman what I was looking for I let him know I had been in the excavation industry for over 30 years and had no problem figuring out the boulders I wanted and had the equipment to set them my self but had no pool building experience at all. I have built a few small ponds with liners before but never a pool. A submerged Boulder shelf was substantially more money than a standard boulder shelf at pool beam hight. So we decided to just submerge the waterfall-grotto and have 6 boulders sit at 'top of pool beam' hight to complete the wall.

Fortunately I was able to dry build the water fall on site before excavation so I could give them the correct measurements for the submerged shelf.

I had assumed I would be setting the boulders on the gunnite then they would grout (seal) the face of the boulders then plaster to the face of boulders. They wanted to plaster the entire shelf first so it would simply be a extension of the pool with boulders basically sitting in the pool. At the time I did not consider what happens when the plaster fails behind and under the boulders. I still had not grasped the concept that the gunnite is porous and it is only the plaster that seals the pool and plaster has a shelf life. I do feel if it ever does start leaking behind the boulders I can then seal to the face of them so that let's me sleep at night for now... :)

We ended up building the entire wall and waterfall on the gunnite to make sure it all fit and figure out the transitions in and out of the water. Then we removed the waterfall so they could plaster.

I only wish I had found this site before my build to get better advice on the best approach for the boulders. I would imagine @bdavis466 would be able to give you some great advice on this.

I have a bunch of pics of the Build but here are a few to give you a idea. Let me know if you have any questions.. :)View attachment 155066


View attachment 155062View attachment 155065View attachment 155064View attachment 155067
Rich, thank you for the detailed process you went through. Your waterfall looks great and those are some nice large boulders. I think if I go through with it, I may approach it the way you went through it. But what does happens when the plaster behind the boulders needs to be reapplies or fixed? Maybe pull them out but what a pain even if you have some equipment at hand.

do the natural boulders affect the water chemistry? Looks like you have granite and maybe the lighter ones are limestone?
 
Popper,

You can look through our construction pics and I think you will notice that they is a very fine line between a great looking waterfall and a pile of rocks.

In my mind, Rich's post above shows a great example of how to make a waterfall look more natural and like it should be there. He has the advantage of a large lot with a natural background where you just might find such a waterfall.. Also, it blends into the yard and is just not all piled up in one spot with a wood fence three feet away.

Whatever you do, make sure your water feature appears as it is supposed to be there, otherwise it will just be a pile of rock.

Keep in mind that a waterfall is not a requirement. :mrgreen:

Thanks,

Jim R.
Yes, I definitely agree. Having a natural outcrop would be the goal other than having it look like an oversized fish tank accessory.
I may have a 1.5-2’ ledge about 6” deep in the back corner where the waterfall could go. Plumb a line and maybe supply pipe for a future pump so there would already be the pipes and a light in the right spot. Down the road as I get the itch for more projects I could do it.
 
We have a 3-ton water fall in our plan, with dimensions of 8ft wide, 2.5ft high, and 3ft deep. Here is what the steel looks like for the gunite support. We also have boulder coping on the sides, so notice the bond beam is steel'ed in such a way to provide a lip for the boulders to dip down.

View attachment 155072
That looks cool stoop. Thanks for pointing out the slanted steel structure. Wouldn’t have noticed that. Will like to see it down the road.
Looks like the steel is pretty standard at the ledge for waterfall, but that’s my untrained eye.
 
But what does happens when the plaster behind the boulders needs to be reapplies or fixed?
That is my question as well. I was simply following the PB's recommendation "Assuming" they had done this many times before and it was a excepted practice. Turns out I do not believe that was the case. My plan is if I do get a leak back there I will then seal to the face of the boulders up to top of beam. When I filled in the back I had a Mason simply build it all solid with mortar and stone and block. I had told him to be sure all voids were filled. Unfortunately I do not think he achieved that. I did have a small leak during construction where sand actually washed into the pool through a small gap he missed between the block and pool beam. When he got almost to the top he recommended getting a mixer and just topping the whole thing with concrete. In hind site I should have just had him build the block wall on top of the pool beam and filled the entire back with concrete.

The PB told me to just set the boulders right on top of the new plaster. I could not bring myself to do that and in addition 1 Boulder need to be shimmed up 2.5". So I poured 3 pads on top of the plaster where the boulders were to be set, knowing there is always some final tweeking when setting boulders and did not want to be twisting the boulder on top of new plaster. This worked well. I wanted the Boulder submerged 6" but knew I needed to shim one up 2.5" so I had them give me a water depth of 9" on top of shelf.

do the natural boulders affect the water chemistry? Looks like you have granite and maybe the lighter ones are limestone?

Not really sure of what they are made of. I am fairly sure the darker ones are granite. Just be very careful to avoid any orange ones. That first orange one on top of the pool beam does seep out some minerals that stain the tile and plaster with a rust color.

I have had no issues at all with the water chemistry. And because they are such large boulders basically just siting on each other with almost no mortar in between ( I used hydrolic cement under the cap rocks in a few places to hold them up in place) I do not get any of the effervescence you see in a lot of the warterfalls.
 
  • Like
Reactions: jalapenopopper
That is my question as well. I was simply following the PB's recommendation "Assuming" they had done this many times before and it was a excepted practice. Turns out I do not believe that was the case. My plan is if I do get a leak back there I will then seal to the face of the boulders up to top of beam. When I filled in the back I had a Mason simply build it all solid with mortar and stone and block. I had told him to be sure all voids were filled. Unfortunately I do not think he achieved that. I did have a small leak during construction where sand actually washed into the pool through a small gap he missed between the block and pool beam. When he got almost to the top he recommended getting a mixer and just topping the whole thing with concrete. In hind site I should have just had him build the block wall on top of the pool beam and filled the entire back with concrete.

The PB told me to just set the boulders right on top of the new plaster. I could not bring myself to do that and in addition 1 Boulder need to be shimmed up 2.5". So I poured 3 pads on top of the plaster where the boulders were to be set, knowing there is always some final tweeking when setting boulders and did not want to be twisting the boulder on top of new plaster. This worked well. I wanted the Boulder submerged 6" but knew I needed to shim one up 2.5" so I had them give me a water depth of 9" on top of shelf.


Not really sure of what they are made of. I am fairly sure the darker ones are granite. Just be very careful to avoid any orange ones. That first orange one on top of the pool beam does seep out some minerals that stain the tile and plaster with a rust color.

I have had no issues at all with the water chemistry. And because they are such large boulders basically just siting on each other with almost no mortar in between ( I used hydrolic cement under the cap rocks in a few places to hold them up in place) I do not get any of the effervescence you see in a lot of the warterfalls.
Rich,
Are you talking about the orangish boulder in your build?
 

Enjoying this content?

Support TFP with a donation.

Give Support
Thread Status
Hello , This thread has been inactive for over 60 days. New postings here are unlikely to be seen or responded to by other members. For better visibility, consider Starting A New Thread.