
Vinyl pool remodel in San Diego - Going swimming!
- Thread starter carlscan26
- Start date
You are using an out of date browser. It may not display this or other websites correctly.
You should upgrade or use an alternative browser.
You should upgrade or use an alternative browser.


Re: Vinyl pool remodel in San Diego
Day 4: Concrete cut out for the skimmer and more sheathing work. (No pics of this day)
Day 4: Concrete cut out for the skimmer and more sheathing work. (No pics of this day)
Re: Vinyl pool remodel in San Diego
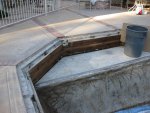
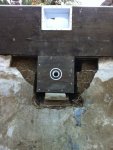
Day 5: Track installed, skimmer and new suction port installed, sheathing completed except for corner by waterfall (waiting for coping to be cut out).
I had hoped the new lower suction port would be lower - I will discuss this with the builder this week
Day 5: Track installed, skimmer and new suction port installed, sheathing completed except for corner by waterfall (waiting for coping to be cut out).
I had hoped the new lower suction port would be lower - I will discuss this with the builder this week
Attachments
Re: Vinyl pool remodel in San Diego
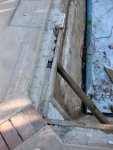
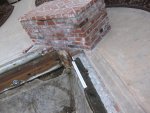
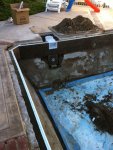
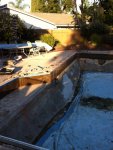
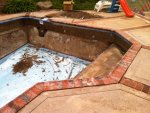
Days 6-7: New coping install begun; a little less than half was completed over these two days.
Pics from Day 6 (Saturday) - much of the day was spent measuring and planning lengths, angles and levels. They have a lot of work to do to get the coping level and straight. It's a good thing the coping is long as they are cutting different lengths of brick along different sections of each run. For example, the wall along the skimmer curves out up to 1" in the middle and curves back in further on the far side. The bricks were cut so that the coping is straight and therefore the overhang varies from 3/4"-1 3/4" (target of 1 1/2") so the bricks vary in length from one end to the other to align with the decking. They did a great job; before it was obvious from the deck, now you can barely tell unless you're in the pool. The wall below wasn't that bad but it's a problem everywhere. Not uncommon from reading other build posts either.
Sorry about the poor quality of these pics.
Attachments
Re: Vinyl pool remodel in San Diego
They finished too late on Sunday (Day 7) for me to get any pictures and today it was raining. They got a little less than half of the coping finished on Day 7. If anyone in SD needs a great landscaping and hardscaping contractor PM me - Sabino is the man!
Temporarily putting my notes for Day 8 here:
On Day 8 my masonary guys cut out the remaining bricks under the waterfall so the track and header can be replaced and the sheathing completed in that corner. We will now have brick extending from below the waterfall, pitched downward so that if the waterfall is not enabled properly (ie with enough flow) that the water that dribbles down the face will be directed into the pool. Before it would end up going behind the liner the way it was setup Below the waterfall we are switching from the safety grip bullnose that curves upwards to a traditional straight bullnose brick to allow the water to flow off of it and into the pool. Hopefully it won't look out of place.
They finished too late on Sunday (Day 7) for me to get any pictures and today it was raining. They got a little less than half of the coping finished on Day 7. If anyone in SD needs a great landscaping and hardscaping contractor PM me - Sabino is the man!
Temporarily putting my notes for Day 8 here:
On Day 8 my masonary guys cut out the remaining bricks under the waterfall so the track and header can be replaced and the sheathing completed in that corner. We will now have brick extending from below the waterfall, pitched downward so that if the waterfall is not enabled properly (ie with enough flow) that the water that dribbles down the face will be directed into the pool. Before it would end up going behind the liner the way it was setup
Below the waterfall we are switching from the safety grip bullnose that curves upwards to a traditional straight bullnose brick to allow the water to flow off of it and into the pool. Hopefully it won't look out of place.siska
0
Re: Vinyl pool remodel in San Diego
Great pics and story! I'm just wondering: did you know the pool was in such a bad shape? And how much is this gonna cost you? Seems like a lot of work... Good luck with finishing the job!
Great pics and story! I'm just wondering: did you know the pool was in such a bad shape? And how much is this gonna cost you? Seems like a lot of work... Good luck with finishing the job!
Re: Vinyl pool remodel in San Diego
Thanks Siska. I'm trying to be detailed for my own records and hopefully it's helpful for someone else/satisfy people's curiosity - I know I especially enjoy the detailed build threads.
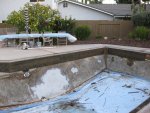
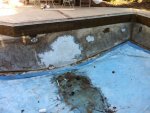
To be honest, no we did not know it was in this bad of shape. There were no equipment leaks and the equipment functioned. I also had my father in law look at the pool with me and he didn't see anything either. BUT: neither of us had any experience with a vinyl pool. For example I had no idea that the liner should not have been that badly faded after just 5 years. So we made a huge mistake not getting a proper pool inspection performed. At the minimum I should have taken some water in to a pool store to at least get a general sense of how the pool was being maintained.
The cost is not going to be cheap by my standards and while we could forgo some of the items, I believe in doing things right and not cutting corners:
- Liner is $3,150
- 2X4s and sheathing for the entire pool is about $1,100 - one option was to only sheath parts of the pool which I never really considered. I did consider doing this part myself but ultimately decided with my available time, travel schedule for work and the holidays etc. it wouldn't get done until late January at best and we didn't want to leave the pool empty for that long as we have a high water table and even with our sump system we're concerned about damage to the dug out part of the pool. (It's raining right now and the pump has been running a lot in the last 24 hours).
- The coping materials are just under $1,000 and the labor for the tear out and replacement and new mastic/deck-o-flex is going to run me $1250-$1500 depending on how many days it takes as I pay them by the hour. Initially we thought we could leave the coping and just sheath the structure and use a front mount track but with all the damage to the top 2X4s it became clear that this soultion wouldn't work as the track would only be secured to the plywood in many places since the rotted 2X4s behind would not hold the nails. In addition, the overhang of the existing coping for most of the pool was 3/4" and almost nothing in many places so we would have had a problem there too. Factor in that we weren't fans of the existing coping (rough edges = scratched up kids) and the additional $2,500 was committed.
- Skimmer upgrade is just under $1,000 - this was the only truly optional item in my opinion, and could have been eliminated but we either did it now or never would and as I am the one who does all of the pool maintenance I'm the one who pulled out dead lizards and a dead bird. The old skimmer was just a general pain and I also help to justify this by the addition of the new suction port too.
So this will end up around $7,800 The last liner replacement cost the previous owner about $3,100 five years ago.
EDIT: I forgot to include in this run down the concrete coping supplies and rentals, dump fees etc. - that ran just under $500. In addition, labor for the pool coping took two more days than expected, but the results were excellent so we're not upset about that. Also the deck-o-seal material (and I've decided to try my hand at it myself) - so approx another $100 with the sand. So the new total is about $8,800.
siska said:Great pics and story! I'm just wondering: did you know the pool was in such a bad shape? And how much is this gonna cost you? Seems like a lot of work... Good luck with finishing the job!
Thanks Siska. I'm trying to be detailed for my own records and hopefully it's helpful for someone else/satisfy people's curiosity - I know I especially enjoy the detailed build threads.
To be honest, no we did not know it was in this bad of shape. There were no equipment leaks and the equipment functioned. I also had my father in law look at the pool with me and he didn't see anything either. BUT: neither of us had any experience with a vinyl pool. For example I had no idea that the liner should not have been that badly faded after just 5 years. So we made a huge mistake not getting a proper pool inspection performed. At the minimum I should have taken some water in to a pool store to at least get a general sense of how the pool was being maintained.
The cost is not going to be cheap by my standards and while we could forgo some of the items, I believe in doing things right and not cutting corners:
- Liner is $3,150
- 2X4s and sheathing for the entire pool is about $1,100 - one option was to only sheath parts of the pool which I never really considered. I did consider doing this part myself but ultimately decided with my available time, travel schedule for work and the holidays etc. it wouldn't get done until late January at best and we didn't want to leave the pool empty for that long as we have a high water table and even with our sump system we're concerned about damage to the dug out part of the pool. (It's raining right now and the pump has been running a lot in the last 24 hours).
- The coping materials are just under $1,000 and the labor for the tear out and replacement and new mastic/deck-o-flex is going to run me $1250-$1500 depending on how many days it takes as I pay them by the hour. Initially we thought we could leave the coping and just sheath the structure and use a front mount track but with all the damage to the top 2X4s it became clear that this soultion wouldn't work as the track would only be secured to the plywood in many places since the rotted 2X4s behind would not hold the nails. In addition, the overhang of the existing coping for most of the pool was 3/4" and almost nothing in many places so we would have had a problem there too. Factor in that we weren't fans of the existing coping (rough edges = scratched up kids) and the additional $2,500 was committed.
- Skimmer upgrade is just under $1,000 - this was the only truly optional item in my opinion, and could have been eliminated but we either did it now or never would and as I am the one who does all of the pool maintenance I'm the one who pulled out dead lizards and a dead bird. The old skimmer was just a general pain and I also help to justify this by the addition of the new suction port too.
So this will end up around $7,800
EDIT: I forgot to include in this run down the concrete coping supplies and rentals, dump fees etc. - that ran just under $500. In addition, labor for the pool coping took two more days than expected, but the results were excellent so we're not upset about that. Also the deck-o-seal material (and I've decided to try my hand at it myself) - so approx another $100 with the sand. So the new total is about $8,800.
Re: Vinyl pool remodel in San Diego
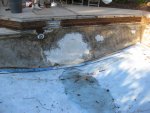
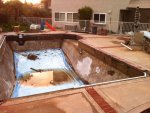
Some more pics - taken yesterday but here is how the coping looked at the end of the day on Sunday.
This side of the pool is the one I referenced in an earlier post - it's not straight, square or level. The coping is overhanging from 3/4" to almost 2", and sits between 1/2" to almost 2" above the track. The guys are doing a heck of a job in fixing this. I'll probably be the only one who ever sees this but I still have to shake my head at it. I am a little annoyed the PB didn't catch that huge curve down in the middle of the wall in the third picture and didn't correct it when they repalced the 2X4s and did the sheathing. The horizontal bowing in the second picture can't be fixed but the vertical bowing could have been reduced if not eliminated.
Attachments

Re: Vinyl pool remodel in San Diego
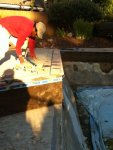
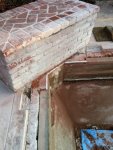
OK so here's a picture of something that I got a real kick out of. This may be a standard trick (is it still a trick if it's standard?) but I have never seen it anyway. The bricks in several of the corners are cut such that a small triangle opening is left to be filled. I had assumed that he would just cut a single piece to fill it...which he did. But then he also cut out a groove right down the middle of that piece the same width as the grout line. So when it was grouted it looks like two smaller triangles and best of all he maintained the grout line through to the edge of the coping. Maybe I'm just easily impressed but I think it's really clever and a great detail.
OK so here's a picture of something that I got a real kick out of. This may be a standard trick (is it still a trick if it's standard?) but I have never seen it anyway. The bricks in several of the corners are cut such that a small triangle opening is left to be filled. I had assumed that he would just cut a single piece to fill it...which he did. But then he also cut out a groove right down the middle of that piece the same width as the grout line. So when it was grouted it looks like two smaller triangles and best of all he maintained the grout line through to the edge of the coping. Maybe I'm just easily impressed but I think it's really clever and a great detail.
Attachments

Re: Vinyl pool remodel in San Diego
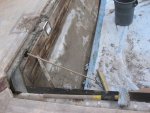
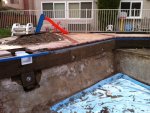
Day 10 (Wednesday). The pool guys didn't show up until the end of the day - they got tied up with an liner install that should only have taken the morning but took all day.
Sabino was on site though by himself measuring and cutting coping bricks pretty much all day. None were laid but he pretty much cut everything remaining. Unfortunately he won't be able to come back until Saturday, and I expect there is still two more days of work left not including the deck-o-flex.
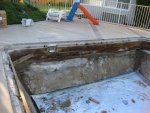
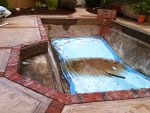
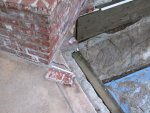
He also spent some more time cutting back under the waterfall and the concrete on both sides. You can see in the first picture that the concrete right next to the waterfall was cracked and had heaved. We decided to cut out the width and length of two full bricks over this damaged portion and then a matching cut on the other side to preserve symmetry. We thought this would be better than trying to cut it out and trying to match new concrete to the old. We also considered leaving it but it is an eyesore and also a source for water to get behind the liner so something had to be done. Seeing how we're also adding new coping below the waterfall we're hoping this all ties together nicely.
The PB and one of his guys did show up at the end of the day and nailed up a piece of sheathing and measured for the last piece needed.
Their plans for tomorrow are to finish the sheathing, finish the corner under the waterfall, finish the skimmer, finish the track, clean up and measure for the new liner.
Day 10 (Wednesday). The pool guys didn't show up until the end of the day - they got tied up with an liner install that should only have taken the morning but took all day.
Sabino was on site though by himself measuring and cutting coping bricks pretty much all day. None were laid but he pretty much cut everything remaining. Unfortunately he won't be able to come back until Saturday, and I expect there is still two more days of work left not including the deck-o-flex.
He also spent some more time cutting back under the waterfall and the concrete on both sides. You can see in the first picture that the concrete right next to the waterfall was cracked and had heaved. We decided to cut out the width and length of two full bricks over this damaged portion and then a matching cut on the other side to preserve symmetry. We thought this would be better than trying to cut it out and trying to match new concrete to the old. We also considered leaving it but it is an eyesore and also a source for water to get behind the liner so something had to be done. Seeing how we're also adding new coping below the waterfall we're hoping this all ties together nicely.
The PB and one of his guys did show up at the end of the day and nailed up a piece of sheathing and measured for the last piece needed.
Their plans for tomorrow are to finish the sheathing, finish the corner under the waterfall, finish the skimmer, finish the track, clean up and measure for the new liner.
Attachments
Re: Vinyl pool remodel in San Diego
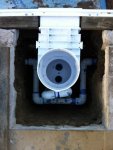
I never got a response to the question in this post about the float valve assembly and the equalizer check valve assembly for the skimmer. I think if I have the equalizer valve then I can't run suction through both the skimmer and the drain at the same time - it appears to be an all or nothing type valve. Anyone disagree or agree?
I never got a response to the question in this post about the float valve assembly and the equalizer check valve assembly for the skimmer. I think if I have the equalizer valve then I can't run suction through both the skimmer and the drain at the same time - it appears to be an all or nothing type valve. Anyone disagree or agree?
Re: Vinyl pool remodel in San Diego
I'm way behind posting updates...but the liner is being dropped today!
I'm way behind posting updates...but the liner is being dropped today!
Re: Vinyl pool remodel in San Diego
I unfortunately won't be able to post pics for a few more days but it looks great!
I unfortunately won't be able to post pics for a few more days but it looks great!
Thread Status
Hello , This thread has been inactive for over 60 days. New postings here are unlikely to be seen or responded to by other members. For better visibility, consider Starting A New Thread.