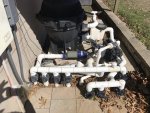
I drained my pool equipment before the big freeze in Dallas and protected all of my equipment. However, my waterfalls are in a raised beam and above my valves. Clearly the valves retained water which of course froze! Next time I will know to remove the face of the valves. Only one valve body cracked but I need some suggestions on how to change the right most valve body. How do I deal with the top terminating directly into the tee? I am hopeful I don't have to redo the entirety of the manifold. Will a standard size pipe fit properly into the valve body if I cut it off at tee? Your expertise will be greatly appreciated.
Valve Replacement Help Requested
- Thread starter peirek
- Start date
You are using an out of date browser. It may not display this or other websites correctly.
You should upgrade or use an alternative browser.
You should upgrade or use an alternative browser.
I think I answered my own question. The replacement valve just came in. It will accept a 1.5" pipe (as is done on the bottom side). Now to figure out where to cut and how to get the valve back in with both ends unable to move.
Auburn02
Well-known member
Yeesh, good luck. I'm not so optimistic it can be done without hacking a lot of that out and rebuilding. But I am not the expert by any means. I love a nice tidy looking pad area but I guess there's a reason some people choose to spread things out with lots of space between them.
- May 3, 2014
- 62,774
- Pool Size
- 6000
- Surface
- Fiberglass
- Chlorine
- Salt Water Generator
- SWG Type
- Pentair Intellichlor IC-40
PVC Repair - Further Reading
The existing valve is glued into the 2” tee. My hope is to cut the valve at the tee joint which should allow a 1.5” pipe to slip inside the tee and new valve.
The hub saver at 2” will cost a lot! I’ve seen the heat gun method but not sure how it will work removing the valve that is inside the tee.
I was successful replacing the valve. It was a bit more involved than I predicted. The cracked valve was glued into the 2” tee. I thought I could cut it off at the tee and use a 1.5” pipe into the remaining valve collar remaining inside the tee. Well there was too much old left over cement in the valve collar for that to work. I used the heat gun method to remove the remaining valve collar piece up inside the tee. Standing on my head, well almost, I was able to successfully remove the collar. As soon as it was all removed I stuck the new valve into the tee (no cement yet) to enable the tee to return to original shape. As it cooled and hardened I made sure I could get the new valve back out. I was a bit concerned of compromising adjacent cement joints but all seems good so far! Not a huge fan of using the coupling but I’m hoping for no leaks for another 20 years.
Attachments
Thread Status
Hello , This thread has been inactive for over 60 days. New postings here are unlikely to be seen or responded to by other members. For better visibility, consider Starting A New Thread.


