Stever's Pool Build

I though you all would like an update...

After much debate I have convinced myself and my wife that the stacked-stone on the24" raised bond beam would be too much maintnance in high-calcium so-cal. Labored over this decision too long and wasted 1.5 weeks. We decided to use a blue waterline tile and put a matching (pattern) tan tile (to match coping) at 45 degrees for the 24". Tjis won't look as good, but who will ever know what 'could have been'?

The city flew a helocipter over all the properties here in Escondido and followed up with a nice friendly house-call to complain about the green pool. Yes, the 8" of water on teh deep end had gone green. They were concerned with mosquitos and floated a bit of oil over the water to kill any mosquito larvae. They were really quite nice about it and made sure to mention that this was our tax $$ at work. I hope the oil will not keep the plaster from bonding to the shotcrete...

The coping was delivered today -- I am pleased with the look. Slightly varrying color, nice natural stone look.

I am getting the decking and drainage started next week. (part of the delay was that the pB did not tell me they needed the level brought up 8" before coping could begin... I could have had this done weeks ago...).

I have a bid of $15,500 for filling dirt up 8" and compacting, adding 900 square feet of concrete, 30 feet of 24" tall CMU wall (split face), deck drains and moving three large rocks a few feet. I upgraded to a 5" deck because I hate to see cracks. Along with this I will closely monitor the mix design (w/c ratio specified at 0.55 max) and have enough tooled joints.

Does this price seem reasonable? Seemed high to me, but I really need to keep going.... (what does textured concrete ususally go for per square foot?)

If all goes as planned tile and coping will be done this week. CMU walls and decking over the next few weeks. Fencing right after that. Then we're plastering! (equipment somewhere in there...)

I am upgrading to the pentair Quad DE 100 filter (cartridge DE filter -- best of both worlds). I have decided not to have the heater bypass valve -- at the flor rated I will be using, the head created by the heater will be minor. I have already added a valve to bypass much of the 150 gpm to the jets in spa mode -- I don't need another. I have kept the auto-valve for the cleaner though. This will allow me to run at sub-cleaner gpm for most of the day and ramp up the pump for a few hours each day for the cleaner. This will also keep more suction through the skimmer most of the day (cleaner off) and keep the surfece cleaner with slower pump speeds. Sounds good in theory -- I'll let yo know if it works.

The plumber is trying to get me to change form VS to VF.... no $$ in it for him, but I'm not convinced it isn't just bells and whistles. Cool, but not necessary.

I met with the solar guy today as well. I came away from the meeting very confident with his abilities. Looks like I can get 75% of the pool area on my south facing roofs. That's good news.

It's time to get the rest of the landscaping going.....

It's taking us a while because I tend to overthing things (drives my wife crazy!) but with all of your help it's coming together.

Thanks again,

Steve
 
HERE WE GO!

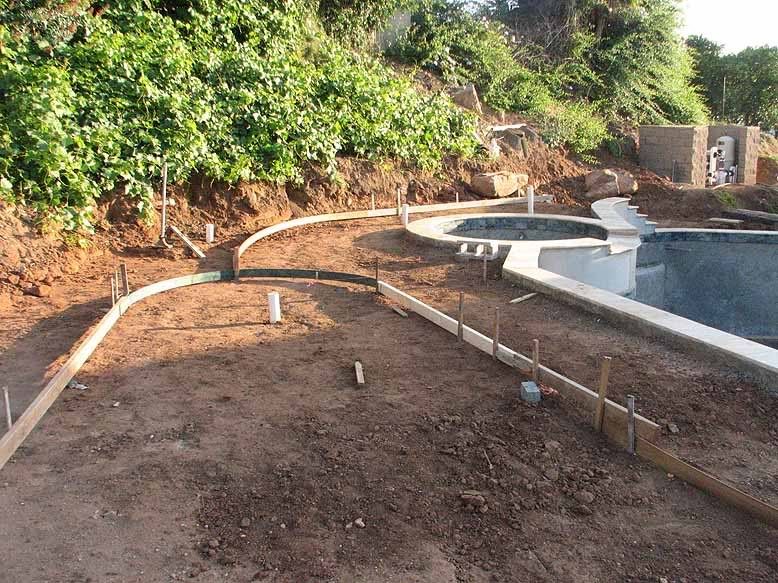
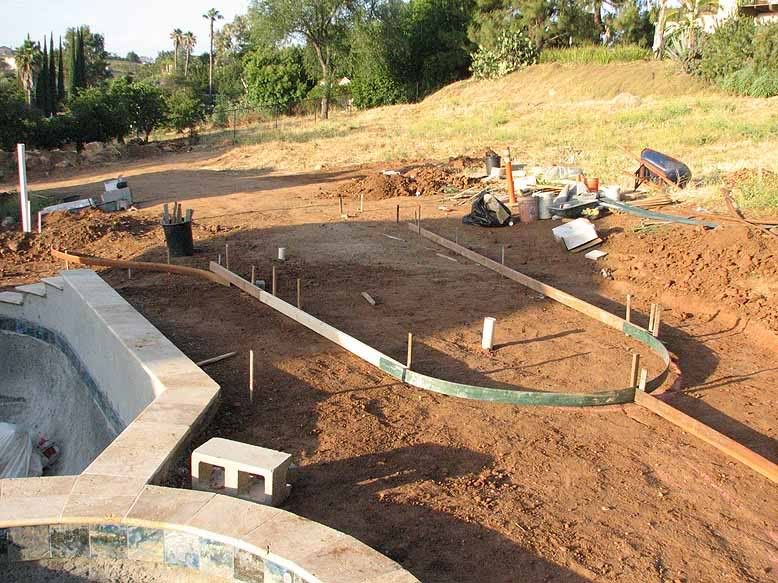
Things are moving again. I had the deck area graded out (so it would not have to happen after the coping was in place -- possibly damaging it) and most of the coping is in. The waterline tile will go in Monday. Unfortunately the raised Bond-Beam tile is on back-order and will not arrive until next month :( .

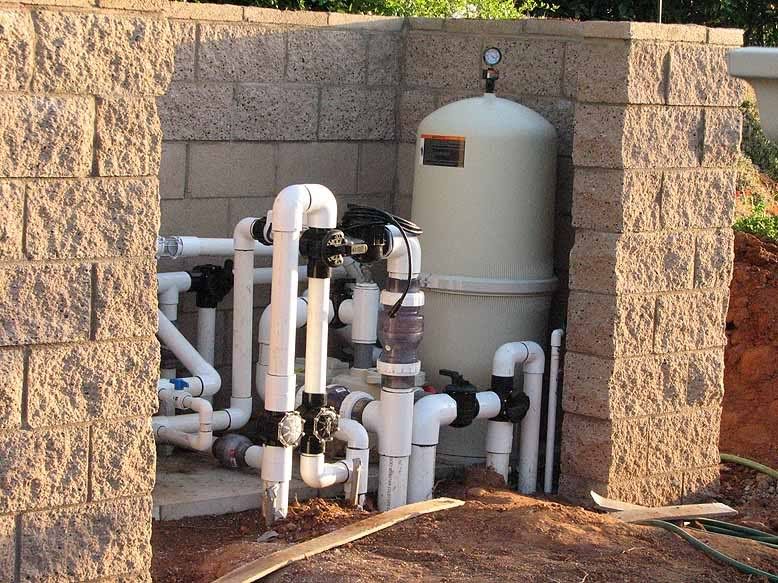
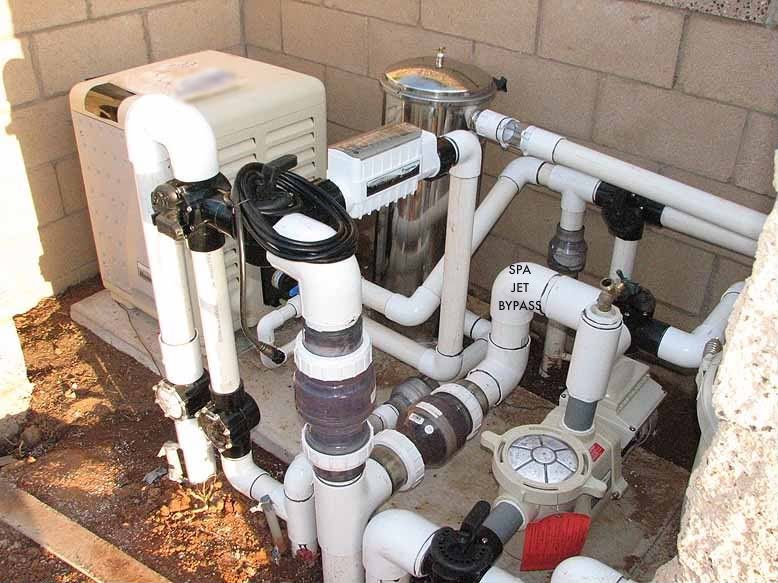
I have contracts to get the deck, deck drains, fence, upper patio, a few small retaining walls and steps to the upper patio and will have these done in the next few weeks. The equipment will go in in the meantime. They will be done with all of this when the tile arrives -- the tile will go in -- plaster next -- then water! :-D

Maybe I'm being too optimistic, but I'm ready to get in the POOL!

I will still have the lower patio, grand stair, gravity walls and grass to put in.... but nothing that'll prevent me from getting in the pool.

I'm trying to have the company summer party at the house by the end of July -- it'll be close! I should have the pool done by the end of June, but the grass will have to go in right away to be walkable by then (really needs 4 weeks). That leaves no time for the gravity walls and irrigation.

I'll keep you posted.

PICTURES:

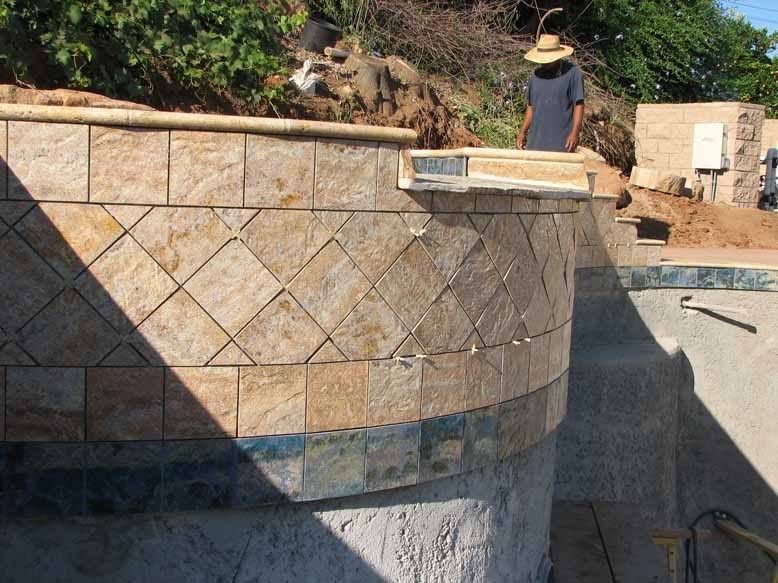
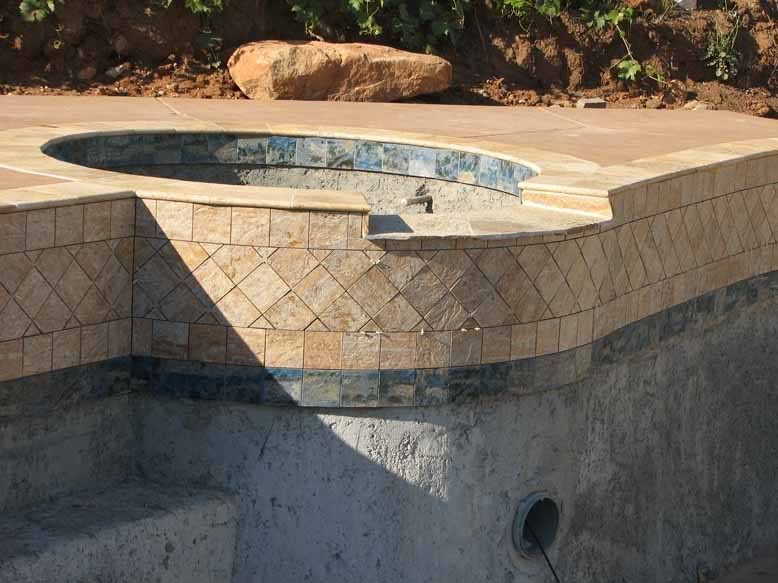
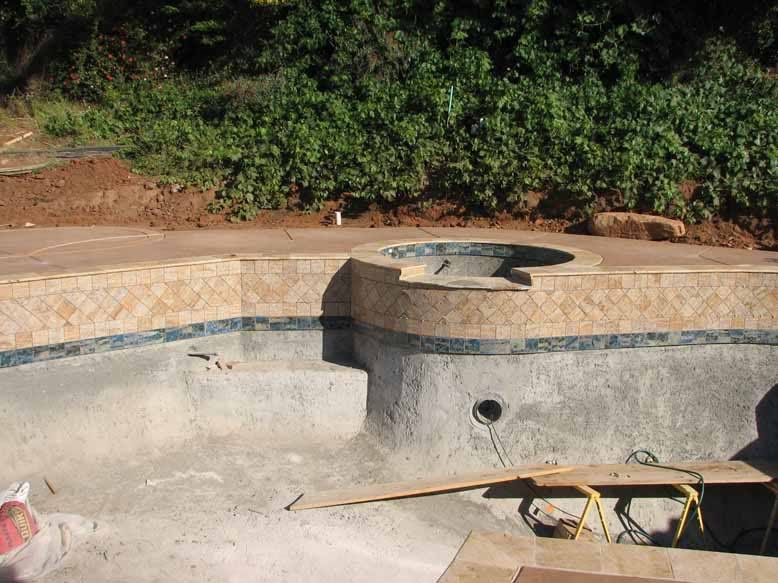
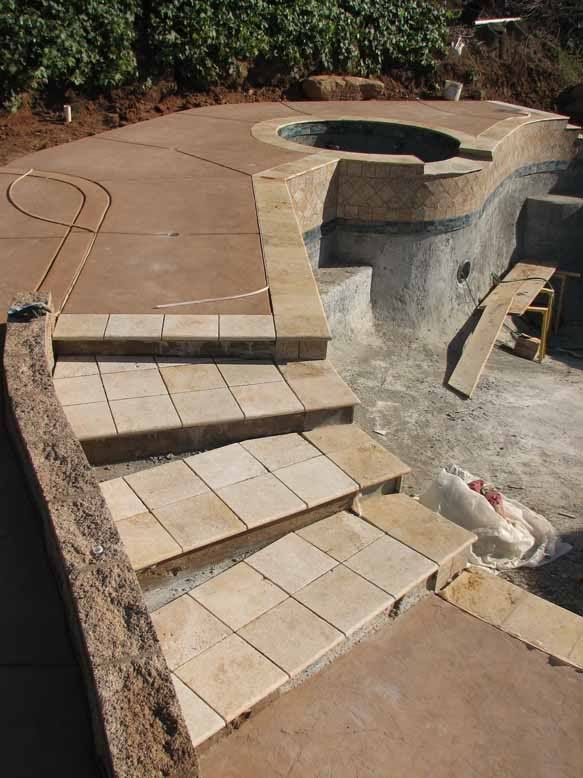
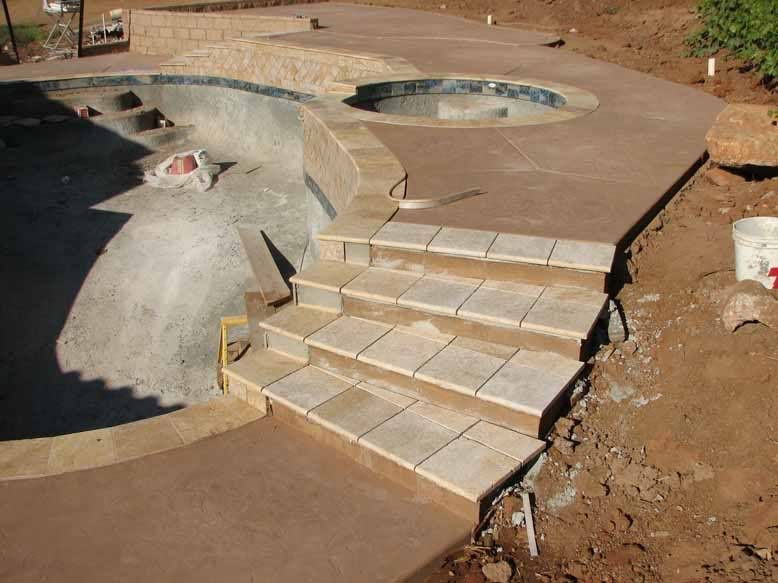
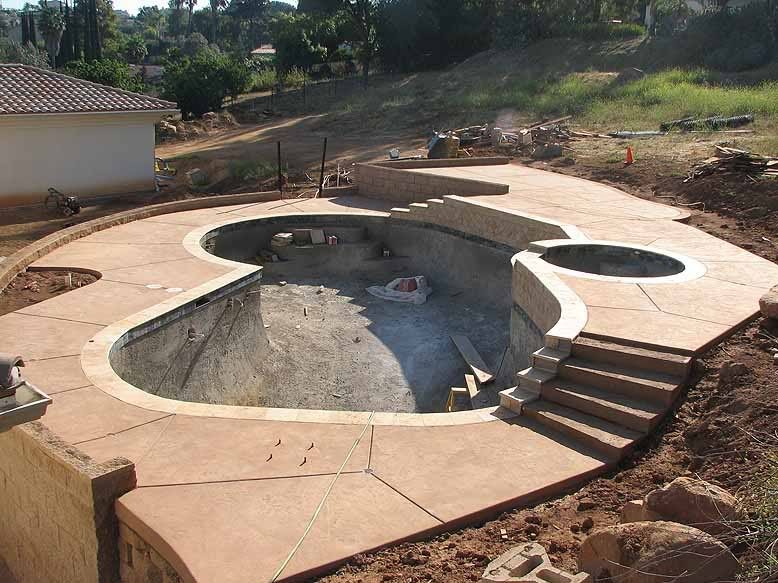
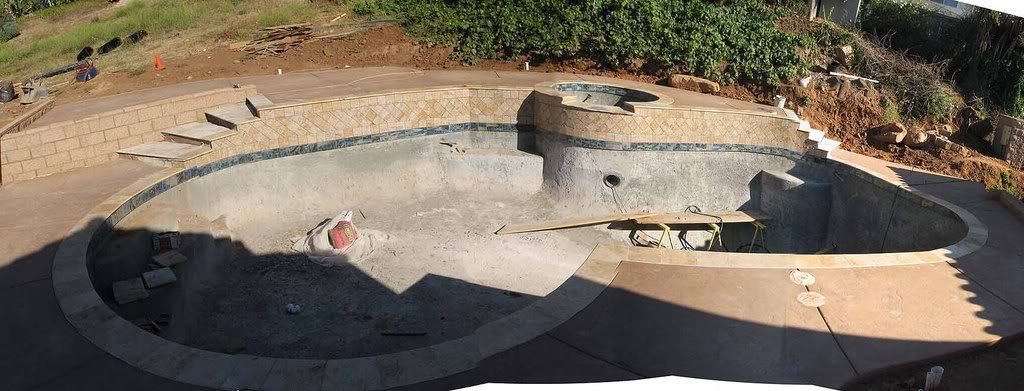
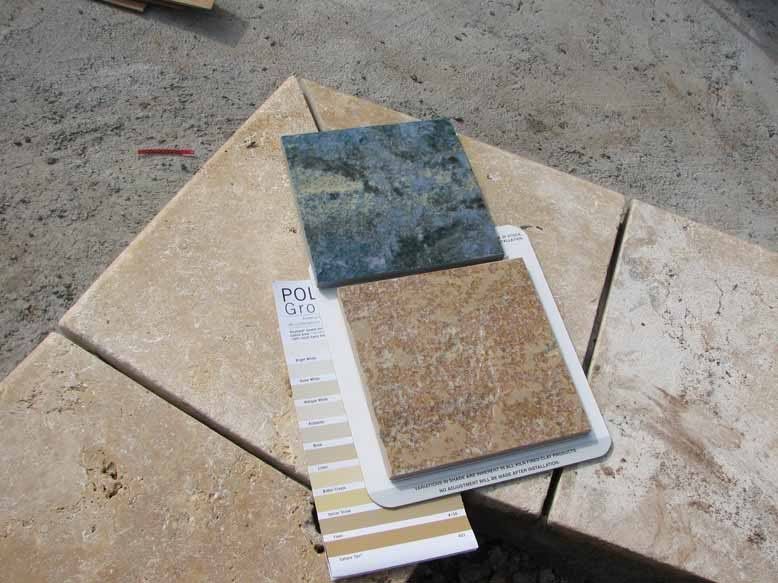
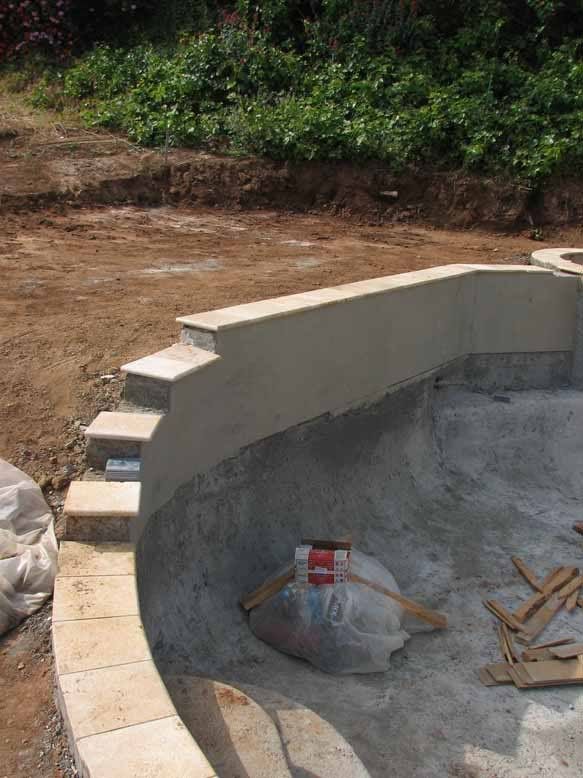
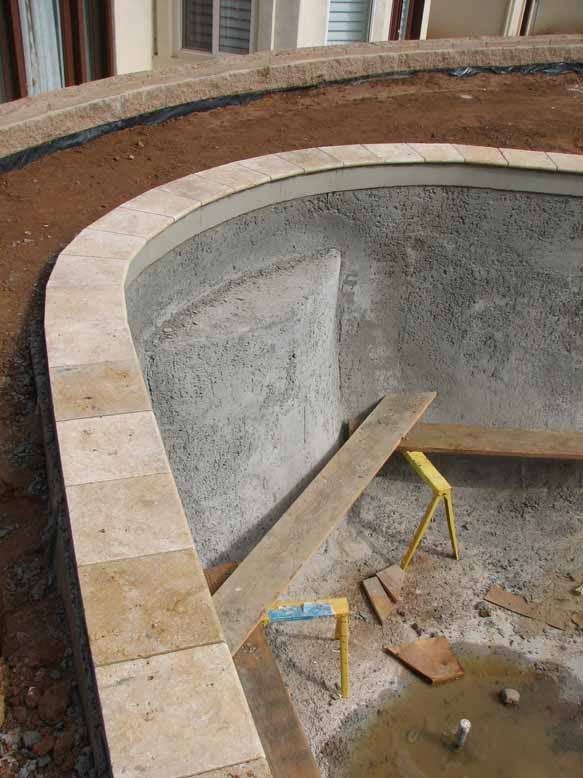
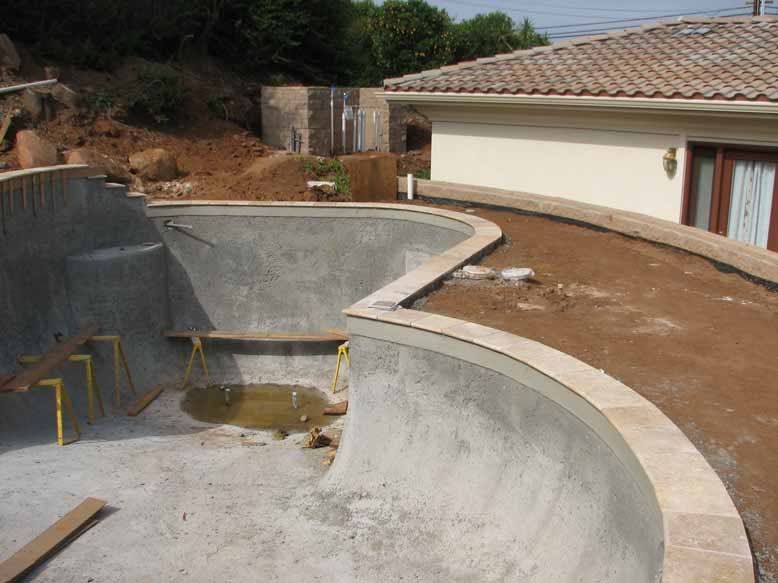
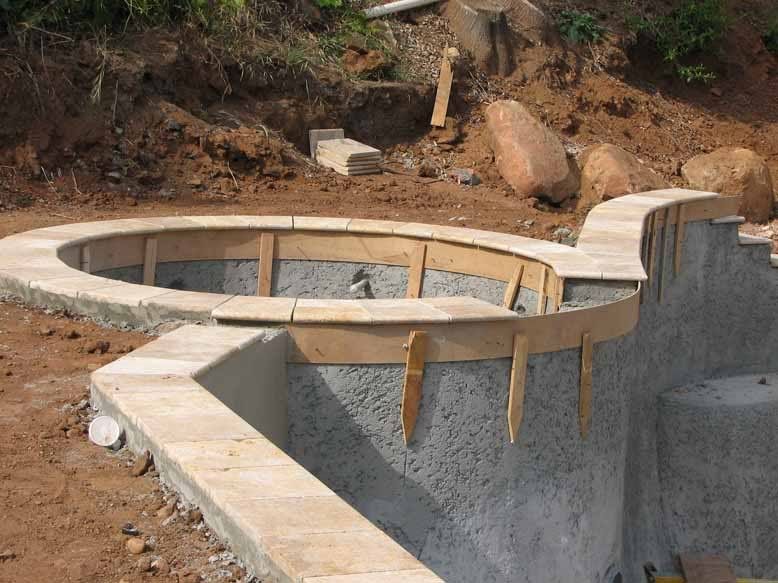
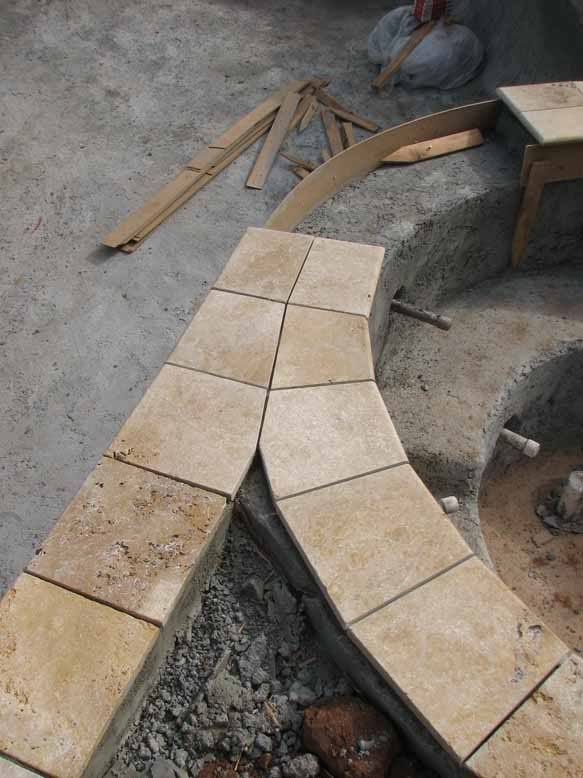
Waterline Tile and Coping:
IMG_4040.jpg


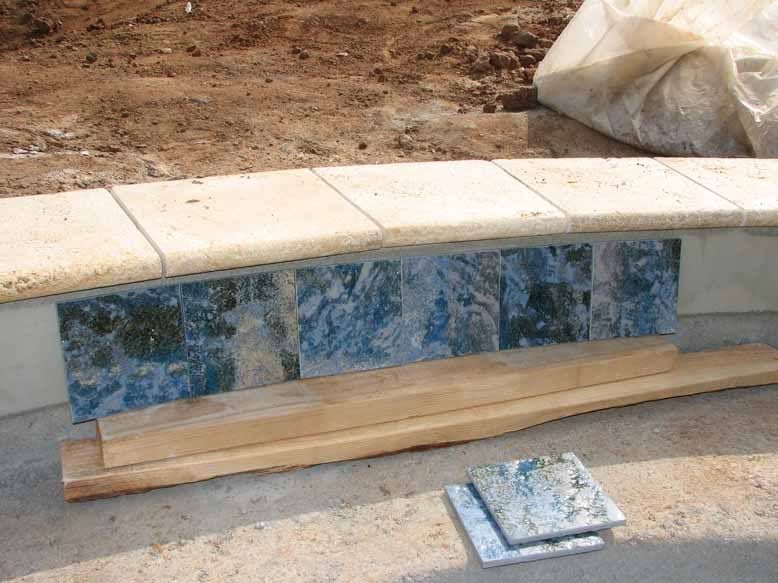
Coping and the two tiles The tan tile matches the blue one and will be placed on the raised bond beam:
IMG_4029.jpg


Coping Steps to Upper Deck:
IMG_4034.jpg


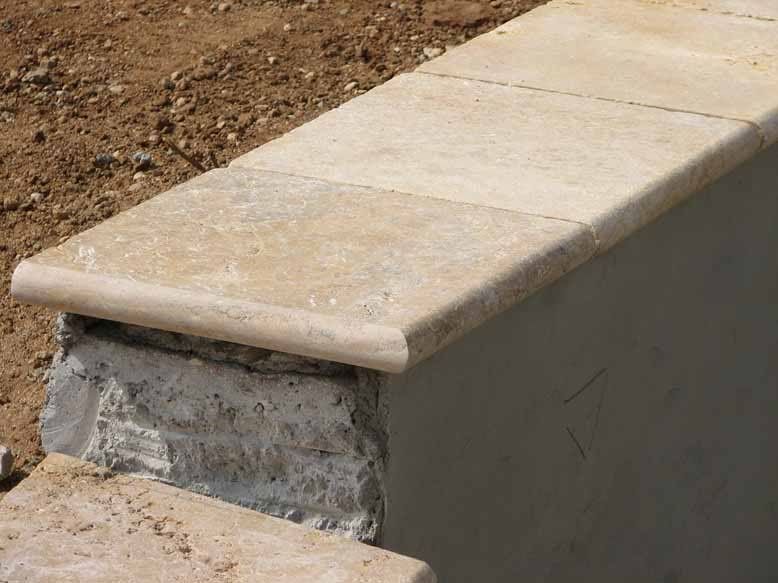
Close-Up of double rounded coping (look like it was hand ground -- but OK, just a little smoother than the rest):
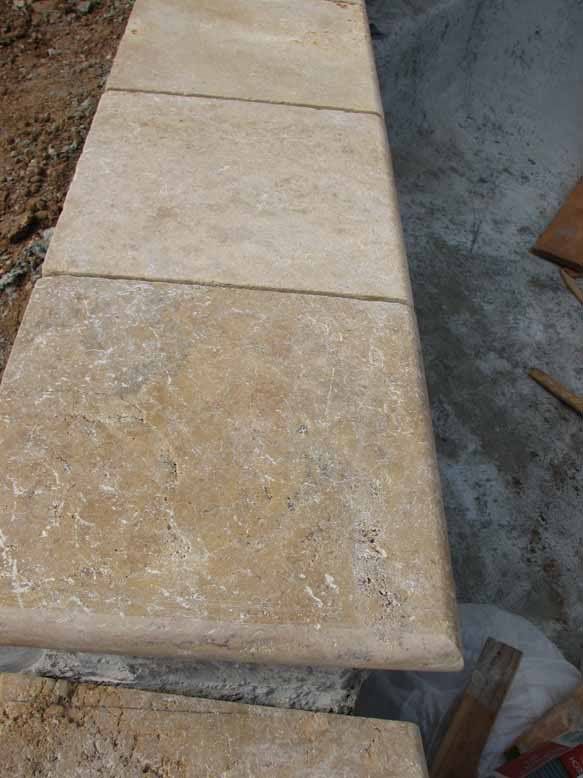
IMG_4038.jpg


IMG_4023.jpg


Deep end coping:
IMG_4027.jpg


More Coping:
IMG_4035.jpg


Coping at Spa:
IMG_4036.jpg


Close-up of cuts for double bevel at spa:
IMG_4026.jpg


I hope you like -- I love the coping. I will have them chip out one or two that are terribly pitted. It's rough tumbled stone, but a few pieces are too far gone for my taste. Overall I love it!

Steve.
 
Still waiting for the raised bond beam tile to arrive... :( Maybe in a week it'l be in. In the meantime, I'm trying to get the deck and fence in.

I have a few large rocks (maybe 1000 to 1200 pounds) that are about 3' x 2' x 1.5' that need to be moved a short distance. The decking contractor will place these for me.

Question #1a: He's just going to set these on the dirt -- is this appropriate? I'm sure if they have a point or round on the bottom he'll make the hole a similar size. I just don't want them to move too much over time.

Question #1b: He plans to use a bobcat and a chain/rope to drag the rocks 10 feet or so to their final position. If these get dragged over the area where the pipes are, will the pipese be able to handle it? The pipes are in an area about 30" wide and are stacked right next to each other -- no gaps for soil and questionable soil under them (as I don't know how they would have been backfilled with little/no gaps. There is about 12" of dirt over them now. If there was 10 pipes and 1000 pounds, that's 100 pounds per pipe -- seems OK, but....?


Question #2a: I will be using a textured concrete with a integral color and a cast-on color. The decking contractor sair he could seal the concrete afterwards to help preserve the cast-on color, but that it would make the deck slippery. How slippery does it get? I do not want kids slipping.

Question #2b: Can this same sealer be used on my travertine coping?

Thank you very much -- more pictures coming soon.

Steve
 
I suspect you'll be ok as 12 inches of dirt should spread the load over a large area. Is it possible to get some wood under the rock while it passes over the area with the pipes? This would help spread the load over a larger area also.

Do you have a piece of scrap piece laying around? If so, test it out by placing something small such as a piece of rebar or narrow piece of wood on the pipe. Then stand with all your weight on this object and over the pipe. This will result in a large stress concentration.
 
stever said:
Question #2a: I will be using a textured concrete with a integral color and a cast-on color. The decking contractor sair he could seal the concrete afterwards to help preserve the cast-on color, but that it would make the deck slippery. How slippery does it get? I do not want kids slipping.

Question #2b: Can this same sealer be used on my travertine coping?

Thank you very much -- more pictures coming soon.

Steve

Hey Steve, it looks great so far! The coping is beautiful. Regarding the concrete sealer, ask your contractor if he can use a non-slip additive. My neighbors have stamped/sealed concrete and it does get slippery when it's wet.

I think for your coping, you'll need a sealer specially formulated for natural stone. He'll be using some sort of acrylic coating for the concrete, but the travertine will lose it's slip resistance if you coat it. Look for something impregnating or penetrating. Then you can choose whether you want the finish to remain natural, or use an enhancer, which will bring out and deepen the color.
 
Vegasmom said:
Hey Steve, it looks great so far! The coping is beautiful. Regarding the concrete sealer, ask your contractor if he can use a non-slip additive. My neighbors have stamped/sealed concrete and it does get slippery when it's wet.

I think for your coping, you'll need a sealer specially formulated for natural stone. He'll be using some sort of acrylic coating for the concrete, but the travertine will lose it's slip resistance if you coat it. Look for something impregnating or penetrating. Then you can choose whether you want the finish to remain natural, or use an enhancer, which will bring out and deepen the color.

Thanks for the kind words -- as you are the most experienced in having a pool built (judged in months). I'm sure yo have had time to ponder the options a few times (then a few more :wink: ). I'll ask about the sealers -- I'm glad there's a non-slip product.

We had a freak rainstorm (Stgorm in San Diego = 0.5 inch in a day) and my decking contractor took off. It's not like he was going to pour -- just lay out the forms. Oh well.

Steve
 
Arg - lost my internet connection and therefore my post just before submitting..... :cry: :cry:

We'll try again:

I have PICTURES!

The deck forming is going in now and the equipment went in today. The gas gets hooked up tomorrow. The tile is on it's way to TX and will be here in a week or so. Sounds like water within 3 weeks.

If you are like me you like looking at piping pictures to try to figure out where it all goes -- so I'll post a bunch of piping pictures for those people.

I only have 3-4 inches of straight pipe befire the VF -- manual says I should have 10" -- will this be a problem?

Deck forming:
IMG_4546.jpg


IMG_4549.jpg


Overall Equipment:
IMG_4584.jpg


More Equipments pics:
IMG_4553.jpg


IMG_4552.jpg


IMG_4554.jpg


IMG_4567.jpg


IMG_4563.jpg


IMG_4566.jpg


IMG_4555.jpg


IMG_4556.jpg


There's a few more 90's than I'd pictured, but IMHO it looks pretty clean -- opinions? That 3" check valve is quite a monster! :shock:

Even with the IntilliFlo VF, I think I'll need (well... want) a flow-gauge for the spa mode. I have a bypass routed in with 25% of the water going through filter/heater/chlorinater and the rest combines in after this equip and then all goes to the jets ( so I don't put 120 gpm through the filter/heater). The heater loop wants to be run at 40 gpm. I guess I can just adjust the valve untill the heater fires and then raise it a bit more.... In pool more I could check the VF meter against the B/W meter -- not that I'd know which was right if they differed. I'm better off living believing the ONE I have is right instead of always wondering. (Ignorance is bliss).

Steve
 

Enjoying this content?

Support TFP with a donation.

Give Support
Belldiver said:
There is a non-slip addative for the concrete sealer. I have some at home for my deck. I think it's called rhino coat (sp?). I'll check when I get home tonight. You just mix it in with the sealer when you roll it on and it adds a little texture.

Jim

Thank you Jim and Vegasmom -- I will make sure to ask for this. Can you see it after it's applied? Is is sandy/rough?

Thanks,
 
JasonLion said:
Great plumbing job in a tight space!

I know -- it is very tight. They asked for a 4x8 CMU enclosure -- which is what I had built. I don't know why they didn't ask for more space. The "gas hookup guy" this morning was swearing about the gas hookup behind the heater (he was not a slim man).

Most of the equipment is easy to get to. The SWG is top front, the pump filter is clost to the front. The filter is to the side -- a little difficult to get to -- and the seperation tank is in the way back. I hope with he Quad DE 100 I will not need to use it more than once or twice a season.

Would you recommend a light roof over the equipment? It would have to let air flow through, but would protect the equipment from the sun and rain....

Thanks,
Steve
 
Minor update -- but I know how much you like the pics!

equipmunt all in and wired up save three more auto-valves (2 went in -- must have been the 2 provided in the IntelliTouch kit). Control panel wired up inside the house. It's not on - of course. I'm dying to fiddle around with it! The first pour (small band of concrete) for the deck will happen tomorrow (Monday). Maybe Thursday for the rest of it. The band of concrete will be smooth, while the rest will be textured (kind'a the broken stone look). I have verified that the sealer used will be one with the non-slip additive.

Minor mistake with the formwork that needs to be fixed prior to pouring -- I wanted an upper pad for a 12'x12' gazebo and due to the weird shape, it tappers off at one corner to 9 or 10 feet.

Bigger issue with the septic. I had the cleanouts uncovered for the first time (house = 5 years old) to locate them in the loer patio (near the house). One was all crushed with the top broken in and a trashcan lid on top keeping the dirt in. Good job Mr. House-Builder. :x I thought I had found all of his screwups. (spec house -- we did not hire him). I'll need to get the riser replaced. :cry: Might as well have it pumped while it's exposed..... No sense digging it up again in a year or two.

Septic -- Notice trashcan lid found burried as a make-shift lid.
IMG_4629.jpg


IMG_4596.jpg


stiched02fromhill.jpg


Mosaic of 8 pics to get the "whole effect"
StitchFromSide.jpg


Steve
 
Update:

- Tile is in and will be installed next week.

- The smooth bands of decking have been poured and the textured will be poured Wednesday. (planned for Tuesday, but withe the septic pump truck in the drive-way the same morning, there would have been a fight!).

- The fence will start Thursday and finish up the beginning of the following week.

- I have to call on the Solar install -- but this is not critical path.

- I had a hard time making a final decision on the diving board. I really liked the 'Hip- Hop' board (see below) but discovered it could only be mounted on the cantilever (jump) base or the rigid base. The board is rigid, so I really didn't want a rigid board ona rigid base. I also didn't want too much spring for safety reasons (anybody out there with a SRSmith cantilever board mount?). I figured finally that a rigid board on a flexible base would be somewhere in the middle. Then I discovered that the cantilever base was not recommended for salt pools. In fact 90% of the SRSmith bases are not recommended for salt pools. Anybody out there with a SRSmith cantilever base and a salt pool? How has it held up? I took the risk that it would not be much of a problem (SRSmith just limiting their liability) and went for it.

(not my pool)
HipHopCantilever.jpg


We're trying to get swimming by the 4th. If the fence is done the week of the 23rd, we should get plastered (so to speak) the same week and filled up with almost a week to get the chemicals to balance..... it'll be close! Of course there's still 2 months of landscaping untill th eptoject can really be called done!

Thanks all for your help on this -- we're almost there!

Steve
 
Hang in there Stever it is looking GREAT :whoot: Wow I didn't realize the elevation of it all until these new pics. Holy smokes! It surely is coming along nicely. Love your tile in the pool. We too hope to have the push for the fourth we are supposed to get concrete on Wednesday this week. Won't it be nice to just float around and enjoy it! Then once you are relaxed you can think about all the landscaping that needs to be done :roll:
 
The Deck is poured!

The deck was poured last week. The pictures below show it a little darker than it will be as it still has the release color on. Tomorrow they will acid-wash it off a little to give it the 2-color look.

The tile is mostly in. The fence is starting -- should be done this week.

I will, however, miss being open for the 4th. :( The best I can hope for is plastering on about the first of July and swimming by the 6th or 7th or so. This is unless we just decide to risk burning off our skin and jumping in ahead of time.....


Once the tile was installed, the coping only overhangs the curved amount -- about an inch. Not much to hold onto and it looks a little funny. I guess I'm stuck with it.

The tile corners lifted due to the curve at the spa.... do you thin this will look OK when grouted? Shuld they have cut the tiles in this location vertically (corner-to-corner) to allow them to sit flatter?
IMG_4726001.jpg


Another tile picture:
IMG_4718001.jpg


And another:
IMG_4753001.jpg


Coping on steps:
Front steps. Yes, the stone was unavoidably from another color lot. Not the end of the world.... I'll tell people I meant to do the steps a little lighter. (a lesson for others out there -- buy all you need and more all at once)
IMG_4749001.jpg


front steps
IMG_4746001.jpg


rear steps
IMG_4745001.jpg


Overall Pictures:
IMG_4739.jpg


stitchdeck03-b.jpg


Getting very close!

Steve
 

Enjoying this content?

Support TFP with a donation.

Give Support
Thread Status
Hello , This thread has been inactive for over 60 days. New postings here are unlikely to be seen or responded to by other members. For better visibility, consider Starting A New Thread.