bbrock
Well-known member
Great question. And a good point. On my next day off, I’ll get up there and try to inspect the wooden mounts, and the brackets that they are affixed to.
What is unistrut?
What is unistrut?

Great question. And a good point. On my next day off, I’ll get up there and try to inspect the wooden mounts, and the brackets that they are affixed to.
What is unistrut?


 www.h2otsun.com
In my case, as a ground mount, I have roofing panels installed over the strut. The photo I shared above was an in progress picture for clarity but you are correct without the additional context could be confusingMy only expertise in Heliocol installation comes from my own roof. But IMO, that is not a good solution for installing Heliocol panels. Not without a modification, anyway. As pictured, there are two problems.
(1) The tubing is laying on metal channels in three places. As the tubing expands and contracts, it's going to get dragged across the channels. That will wear the tubing prematurely and lessen the systems lifespan. Heliocol panels are to touch the roof (or any support surface) only at the horizontal spacers. Not even the manifolds touch the roof. You don't want any point of the tubing to touch the roof. It's the spacers that drag across the roof during expansion/contraction, keeping the tubes from doing so.
(2) The upper manifold can be attached to the roof/structure, but not the lower one. Both manifolds are supposed to held by special Heliocol mounting brackets, but the upper brackets are different from the lower ones. The upper ones fit the diameter of the manifold pretty closely. That fixes the position of the upper manifold relative to the roof. But the lower brackets have an oblong hole through which the manifold rides. This allows the lower manifold to move back and forth, in a direction perpendicular to the manifold. That movement is caused by the expansion and contraction of the tubing. So as the panels get longer and then shorter each day, the upper manifold doesn't move, but the lower manifold slides back and forth inside the lower brackets. By fixing the lower manifold, the tubing will expand and droop, and then contract and tighten, possibly stretching the tubing at the point where they connect to the manifold, weakening that connection and likely lessening that connections lifespan. So...
Each of the panels' cross spacers needs to be supported. In the panels pictured, there are 48 of them: 12 in each section times four sections. Times the number of panels. I suppose you could do that with vertical struts, but you'd need eight per panel (two per section) to do it properly. Or you could use plywood (somehow protected from the elements) or some other weather-resistant flat material. Whatever would work. That's for the system pictured.
For @bbrock's roof, he'd want to mount the Heliocol brackets properly to the existing roof, then let the spacers slide across the shingles. But this is where it gets really fun. See if you can follow this, because I had to reinstall mine after I realized the following. The frequency of the spacers didn't match the frequency of my roof tiles. So sometimes the spacers sat right on the end of the tile, but in other places the spacer aligned with the middle of the tile, and worse case was when they aligned with the top of the tile. When they did that, the tubes drooped enough to then touch the tile. Which is bad. Because as they move back and forth, they would saw themselves to death against the course surface of the tile. So the solution was to move each row of spaces so that they were positioned over the end of the tile. That way, even if they drooped a little (like a suspension bridge), they were still high enough to not touch the tile. Ya following that?
But that wasn't the worst of it! A properly installed array of panels is not parallel to the roof. You want the panels skewed a bit, such that one side is a bit lower than the other. This allows the horizontal manifold just enough slope to fill and drain properly. This affects not only how the panels drain at the end of each day, but also how the panels fill and flow throughout the heating cycle. If you don't have that skew, you'll reduce the panels efficiency. I can explain more about that if you're interested. But the point was, I couldn't just slide the spacer up or down a set amount for each panel, I had to adjust each set of spacers to perfectly align with their corresponding tiles, which is slightly different for each section of each panel! I know that's going to be hard to picture, but trust me, that's the right way to do if you want (a) the panels to heat with the highest efficiency, and (b) for them to last as long as possible.
And just to forewarn: those spacers cling to each tube, quite snuggly. They don't want to come off easily, and they are a bear to put back on. You have carefully (but forcefully) pull them off, then fit each tube back into its corresponding slot: times all those tubes, times 12 spacers, times four sections, times X panels (eight on my roof). That's 1000s of connections. Took me all day.
Anywho, that's my two cents. No installer will do that. They'll lay the panels straight to the roof, allowing them to fill and drain less efficiently, and they'll let the spacers fall where they may, so that they'll wear as they wear. They figure no consumer will know what I just described. They won't explain any of this to you, nor offer to do it right, even if they know how, which they probably won't. So you can ignore all this and hope for the best, or you can try and get them to do it, or you can do it yourself. (I'll explain the exact process if you care to know.)
FYI: the following website has great info about how solar heating systems work. This particular page explains why you want to skew the panels. They have some great animations that show what's going on. I call it "skew," they call it "tilt." Read everything on this page, especially the captions that appear during the animations.
Plumbing a Solar Pool Heater | Hot Sun Solar Pool Heating
The basic concepts you must know to correctly plumb a solar pool heater.
 . There is a roof install in out area where they used the channel top and bottom with standoffs to just clear the "s" tile roof. The panels sag the 13/16 depth of the channel and are supported on the roof.

The reason I would tend to disagree, is because solar panels don't add all that much heat. 5 degrees sometimes. Maybe 10 under perfect conditions. And it's less about the 10 in the summer, it's more about extending the swim season: five or ten degrees, for me, is the difference between enjoying my pool in May, or having to wait until June, or July. Point being: I took great lengths to squeeze out every bit of heat I could. And I can't recall ever thinking: "Gee, I wish my pool wasn't so warm."If they’re parallel with the roof, then, so be it. Somethings better than nothing.
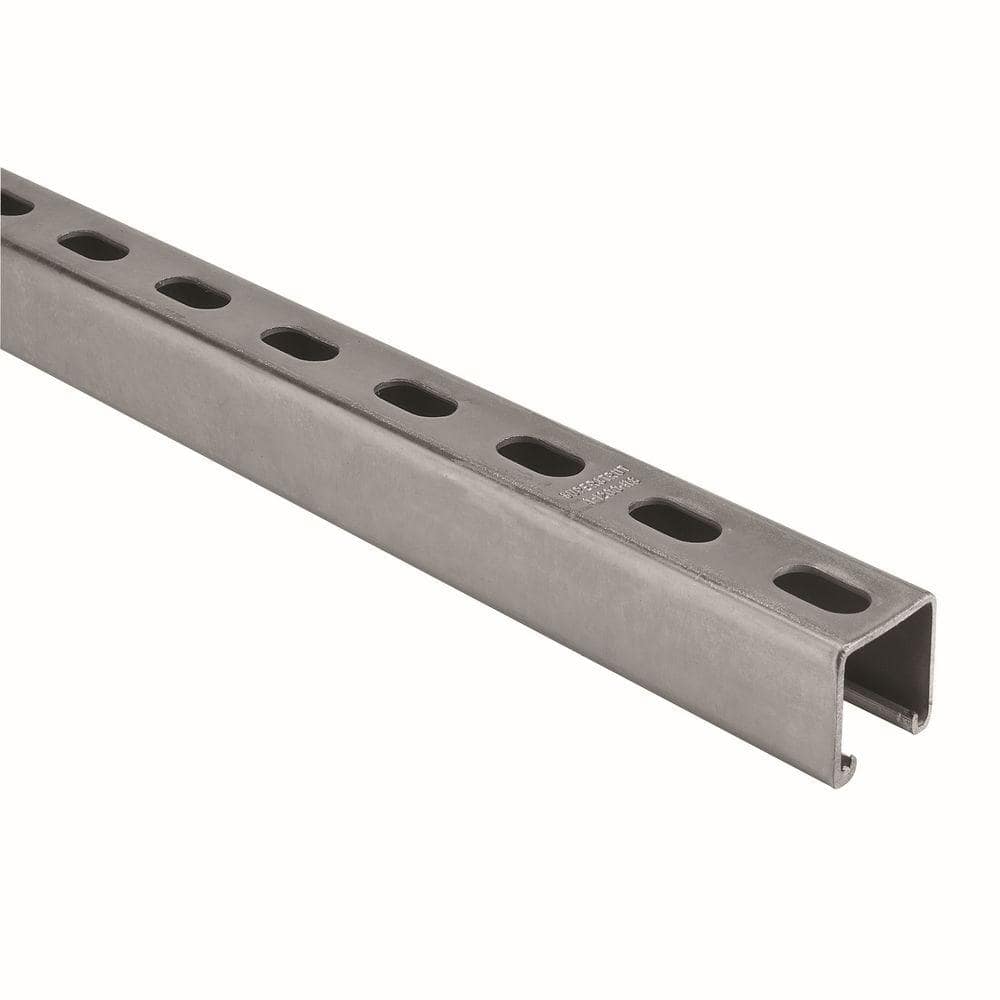
So I went up to my roof. The wood is pressure treated wood, but it should be replaced. It won't last. It looks like the prior installer penetrated the metal shingle and adhered wooden blocks in the valleys and on top of those had secured another piece of wood.What is the roof standoff made of? If the standoffs are still good You could replace the wood brackets with unistrut and mount the panels to the unistrut. Then you would not need to mess with the roof penatrations


Maybe try calling decra and see ahat an acceptable patch would be ?So I went up to my roof. The wood is pressure treated wood, but it should be replaced. It won't last. It looks like the prior installer penetrated the metal shingle and adhered wooden blocks in the valleys and on top of those had secured another piece of wood.
One installer is saying he'll use Heliocol, but states to remove the old system, fill the holes, then adhere the new Heliocol direct to deck and make new penetrations into the metal shingles, and seal those penetrations. He will not warranty the prior holes he is going to fill/seal, but he will warrant the new ones he makes. My concern are the new penetrations into myDecra (or Cal-Pac) metal shingles, and then when the system fails let's say in 20 years, it is going to have to be replaced and yet again more new holes will have to be made into my Decra metal shingles. Any suggestions?
I have considered the super expensive route of re-roofing the South, North, West face of my home with comp so that Heliocol panels can be installed. Another installer is talking about removing the old system, filling the holes, replacing the rows of old Decra metal shingle panels (since it comes in a long row) that had the penetrations with new panels, and installing a rack/mounting system so the thermal solar could be installed. But, I don't see any rack/mount system like I have used for my PV that could work. Will it have to be custom made like I see on this thread's first page and blocks adhered in the shingle's valley with a rack placed on top?
I looked at Quickbolt (All Products | Try QB2 + Microflashing BoltSeal®) but I don't think that will work for Heliocol.
Here are some pics I took recently of my old system.View attachment 474556View attachment 474557View attachment 474558
Thanks for the feedback.FYI: on the advice of our local area's most well known installer (for whatever that's worth), I attached my Heliocol brackets to the tiles only. I did not penetrate the underlayment or the deck or try to find the framing. Granted, they are cement tiles, but that's all that's holding the panels in place. They've been up there without incident for just about six years now.
The other tidbit worth sharing: it's not roof tiles that make a roof waterproof. It's the underlayment. The tiles do shed water, but their primary purpose is to keep UV off the underlayment. Typically, the underlayment seals/heals itself around any nails or screws that penetrate it. That seal can last decades. The trouble happens when the hardware is removed, which leaves the hole in the underlayment. Which is likely why that one contractor doesn't want to warrant the sealing of the old system's penetrations. Unless there is a plan to remove the tiles and get at the underlayment underneath to properly repair any penetrations, it's bound to fail. Just gooping whatever compound on the tiles without addressing the penetrations below will not be adequate.
In that sense, it'd be better to leave the old wood up there than to remove it. Or find some way to slice it off and leave the nails or screws in place. The problem with that, though, is any movement of the fastener can ruin the seal of the underlayment to the fastener. It's kind'a a one-shot deal. The fastener goes through and the tar material seals to the fastener. After many years, even the "less fresh" tar paper can maintain its seal. But if you pull the fastener, or it moves from side to side, the seal can get ruined.
I'm not a roofer, but I think the correct way to seal the old penetrations is to temporarily remove the tile, lay down a piece of new underlayment (or sheet metal) that tucks under the old underlayment layer directly above it, then "glue" the piece to the existing surrounding underlayment. Something like that. A solar installer may or may not be qualified to properly repair a roof.
Sorry I don't know more about it. I just wanted to give you some questions to ask of the installers you're interviewing, to see if they have the right answers.
Where two faces of a roof meet, it creates a V. Most roofing surfaces (tiles, shingles, etc), can't bend through this V, so they stop just short of it. To protect the underlayment that would be exposed by this, they use sheet metal on top of the underlayment. The sheetmetal is bent and shaped to lay flat against each face of the roof, and ends up shaped like... you guessed it... a valley. This sheet metal valley gets a lot of abuse by sun and water and dirt and leaves and crud, and is susceptible to rust. Once they start rusting, they don't have much life left as the rust will eat through the metal and then you'll get a leak."I would have to see if we could use the existing valley or if there is any rust."


