Solar heater Heliocol on metal roof help

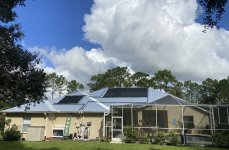
I wasn't able to follow all of that about the struts. I can only speak to how I did mine. The screws that fasten my clamps to my roof don't penetrate my roof's plywood sheathing at all, so they don't screw into the framing. They're just screwed to the roof tiles, which aren't attached to the sheathing either! Scary, right? But that's what the local installer recommended, and they're a big shop that know their stuff.

I'm not trying to talk you out of trying to hit the framing, but I doubt that it is necessary. The proper screw, through the metal roof, into the plywood sheathing should be plenty strong enough. Use a spacer if you need to to clear the metal ridges. I would use a square of composite decking for that, as it would hold up well to the UV and weather. Just apply a proper roofing sealant anywhere water might penetrate, and you'll be good-to-go. I think the rest of what you all are describing might be overkill, unless your wind loads are just crazy high. I get 20-30MPH winds, directly on my panels, and no problems so far. Helicol panels are designed to take it, and if you screw into your roof sheathing it'll be a pretty darn strong connection. I'm certain my screws are going to hold to the tiles, so really its the weight of the tiles, along with how they interlock with surrounding tiles, that is holding my array in place. Since I didn't penetrate the sheathing or the underlayment paper, I don't have to worry about leaks. Which, I suspect, is why the local guys do it this way. Sorry, I digress, and realize we have different roofing systems. My point was: if my array is OK attached only to the tiles, yours, attached to the sheathing, is going to be all that much stronger.

If you're determined to find the framing, and you can access your attic space, you can crawl up there and find a "landmark" near your panel location. Like a plumbing vent pipe, skylight or a heater flue, and take measurements between it and the framing. Back up on top, you locate the same landmark and plot the measurements to the framing using the landmark as your reference. If you measure well, you'll have a pretty good shot of finding the rafters. If you can't access the attic, plumbing vent pipes are likely attached to framing, so you have a 50-50 shot at guessing to which side of the rafter the pipe is attached. Alternately (or additionally), if you have eaves, you should be able to see the ends of the rafters, and plot their locations from there. Either way, you might miss some, you might hit some, but even if you miss, the attachments to the sheathing are going to transfer load to the nearest rafter, especially if you get close.

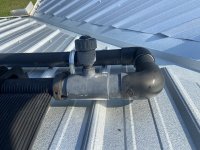
Regarding support, I made sure every one of the Heliocol support/spacers (the ones that run perpendicular to the tubing, about every foot) were sitting on the tiles. I had to move them, to align their frequency with the frequency of the tiles. I believe this to be important. One, to keep the tubes from touching anything, and two, to minimize the stress on the connections of the tubes to the manifolds. Remember, the manifolds and the tubes are expanding and contracting, in all directions, possibly multiple times a day. The failure points for Heliocols are the scraping of the tubes on a rough roof surface and the tube connections. So I made sure to eliminate or reduce both. If you don't support every spacer, then your tubes will be hanging down, and they'll either be touching and dragging across the roof as they move, or be pulling on the manifold connection more than they should, or both. No bueno.
 
Last edited:
Well I finally got to the reinstall. Ended up buying a small sheet of 3/4” thick plastic and cutting it up to make spacers to go between the “gator clamps” and the metal roof, then drilled holes in the spacers and ran the mounting screws through the clamps And spacers and into the roof deck. Then applied sealant along top & sides of spacers at the roof level and sealed over the screw heads.

For the layout, I just mimicked the way it was originally installed.

Finalized the install earlier today and turned it on. So far, so good.
 

Attachments

  • F35A2E84-A867-4FBF-B75B-6645F8617412.jpeg
    F35A2E84-A867-4FBF-B75B-6645F8617412.jpeg
    494.3 KB · Views: 22
  • Like
Reactions: Dirk and Ahultin
Well now there’s a leak of sorts… the plumbing all seems fine, but some water is coming out of the vent / vacuum breaker. I reused the same old one… I might need to take it apart and clean it or something.
anybody here familiar with how they’re supposed to work? See pic.
 

Attachments

  • BEA8B76C-0A93-4D7A-91A7-7EE22212A08A.jpeg
    BEA8B76C-0A93-4D7A-91A7-7EE22212A08A.jpeg
    499.1 KB · Views: 9
Well now there’s a leak of sorts… the plumbing all seems fine, but some water is coming out of the vent / vacuum breaker. I reused the same old one… I might need to take it apart and clean it or something.
anybody here familiar with how they’re supposed to work? See pic.
Well, they're not suppose to leak! ;)

I've never taken one apart, so can't advise. I'm just offering an alternate idea. Move it. I put mine under the eves, to keep it out of the sun. Sorry, did I already mention that? They don't have to be on the roof, or at the highest point. UV is hard on everything, and under the eves you can keep a better eye on it. They're not cheap, about $40 on Amazon. Is it worth messing with the leaking one? Either way, if you need a new one, or have to fiddle with the old one, getting at it under the eves is going to be more convenient.

Put in a new tee, and just plug the old tee. If it doesn't work well in the new location, you can move it back and you're only out the cost of a tee. Here:

vrv.jpg

Mine:
vrv 2.jpg
 
That’s not a bad plan. I got up there and took it off, brought it down and took it apart and cleaned the components. It’s a really simple thing.

I was surprised when water gushed out of the pipe after I removed it… figured it would have drained! But instead of draining down, the water continued to come out of the threaded hole until I reinstalled it.

Will keep an eye on it to see what happens, but knowing how simple it is i believe it’ll work fine now that I got rid of the crud.
 
I was surprised when water gushed out of the pipe after I removed it… figured it would have drained!
When the solar heating and pump are done for the day, water should come down off the roof in two paths. Some of it comes down through the return pipe. The rest comes down through the supply pipe. I don't have a good pic of your plumbing, but as near as I can tell yours is plumbed like a typical system. The return pipe has an unobstructed path to the pool. The VRV allows the water to come down without creating a vacuum.

But the water coming down through the supply pipe doesn't have a straight shot. It's gotta go through the solar valve, which is actually closed to the roof when the solar is shut down for the day. It makes its way through the closed solar valve in one of two ways. (1) If the three-way solar valve is a "special" type, unmysteriously called a "solar drain down" valve, then there's a one way check valve gizmo inside it that allows water to flow through it from roof to pool, but not the other way (so water doesn't go back up to the roof when the valve is closed to the roof and the pump is running). With me so far? Or (2) the solar valve is a DIY modified "normal" three-way solar valve. Some installers that don't want to spring for a proper solar drain down valve will just drill a small hole in a three-way valve's gate, and the water from the roof will flow through that hole. Water can also flow the other way, unrestricted, when the solar valve is closed to the roof and the pump is running, but they get away with this kluge because of the head involved (due to the height of the roof), not much water will get up the supply pipe. Whew. OK:

So the fact that you found water on the supply side could mean one of a few things

- you don't have a solar drain down valve and there is no hole drilled in the gate, so the supply side never drains, or

- the drain down check inside the solar valve is not working well, or at all, or

- you managed to get up on the roof fast enough, after turning off the solar system and pump, and the supply side just hadn't finished draining. The drain down check (or the drilled hole) are not all that big, so it can take a while. My panels take about 15-20 minutes to drain.

Let me know if you need any help figuring out which of those things was happening...

So that's the stuff I know. The part that's a little fuzzy is how the VRV can cause issues. It has something to do with how it opens and closes, and sometimes partially opens due to the water pressure in the pipe its screwed into. That might even explain the leaking you saw. It might not have been leaking, but rather partially open allowing water out while the pipe was under pressure. Sorry, I'm not sure about all that. If you fixed the leak, and determine all the panels eventually drain properly, then ignore all that. If not, then I'll call in a guy that knows more about it.
 
Last edited:
By the way, if I'm understanding your plumbing correctly, almost all of the water on the roof is going to come down through the supply pipe, through the solar valve, so it'd take a while. Only the water in the return pipe itself comes down through the return pipe. My setup works the same way.
 
Thanks Dirk.

I had to replace the valve (but not the motorized part that goes on the front of the valve) and I didn’t know any better so I didn’t drill a hole. Heck, maybe that drilled hole is the reason I thought the valve was bad in the first place.

I didn’t know to inspect the old valve for a hole… I probably tossed it, but I’ve been known to keep old stuff around for no particular reason, so it might still be around here someplace.

Bottom line, sounds like I’m going to need to drill that hole. I sure hope it can be done without un-plumbing everything!

Back to the vacuum breaker: it went back to leaking water when the system started to drain, so the valve inside is apparently done. I ordered a new one but it won’t be here until next week. Meanwhile we await this hurricane to see what it’s going to do.

Never a dull moment! Haha

Russ
Yah, unfortunately I don't know anything about making that hole (how big, or where exactly it goes). I doubt very much you'll need to replumb anything. I suspect you disassemble the valve, pull out the gate and drill a hole somewhere in the gate, then put it all back together. Should be pretty easy once you find the particulars about the hole.
 

Enjoying this content?

Support TFP with a donation.

Give Support
I think a small amount of leakage from a vacuum relief valve is normal. Under zero pressure, there's nothing pushing water out. Under full pressure, the valve is closed and shouldn't leak. But during the interims between no pressure and full pressure, the valve temporarily has water but is not fully closed. My VRVs drip under that condition and I think it's normal.
 
Yah, unfortunately I don't know anything about making that hole (how big, or where exactly it goes). I doubt very much you'll need to replumb anything. I suspect you disassemble the valve, pull out the gate and drill a hole somewhere in the gate, then put it all back together. Should be pretty easy once you find the particulars about the hole.
I just pulled the old valve apart and found a fairly good-sized hole in the gate. So I probably didn’t need to replace the valve at all! I only replaced it because water was getting past it when it was closed.. duh!

The hole seems pretty big (I’ll attach a pic). I’m going to search around online a little, to see if I can find any guidelines on how big it really ought to be.

Thanks again… I wouldn’t have known diddly about that hole without your help.
 

Attachments

  • C18C3A42-5AD0-4EF4-81E6-40B2006C0958.jpeg
    C18C3A42-5AD0-4EF4-81E6-40B2006C0958.jpeg
    244.3 KB · Views: 5
  • Like
Reactions: guinness and Dirk
According to a Leslie's webpage, that might be about right. This page has several pics of a drain-down gate. You can kinda make out the one-way check valve in one of them.


This page has a drawing, but not all that helpful:


I would guess the check mechanism impedes the flow somewhat when it's open, so maybe an "un-checked" hole should be a bit smaller? You could always start smaller and work your way up until the time it takes to drain is acceptable to you.
 
Last edited:
Here's a good pic of the check. Too bad they don't sell just that check (or maybe they do?). Some shops are trying to get over a c-note for just the gate with check. It'd be like Pentair to hold out on a cheaper part when they can get you for the whole gate. :( So far I've seen that gate by itself costs more than an entire Pentair drain-down valve! I can't find a Jandy drain-down. Maybe only Pentair makes one.

20263_0_2019531144817.jpg
 
Last edited:
I found the answer unexpectedly while looking for something else. It was in the manual for the Hayward heater controller… it specified 1/8” to 1/4” so today I disassembled my valve and drilled a 1/4” hole in the gate, then reassembled and fired up the system.

We will see how it goes. It was heating constantly earlier this week no matter where we set the temp dial, so I tested the temp sensors and both tested bad so I ordered new ones. But now after the hurricane the pool temp is down to 71. This is the first sunny day since the storm, so it will be interesting to see how warm it gets today with constant solar heating.

Link to Hayward manual where I found the answer: https://hayward-pool-assets.com/ass...df/manuals/aquasolar-gl-235 owners-manual.pdf
 
I think a small amount of leakage from a vacuum relief valve is normal. Under zero pressure, there's nothing pushing water out. Under full pressure, the valve is closed and shouldn't leak. But during the interims between no pressure and full pressure, the valve temporarily has water but is not fully closed. My VRVs drip under that condition and I think it's normal.
You may be correct… my input pipe wasn’t able to drain back through the valve, and that’s when the leakage was occurring. I’ve added a hole to the valve gate to allow it to drain back down, so I’ll find out later whether the leakage still occurs.
 
Link to Hayward manual where I found the answer
How in the heck did you find that! Seems like a 1/4" hole (let alone a 1/8") would take forever to drain all the panels you have. I guess you'll find out.

What was the diameter of the hole in your old valve? Hard to tell from the pic...
 
How in the heck did you find that! Seems like a 1/4" hole (let alone a 1/8") would take forever to drain all the panels you have. I guess you'll find out.

What was the diameter of the hole in your old valve? Hard to tell from the pic...
Don’t know how long it took to drain because I wasn’t constantly monitoring it but when I checked it after the heater had turned the 3-way valve off, I eyeballed the roof and the vacuum breaker wasn’t leaking and there was no wetness on the roof to indicate that it had leaked.

I didn’t measure the hole in the old gate but it‘s at least 3/8” and maybe bigger.

I was just reading along in the manual trying to learn more about the controller and there it was!
 
  • Like
Reactions: Dirk
Very informative thread.

I have to get my 6 panel system replaced. It probably lasted 20 years. They are on a wooden bracket mounting system that the original home owner installed. I don't know the condition of the wood or its integrity. If it is good, should I just reuse it?

If not, what is a good mounting bracket system so I can mount these panels to stone-coated metal shingle roofing?
What is the roof standoff made of? If the standoffs are still good You could replace the wood brackets with unistrut and mount the panels to the unistrut. Then you would not need to mess with the roof penatrations
 

Enjoying this content?

Support TFP with a donation.

Give Support
Thread Status
Hello , This thread has been inactive for over 60 days. New postings here are unlikely to be seen or responded to by other members. For better visibility, consider Starting A New Thread.