So...it finally happened...

Rattus Suffocatus

Silver Supporter
Jun 5, 2019
1,657
Corona de Tucson, AZ
Pool Size
14000
Surface
Plaster
Chlorine
Salt Water Generator
SWG Type
CircuPool Universal40
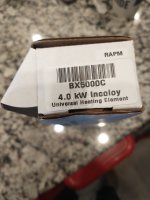
Among three other disasters that happened on a long planned weekend away, my hot tub I think probably has lost it's heating element. (That is most likely but I haven't dug into it yet.) It is popping the GFCI in the Spa Panel.

This was particularly embarrassing as when we were away my across the street neighbor called me because they are buying and adding on a detached hot tub to their pool...and he wanted me to give him recommendations on the wiring job. His house is a mirror image to mine, so he could do exactly what we did (it passed inspection with flying colors). So I looked his stuff over and then I showed him mine.... But when I got to the Spa Panel I noticed that the breaker had popped. I have an external thermometer in there to wirelessly monitor it from the house, and it was only a degree or two down from the set point I put the tub when not in use (91,5F with a 93F set point) so the problem was only a few hours old when the neighbor came over.

Anyway.. it's still a tad bit cold here in Tucson.. probably not enough to worry about, but I don't know if I want to drain the tub yet .... and probably can't work on it for at least two weekends... with a 200+ gallon slug of water there is no way it would freeze, it probably wouldn't even if drained but in that case it probably would be more likely... we are right at the end of the season for that potential... but it's been kinda cold this year here.. so I don't know. I am actually 1000' higher than the fish bowl of Tucson so it does get a little colder at night here.

So should I drain it and try to shop vac it dry or should I try to mix it up once a day and keep the chlorine level up? Luckily it's only 250 gallons, so it's doable... I could drain it down part way, etc. too... I really probably can't seriously fix anything for two weeks at least. (I am actually contemplating calling someone to fix it, because my schedule is so tight now, but I also know I'll get taken if I do...)

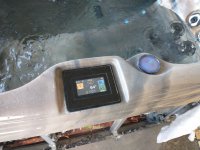
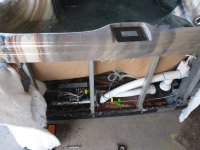
I think it's the heating element as it got to the priming screen on the controller and I was able to run the pumps (both) the first time I reset it-- then right afterwards it tripped. I think the controller retains the setting for an hour or two of no power, so subsequent resets trip almost immediately.

Yes, I know it can be a bad GFCI too.. the tub is probably not even three years old, so I am just a little miffed about it, but I would appreciate sage advice from those who have been through this before. It also could be the ozonator, if if so I'll simply disconnect it for good...

The tub was due for a a water change and ahh-some treatment anyway. I hadn't used it in several months because of a medical issue with my left foot but that JUST healed up (but I was keeping the water fairly good despite not changing it... I wouldn't have gotten into it but there wasn't so much neglect that there was something to damage the element), so I was going to get it going again in maybe 2 weekends doing a through cleaning first. The other disasters are worse. I have a transmission problem that happened on Saturday with my daughter's van for example.

The pool has so much dirt and rocks kicked into it from our dogs and a couple of bad wind storms after we "closed it" (you don't here... even the SWCG stays on) that I am contemplating on hiring the spring cleaning of it out too... 2021 was a BAD year for me. Darn near destroyed me. 2022 isn't much better so far.

Never a dull moment in our household, I swear.

Whatever advice you wizards can give me to keep the water from growing Godzilla in the next several days would be appreciated. I do know if it's the GFCI, I can replace that fast and if it's the heater I can probably run the pumps twice daily with it disconnected but it probably will be a couple of evenings before I can diagnose that...

It's a "American Whirlpool" (MAXX) with Balboa innards in it. I guess asking a for a good source of parts now is apropos.
 
Last edited:
So should I drain it and try to shop vac it dry or should I try to mix it up once a day and keep the chlorine level up?
I wouldn't worry at all about the tub freezing deep enough to matter. The water in the small plumbing however won't have that buffer. So I vote for shop vac. If the plumbing was to burst, you know darn well it would be in the least accessible location.

Sorry for more struggles. :(
 
Well, after looking at some videos, I can't tell you how tempting it is to buy a $30 element even if it isn't the problem this time to have a spare. I still need to at least take to cover off though and see what size it is. (I imagine it's 4 Kw or 4.5 Kw for a 250 gallon tub but who knows?). It doesn't seem like it's a horrible fix to do, honestly.. Still probably the earliest I can do it during daylight hours is Sunday... Sigh.... Yeah if the $30 specials only last two years... meh... It doesn't look like a bad job.. Thanks for the suggestions. For now I think I am going to keep the chlorine level up and use something to stir the pot up. If I can get the pumps to get to the priming screen again, I can blow water through the plumbing once or twice...
 
Lowest temp between now and Sunday... 36F according to the NWS. Well, at least that is good... so yeah.. answering my own questions. I bought a property 51 miles south of here to retire to in maybe 3-5 years... and at 1100' further higher in elevation it's still hitting below freezing there every night (it does that there), but it does have the advantage of rarely topping 100F there... I plan on doing non-disaster weekends there until I retire...

I probably don't have to worry about the occasional short term freeze after all for about 350 more days here in Tucson... we are likely past that.. certainly until Sunday...
Bleach and a broom handle (to stir) it is until the weekend... sigh...

Now to also figure out the transmission problem. I have 4 cars and only two are now operable. I suppose I can get the other car running again... it should only be a dead battery and a fluids change... It's a manual and then I'd have to teach the kids to do that. I don't think I have the patience. We just took possession of that other property and we have some work to do on it. Luckily I got 60% of that done last weekend.... I still have 60% of an estate left to settle and a house in Wisconsin to sell, two weeks at least out in the Midwest between the two)... and work hasn't been so good for several months...

So yeah... I am on critical overload now, and have been for just about 12 months.. I think getting the tub going should be a priority... I NEED TO RELAX, MAN!! :)
 
  • Like
Reactions: Newdude
One random thought about this all.... when I was into beer brewing and was looking to build a RIMS (Recirculating Infusion Mash System) tube, I sure wish I would have known about these tube mount spa elements... they aren't much more expensive than a normal one, and it sure would have made building the tube easier... (a 4KW 230V element at 120V would be 1KW or just about right for that purpose). I figured a couple of you guys would appreciate this thought as I know there are some brewers here. Even buying the complete heater tube would only be slightly more expensive than a homebuilt RIMS and much less than the purpose built ones....

I instead built a PID controlled kettle with a standard water heater element and a spa panel that, of course, is a different brand than the one I was able to buy here in AZ, so I can't even steal the breaker for a quick test... I remember when I had time for hobbies... I kind of miss it.... but why I didn't think "spa element" when I got the "spa panel" means I am not as clever as I thought I was...
 
Since one leg of the heater is turned on as soon as the breaker is turned on, before the priming sequence even starts, I doubt it is the heater. But, as you said, they are cheap and yours is getting close to average lifespan anyway. I'd spring the extra $ for the titanium element. Make sure the element is not touching the inside of the tube or it will burn out.
Since the ozone circuit turns off if a button is pressed, or the jets or light is on, it can lead to trouble tracking it down. It is often the cause of intermittent trips. Unplug it until you figure this out.
Disconnect the heater and it may work even if it is a bad breaker as the amp draw is greatly reduced.
Ultimately, you have to track it down, disconnecting one thing at a time until you find what's causing it.
That tub will not freeze if the pumps are running. In emergencies I will hard-wire the low speed pump to prevent freezing.
 
  • Like
Reactions: Newdude
Okay.. thanks. It was odd that it made it to and through the priming screen the first time though. I did order off an element, if it's not that I will keep it as a spare anyway. I just got the standard one.. Its so easy to change one out in that Balboa design I don't care if I need to do it every 3.5 years.

It'll be a bummer if it's the breaker. Those things are way more pricy than they should be. I'll know when I am home during daylight hours. (which might not be until Sunday unfortunately). Our weather is such now (thankfully it wasn't a month ago) that the water won't freeze regardless, but I am getting in there when I can and stirring up the water at least once a day and keeping the chlorine level a little high. I don't think it's the pumps, that few seconds I ran them they seemed fine. I guess if it is the ozonator then I might be asking on how to remove it entirely. I didn't really want it but it wasn't an option to delete it when I bought the tub. You do bring up a good point of one of the legs being always on the element and not relay switched though.. That would seem to rule out the heater... bummer. But it was still odd that it ran for 25 seconds the first time but trips after maybe 2 seconds subsequent times. Maybe it's the stupid breaker after all....

Thanks for checking in here and putting in good input.
 
It's a bummer not getting home every night until after dark. But I am tripping the GFCI instantly now every time, because I decided to try it again to see if I could again get to the priming screen out in the wee dark hours last night. Not possible.

I actually hope it's the element. (it probably is.) Sigh. I simply can't keep up with all of it in the last year or so... I have been checking the water minimally (TA and Cl) all winter on both the pool and hot tub but not entering into Pool Math. I just looked.. the last time I did a full test on either the pool or the hot tub and entered the data was five months ago. So I probably do deserve this... Good thing I have the open loop portion pretty precise now for both the pool and the tub. The SWCG helps a lot on the pool.

HEY--- At least I now have a "profile banner" here now. :)

I am kind of freaked out about the 240V 50A GFCI and spa panel lack of availability though. I really hope we (the USA) doesn't get into a conflict now, we wouldn't be able to support it because there are no parts available for anything. It's like a wake up call for me, honestly. I am going to start buying and keeping spares for everything. No more "just in time". but heads up if anyone reading this thinks they might need a new GFCI in the next several months or are intending on buying a new detached hot tub.... rush out now in a buying frenzy....there is at least one acceptable option still out there for new panels...
 
Last edited:

Enjoying this content?

Support TFP with a donation.

Give Support
Problem isolated. Heater element. Did not have enough time to do the job before the sun went down and I think I need a new set of skinny open end wrenches to get to it.

My heater did arrive... USPS to the wrong house. Luckily we are on Amazon misdeliveries in our HOA so the neighbor brought it over two days after it supposedly was in my mailbox.

I got a free upgrade to incoloy apparently. I ordered a 4KW element but the tub had a 5.5KW one in it which seems big for a 250 gallon tub. I think the 4KW will be fine.
 

Attachments

  • IMG_20220220_171509087.jpg
    IMG_20220220_171509087.jpg
    286 KB · Views: 15
  • IMG_20220220_163342874.jpg
    IMG_20220220_163342874.jpg
    362 KB · Views: 15
  • IMG_20220220_163219416.jpg
    IMG_20220220_163219416.jpg
    378.7 KB · Views: 15
Hopefully it goes in easy peasy & clears up your issue. Looks like u have some room at least. I dread ever having to work on mine with its tiny access door.
 
Yeah, as long as I can get at everything it should be okay.. it's a lot like doing an oil change on a crowded modern car though.. Just have to figure out when I can take off about three hours during the day to have adequate lighting when I do it.. I have been pretty overscheduled lately (and there is no sign of let up)... I might have been able to do it last night if I had a flat 1/2" wrench similar to the 3/8" one I found... I will try to take pictures throughout the process to show how it's done for others. It's not conceptually difficult and probably wont be physically difficult once I figure out how to remove it from the controller.
 
Yeah, as long as I can get at everything it should be okay.. it's a lot like doing an oil change on a crowded modern car though.. Just have to figure out when I can take off about three hours during the day to have adequate lighting when I do it.. I have been pretty overscheduled lately (and there is no sign of let up)... I might have been able to do it last night if I had a flat 1/2" wrench similar to the 3/8" one I found... I will try to take pictures throughout the process to show how it's done for others. It's not conceptually difficult and probably wont be physically difficult once I figure out how to remove it from the controller.
With easy access it's a 30 minute job. Balboa packs are easy to work on. Your biggest issue is the fact that you have no valves, so must drain it or get everything wet. If you have enough play on the pipes you can plug them, but getting the gaskets to seat in a fitting gushing water is tricky. And everything, including you, will get soaked.
Once you've dealt with that issue, just disconnect the heater at the element terminals. (Use a thin wrench or pliers under the copper tab to prevent twisting the terminal, which will ruin the new element.) Then unplug the two sensors from the board and loosen the 2 heater tube mounts on top and bottom. Unscrew the black union nuts on each end of the heater tube and pull it out.
Remove both sensors from heater tube to avoid damage and get them out of the way. Unscrew the black nuts on the heater tube and remove the sensors. If it sticks, push it from inside the tube with a screwdriver, do not pull on sensor wire. Keep track of the o-rings. They usually stay on the sensor, but have been known to stick to the fitting.
Remove the 2 element mounting nuts on the heater and push the terminals into the heater to remove element. Sometimes it won't fit and I cut off terminal tips to remove eaily. The new one will fit.
MAKE SURE O-RINGS ARE ON ELEMENT BEFORE INSTALLING IN TUBE!!!.They go on the inside folks! And make sure the old ones arent stuck inside the heater tube. I clean this area with a wire brush through the terminal holes as well. Remove the big nut on the element but leave the nut on the small terminal to protect the threads. Insert element into tube and guide into place so terminals line up with holes. A pair of needlenose can be helpful, but don't scratch the coating on the element. Wrap the tips with tape if need be. Once lined up, turn heater so element terminals fall into holes. You may have to encourage them a bit. Place large nuts finger tight on posts.
Now for the part everyone messes up...
When tightening the nuts the element will twist in the tube. If the element is touching the tube anywhere other than the mounting flange it will burn out. I insert a large screwdriver into the tube on the side it twists toward to hold it while I tighten the nuts. If you remove it and the element still touches START OVER, loosen both nuts, and tighten the other nut first. Do not bend the element once the nuts are tight.
Install sensors and inspect clearances. If the element touches either sensor, loosen mounting nuts and retighten.
Reverse the process to install tube. The sensor on the right side of the heater is sensor "A" in your case.
HOLD THE HEATER TERMINAL BELOW THE TAB AND NUT WHILE TIGHTENING THE TERMINAL TO AVOID TWISTING THE TERMINAL. That's right, all caps and I mentioned it twice! Nothing sucks worse than getting done just to ruin it on the last nut. Don't ask how I know... 😉
 
  • Like
Reactions: Mdragger88
Yeah.. sorry.. there are two gate valves on the tub... they are just a bit farther away from the pack than most of the pictures and videos of other tubs I've seen. One is tucked behind the white insulation on the left, and the other is about 2 feet away on the right. (I'll post a picture later.) They are not right by the pack on that tub, unlike most I've seen online, which is a tad bit bizarre. I had something get sucked up into pump one (while cleaning the tub and changing water.. crud happens) a couple of years ago so I've had it apart once before. Could have contributed to the element failure, though I caught it immediately when it happened so probably not.

So I shouldn't have to drain the tub, but I probably will anyway since it's about 4 months overdue. I had a foot ulcer that had to heal, took awhile... so I was just about to start using it again. My kids have a pool and a spa and can't be bothered to swim instead of playing video games (or in my daughter's case working... 17 going on 40, I swear).. so I really am the only one who routinely uses the tub. My wife joins me occasionally, but typically doesn't go it alone. So I just kept the water within safe range this whole time but didn't change it since it really wasn't being used for about the last 6 months. That will change shortly.

I didn't have a readily available flat 1/2" wrench (but found a 3/8" flattie) so that and the fact I didn't get home on Sunday until after 3:30 PM precluded me from finishing the job. It's 30 minutes for you but since this is my first, I better allow 90-120 minutes. I do have the element disconnected at the terminals (and wrapped with electrical tape currently) since I couldn't see the release on the automotive style connector on the pack and didn't want to break it. I don't need to disconnect it anyway to do the job. Yeah I didn't hold the tube nut on the bad element when I broke the wire loose but I know better on the good one.

Maxx has fluorescent marking goo on everything for warranty (which has expired). That is going to be one of my "it's going to take longer than 30 minutes" issues I am sure... Sharpie marks on the unions that had to line up (or be taken off with lacquer thinner and redrawn on it during the "suck up" incident when it was still under warranty.... but lets not talk about that)... all sorts of Crud to keep you from working on it as an owner apparently.

Your instructions are excellent, there are tips I didn't see in the best YouTube videos. The instructions that came with the element said a lot of that, and even gives torque specs. I am going to feel decidedly unprofessional guessing these torque values. :) I definitely will mark one of the sensors so I don't get them backwards.. that is a great thought. That and the ALL caps.. I do understand that all of the people online complaining that the new element only lasted six months didn't understand that they cracked it during install. I do. The torque specs on the new element are 20 in/lbs for the O-ringed mounting nut and 15 in lbs for the element connection, so not much force is needed.

The insulating material at the tabs is epoxy, so it does look like that would be easy to break. I am betting it is also what failed on my element. I suspect that is why there was a delay the second time the GFCI tripped... it wasn't until the pump turned on that the electrons leaked out that time.....
 
Made a little progress yesterday. Had a root canal done at noon, and got home much later from that than in the schedule. Like after 4 pm. I closed those two gate valves... And apparently there must be at least one more somewhere for jet pump #2 on the tub. So as @RDspaguy predicted it was a wet mess and I ultimately ended up draining the tub. By the time I got the tube out my neighbor who got his hot tub yesterday was also asking me how to fix his gate which the hot tub delivery guy broke 2/3 of the bolts on. So I stopped there and drilled out and filled cinder block.

But at about 3AM I couldn't stop dreaming about mounting the element, so I went down stairs and did it.

I was partially wrong about the torque specs. It was 15 ft/lbs for mounting the element in the tube and then 20 in/lbs for connecting the electrical. The old element did not look horrible but the orings were starting to fail and there was brown goo and some corrosion on the terminals.

So as long as I didn't get too much water in the pack from the wet mess I should be fine. It's freezing out there now though so I might wait another hour to reassemble. Debating not filling it until next weekend though as I will be too busy this week to probably use it. New element installed. I mounted it by gently keeping it in place with my fingers while I turned the nuts down 1/16th of a turn. Gingerly seems to be the modus operendi here. I probably am not at 15 ft/lbs on the element but it is solid and will hold. I put o ring grease on the new (internally mounted) orings.

IMG_20220226_085017669~2.jpg
I left the bad element at the neighbors, will try to get it today to put a picture here for reference.
 
I think I have it together. I had to go out and buy a 1/4" wrench, so I just bought a whole set... Doubled the cost of the job to just under $50. It's harder than doing brake rotors but easier than most coolant repairs on a car. It would be super easy to do but it's a pita to get at everything to do it, and in my case everything was way over tightened from the factory, making it annoyingly difficult.

You need a 3/8" and 1/4" flat set to do the job. I am not going to finish and refill until at least next weekend. Have no time next week to use it anyway.

But here are some more pictures of me messing with it over the last two days. Still if I need to do it again, next time it'll be a two hour job on my tub max. The second pump gate valve shutoff is in an inaccessible location without moving the tub place, so it's always going to be a drain for me.

If your tub is placed and/or configured better than mine it conceivably be a half hour job like stated earlier in the thread.

I did get a couple pictures of the old element corroded from the inside out at the connection. I am an advocate for replacing the element rather than the tube because even the cheap replacements are better quality than the cheap quality originals in the tubes.
IMG_20220226_102151237.jpg

IMG_20220226_093006007_HDR.jpgIMG_20220226_102157419.jpgIMG_20220226_121707549.jpg
 
Last edited:
  • Like
Reactions: Mdragger88
Thread Status
Hello , This thread has been inactive for over 60 days. New postings here are unlikely to be seen or responded to by other members. For better visibility, consider Starting A New Thread.