Small leak from glued elbow: patch or replace?

Ignoramus

Gold Supporter
Silver Supporter
Sep 28, 2022
128
North Houston, TX
Pool Size
24000
Surface
Plaster
Chlorine
Liquid Chlorine
Since I already got the pump out, I would like to collect everyone's opinion on the best course of action.

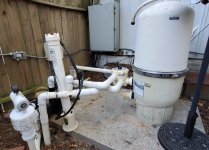
Glued-un elbow just downstream from the pump has a small leak. I have verified that the leak is from the elbow. It is upper glued joint in the picture; lower one is pump union joint.

Dad said i can either patch it with fiberglass wrap or replace pipe section between the pump and filter.

What is the best way to go? Please share your input.

And if I'm replacing pipe, I might get rid of 3-elbow maze of a return section after MPV. Please comment on that, too.

Thank you!
Ig
20231127_122744.jpg20231127_122756.jpg
 
Since I already got the pump out, I would like to collect everyone's opinion on the best course of action.

Glued-un elbow just downstream from the pump has a small leak. I have verified that the leak is from the elbow. It is upper glued joint in the picture; lower one is pump union joint.

Dad said i can either patch it with fiberglass wrap or replace pipe section between the pump and filter.

What is the best way to go? Please share your input.

And if I'm replacing pipe, I might get rid of 3-elbow maze of a return section after MPV. Please comment on that, too.

Thank you!
Ig
View attachment 542805View attachment 542806
Replace any broken PVC joints. Those above are being generous with how long fiberglass patch will last. I wouldn’t give it 5 minutes.
 
  • Like
Reactions: Ignoramus and Dirk
And if I'm replacing pipe, I might get rid of 3-elbow maze of a return section after MPV. Please comment on that, too.
If you're out there cutting pipe already...... it's cheap to replace other things while you're at it. And at least in my case, 4 years from now when I need the glue and primer again, I can't get the primer open, the glue is spongy and I have to replace both. You might as well save that $15 now.
 
BTW, if you lose the "RETURN" label, that's fine. That's not really your return, since that pipe is not yet "returning" to the pool. Typically you'd use that label on one or more pipes that head directly to a return in the pool, not a pipe heading into your filter. It would be used to differentiate a return pipe from a pipe leading to a pressure-side vacuum cleaner, or a spa or a water feature (water fall, water slide, etc).

The arrow is what's important, which you could recreate with a Sharpie.

PS: I like to see as few elbows as possible, and of those I like to use sweep 90s. It matters little with a one-speed pump, but someday you're going to own a variable speed pump, so improving flow (reducing head) can be beneficial. It won't make a significant difference in energy costs over the life of your pool, but it will make some difference.

PPS: A probable cause for that leak was the stress the torque of the pump was putting on that joint, particularly when the pump first fires up each day. Be sure the pump is bolted down tight.
 
Last edited:
Thank you for the input, everyone!
You give me courage and knowledge to push forward.
I'm grateful!
PVC is cheap. A glue joint (or a fiberglass patch) giving way while you are on a week-long vacation is not. Do it right, do it once.
That's my thinking, too. I needed justification, I guess.
If you're out there cutting pipe already...... it's cheap to replace other things while you're at it.
Would it make sense to replace entire section between the pump and MPV
BTW, if you lose the "RETURN" label, that's fine.
The labels were put on in compliance with county inspection requirements: name labels and arrows. I will just replace them.
That's not really your return, since that pipe is not yet "returning" to the pool. Typically you'd use that label on one or more pipes that head directly to a return in the pool, not a pipe heading into your filter. It would be used to differentiate a return pipe from a pipe leading to a pressure-side vacuum cleaner, or a spa or a water feature (water fall, water slide, etc).
Booster pump connection is on that section, just after the flowmeter, facing down.
The arrow is what's important, which you could recreate with a Sharpie.
Inspector will want a label, and I'll get another one.
PS: I like to see as few elbows as possible, and of those I like to use sweep 90s. It matters little with a one-speed pump, but someday you're going to own a variable speed pump, so improving flow (reducing head) can be beneficial. It won't make a significant difference in energy costs over the life of your pool, but it will make some difference.
I have some training in hydrodynamics, and all those elbows bothered me from the day I beheld this equipment pad. At that time, it was almost the only thing I understood, but my hands had been itching ever since. Especially the 3 elbow combo - 90, 90, 135 nstead of single 135°, - on the true return line; on the plumbing photo, it is beneath pump-MPV line.
PPS: ... Be sure the pump is bolted down tight.
😳!!! Nothing on the pad is bolted down. I had
wondered about that, too, but didn't ask. An ignoramus I truly am 🥵😁
Good thing I bought hammer drill recently

Thanks again!
Grateful Ig
 
Thank you for the input, everyone!
You give me courage and knowledge to push forward.
I'm grateful!

That's my thinking, too. I needed justification, I guess.

Would it make sense to replace entire section between the pump and MPV

The labels were put on in compliance with county inspection requirements: name labels and arrows. I will just replace them.

Booster pump connection is on that section, just after the flowmeter, facing down.

Inspector will want a label, and I'll get another one.

I have some training in hydrodynamics, and all those elbows bothered me from the day I beheld this equipment pad. At that time, it was almost the only thing I understood, but my hands had been itching ever since. Especially the 3 elbow combo - 90, 90, 135 nstead of single 135°, - on the true return line; on the plumbing photo, it is beneath pump-MPV line.

😳!!! Nothing on the pad is bolted down. I had
wondered about that, too, but didn't ask. An ignoramus I truly am 🥵😁
Good thing I bought hammer drill recently

Thanks again!
Grateful Ig
While you're doing this, move your flow meter to a pipe after the filter. They get easily clogged with un-filtered water.
 
  • Like
Reactions: Ignoramus and Dirk
Nothing on the pad is bolted down.
That explains the leak. Basically the glue of that fitting was taking on all the twisting torque of that motor, every time it slammed into full-RPM mode. It's pretty impressive it lasted as long as it did!
 
  • Like
Reactions: Ignoramus
While you're doing this, move your flow meter to a pipe after the filter. They get easily clogged with un-filtered water.
Good tip, that never occurred to me. I'll have to check on mine, as it is in front of my filter. There is no other place it could go, but you're right, it shouldn't be before the filter. I should pop mine open and see how it's doing. I have a suction-side vac, so my FlowVis is subjected to that gunk, too. Though I expect a FlowVis (which is just a modified Jandy check valve) might be less prone to dirt than the style that Iggy has.
 

Enjoying this content?

Support TFP with a donation.

Give Support
Would it make sense to replace entire section between the pump and MPV
If there's anything that needs doing, nows the time. Also consider future you needing to dismantle anything and smack unions in there while you're at it. (y)
 
  • Like
Reactions: Ignoramus
While you're doing this, move your flow meter to a pipe after the filter. They get easily clogged with un-filtered water.
Great idea! That flow meter is the reason I have dedicated pair pliers in my "filter toolbox". It gets stuck once a month or so.
That explains the leak. Basically the glue of that fitting was taking on all the twisting torque of that motor, every time it slammed into full-RPM mode. It's pretty impressive it lasted as long as it did!
It's been leaking for a while, although it is a tiny bit - during 4 hours pump run there's not enough water leaked to drip down to pump union.

The joint could have been fresh, replaced just before I got my paws on it.

I expect a FlowVis (which is just a modified Jandy check valve) might be less prone to dirt than the style that Iggy has.
I think there is a check valve in true return line. So it it fails, I could replace it (and that flowmeter) with one FlowVis, right?
I'm attaching pics of the entire system from that side and of what I think is a check valve.
If there's anything that needs doing, nows the time. Also consider future you needing to dismantle anything and smack unions in there while you're at it. (y)
DEFINITELY! Dad's system has unions everywhere and it's sooo much easier to work on.

Thank you all!
Grateful Ig
20231207_091657.jpg20231207_091708.jpg
 
  • Like
Reactions: Newdude
DEFINITELY! Dad's system has unions everywhere and it's sooo much easier to work on.
Just be aware that every union is an o-ring waiting to fail. I'm not saying it'll happen, or happen often, just don't go crazy with them.

Another strategy is to think ahead about replacement of anything/everything and plot out devices and fittings accordingly. For each device and fitting, ask yourself, if I had to replace this, is there enough PVC pipe between it and the two adjacent things to cut it out and then put it all back together with couplers? Then adjust your layout to be able to do that as many times as is practical. I'd use unions only for things that had a high probability of having to come out for repair or replacement, like a pump.

Your plumbing is a typical example where that wasn't always done. Which you're going to run into with this project. Many of your fittings or devices are jammed up against each other, and you'll have to cut out more than one to get to enough pipe to splice something else in.
 
Last edited:
I think there is a check valve in true return line. So it it fails, I could replace it (and that flowmeter) with one FlowVis, right?
I'm not sure I'm seeing a check valve. Unless you have some odd bypasses or such, a flow meter can go anywhere in your circuit. Flow is constant throughout, so you'll get the same reading no matter where the meter is. But as 1poolman1 points out, it's best after the filter.

Or is it? One consideration is the multi-valve. With a flow meter before the filter, flow could be monitored for any position of the multi-valve. With it after the filter, that might no longer be true. I don't have a multi-valve, so I have no idea if that's something you'd ever want to be able to do. Maybe only the flush-to-waste path would be out of the loop, which probably wouldn't matter. Just think it through (better than I can).

I'm not even sure which of your gizmos is your flow meter, but I suspect a FlowVis would not be subjected to collecting dirt like yours does. If you study one, you'd see why. There's really not much to get gunked up, the water flows right through it and it's probably mostly self-cleaning.

Another consideration: any plans for an SWG, or a solar heater? Now's the time to plan ahead. The SWG would be the very last thing, just before returning to the pool. A solar heater's pipes would exit and reenter between the filter and the SWG. Solar heating makes use of a check valve or two, and a FlowVis can serve as one of them.

Here's a good example of the point I was making above. You might not know, now, exactly the best place for a new FlowVis, so you'd want to install it such that there was plenty of pipe on either side of it. That way you could later cut it out, relocated it, and use couplers to glue it back in. If you have the FlowVis jammed up to a fitting or other device, that could complicate moving it.
 
Last edited:
  • Like
Reactions: Ignoramus
Just be aware that every union is an o-ring waiting to fail. I'm not saying it'll happen, or happen often, just don't go crazy with them.

Another strategy is to think ahead about replacement of anything/everything and plot out devices and fittings accordingly. For each device and fitting, ask yourself, if I had to replace this, is there enough PVC pipe between it and the two adjacent things to cut it out and then put back it all back together with couplers. Then adjust your layout to be able to do that as many times as is practical. I'd use unions only for things that had a high probability of having to come out for repair or replacement, like a pump.

Your plumbing is a typical example where that wasn't always done. Which you're going to run into with this project. Many of your fittings or devices are jammed up against each other, and you'll have to cut out more than one to get to enough pipe to splice something else in.
This is something to consider. I put unions on a few things that I figured could be replaced easier, but then found the fitting sizes at home depot changed after a couple years and so I ended up having to cut a union off and replace it anyway because I couldn’t get a new 1/2 union to match what I had.
 
  • Wow
  • Like
Reactions: Newdude and Dirk
This is something to consider. I put unions on a few things that I figured could be replaced easier, but then found the fitting sizes at home depot changed after a couple years and so I ended up having to cut a union off and replace it anyway because I couldn’t get a new 1/2 union to match what I had.
Great point. Leaving room for couplers, instead of unions, is going to be more reliable.
 
  • Like
Reactions: Ignoramus
I'm not sure I'm seeing a check valve.
I think this one is it - when I was making sure all pipes are clear, I could easily push pipe cleaner to the left, but I couldn't feel the way to the right from the black plug in the center.
20231207_091607~2.jpg
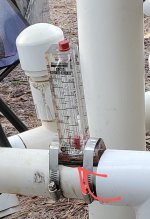
I'm not even sure which of your gizmos is your flow meter,
Here's zoom into flow meter
20231207_143626~2.jpg
 
I think this one is it - when I was making sure all pipes are clear, I could easily push pipe cleaner to the left, but I couldn't feel the way to the right from the black plug in the center.
View attachment 543665
That’s an odd looking check valve if it actually is one.
 
  • Like
Reactions: Ignoramus
Just be aware that every union is an o-ring waiting to fail. I'm not saying it'll happen, or happen often, just don't go crazy with them.
I'm going to draft a diagram of the plumbing system with o-ring locations and laminate it for whoever keeps the pool after me. And I'm going to keep inventory of replacement o-rings for each location: they a dime a dozen at Grainger, I just need to systematize sizes (I have a bunch of scribbled notes with measurements of each OEM o-ring I got new).

I think I'd want to have a union between pump and flowmeter and then between flowmeter and mpv, and unions between MPV and actual return line going into the ground. Right now I have MPV hard plumbed in. And I'm not sure where to cut the pipe to replace leaking elbow. Pump is the only thing that has unions (4 of them, in fact).
20231127_122756~3.jpg
It looks like i should do some 2d or 3d modeling to determine the best layout given locations of the pool and backwash lines.
...fitting sizes at home depot changed after a couple years and so I ended up having to cut a union off and replace it anyway because I couldn’t get a new 1/2 union to match what I had.
Ouch! I'll stock up on spares.
Great point. Leaving room for couplers, instead of unions, is going to be more reliable.
I'll try to do both. Leave room and have unions in strategic places.

Thank you very much, everyone!
Your help is greatly appreciated
Ig
 

Enjoying this content?

Support TFP with a donation.

Give Support
Thread Status
Hello , This thread has been inactive for over 60 days. New postings here are unlikely to be seen or responded to by other members. For better visibility, consider Starting A New Thread.