SF Bay Area build (done!!!)

Day 2 the euphoria of the new deck has worn off and I am being more critical.

Here are the "bad" shots to share.

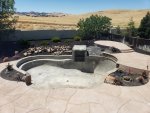
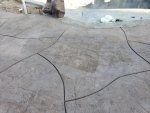
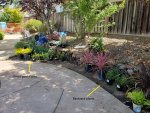
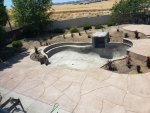
(1) I didn't have budget to rip out and redo ALL my existing concrete. You couldn't tell yesterday but here is the reverse angle with those images.
*Edit*
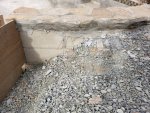
The covered patio outline (install 1 week away) is roughly the transition from old/new concrete
Over 600 sq feet of old concrete would have kicked my budget up another 10k for removal and replacement so this was a compromise we knew going in wouldn't look perfect

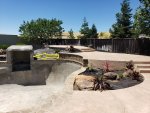
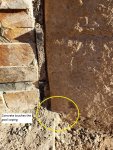
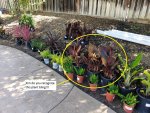
(2) I found 1 spot where I can clearly see the square outline of the texture mat. It is right on the main walking path near my handrail boulders. The only one I saw on the entire patio and it is in the high traffic area. Uggg

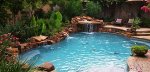
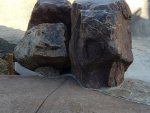
(3) Here is a close up of the coping boulders. Hoping we did enough to keep the patio away so it doesn't settle or heave or anything and bump the boulders around

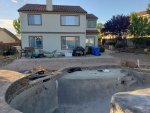
And here is the forecast for the concrete patio curing. Was advised NOT to spray with hose and just let cure naturally due to potential to mottle the coloring. Trading increase durability for aesthetics basically.
 

Attachments

  • Decking poured (5).jpg
    Decking poured (5).jpg
    277.4 KB · Views: 82
  • Decking poured (6).jpg
    Decking poured (6).jpg
    247 KB · Views: 86
  • Decking poured (7).jpg
    Decking poured (7).jpg
    287.1 KB · Views: 84
  • Decking poured (8).jpg
    Decking poured (8).jpg
    244.2 KB · Views: 84
  • Weather for curing.jpg
    Weather for curing.jpg
    78.9 KB · Views: 78
Last edited:
And the wall of Crud is still an issue...

After closer inspection this morning I see we failed

The concrete deck physically touches my coping. The coping is the weaker of the 2 items and will move.

As best I can tell from pre concrete images it is no more than 1 foot of contact. There was gravel formed in a slope before the pour was done


Need ideas for a solution. Is it possible to chip that portion out where it touches? I'll bang away with a chisel if I have to and follow the curve.
 

Attachments

  • Decking poured (9).jpg
    Decking poured (9).jpg
    412.7 KB · Views: 65
  • Decking poured (1).jpg
    Decking poured (1).jpg
    385.9 KB · Views: 64
Last edited:
The different areas look just fine! No one else will even notice it!! All they will see is your petty pool and area around it! As for that one spot I wonder what a light bleach mix will do to it and brushed good. I have another idea if that does not work.

For the wall of crud I am going to call in someone who may be able to give you some ideas. @bdavis466


Kim:kim:
 
Spoke with LS and he agrees need to fix. wants to let the concrete cure more before we address it.

said possible to drill it out and create the separation needed

my google research showed concrete chainsaws can also do horizontal style cuts to achieve the same results


so long as it gets fixed i am fine
 
Landscaping continues at a rapid pace.

My rock wall was installed early this morning and then plants showed up around lunch.

I have a 2 man crew on site just tinkering away. Every time I walk outside something new is done.

After they left I noticed the dry river bed is starting to take shape.

I just need to get my pool crew out to finish the water features and grotto now.

Soon as 4th of July is over I expect full speed ahead on pool again!!
 

Attachments

  • rock wall and plants (1).jpg
    rock wall and plants (1).jpg
    291.8 KB · Views: 71
  • rock wall and plants (2).jpg
    rock wall and plants (2).jpg
    357.9 KB · Views: 83
  • rock wall and plants (3).jpg
    rock wall and plants (3).jpg
    379.7 KB · Views: 82
  • rock wall and plants (4).jpg
    rock wall and plants (4).jpg
    366.3 KB · Views: 82
  • rock wall and plants (5).jpg
    rock wall and plants (5).jpg
    386.1 KB · Views: 72
I am SO in love with it all!!!! I see my BLING plants!!! The nursery trip is planned for next week for me!!! I found some pretty pots I want to put them in. Now I just need to find them! I have their names written down and ready to go!!!

That whole yard is going to be amazing!!

Kim:kim:
 
  • Like
Reactions: NorCalX
NorCalX,

Just an FYI on those Canna's, they are a Rizome, I.E. they spread by root system. keep this in mind and thin them every year at the end of the growing season. The nodes you dig out can be potted and when you have plants a foot or two tall be planted as replacements or new areas.

Looking great!!!

John
 
  • Like
Reactions: NorCalX
Yea.... Let's get that grotto going... Can't wait to see it.. Did you consider the sprayer inside the Grotto ?
Yes we discussed and are trying to figure how to get one that doesn't bump our heads when not in use.

i suggested pop up sprinkler type of system (or telescoping bubbler...whatever analogy you preder). Put 1 in each side wall

PB needed to figure out how it would work before diving in.

The other item is what details i want for the interior of the grotto. We do not want tile everywhere. We dont want ledger stone either. PB proposed smooth stucco as an alternative and we are tempted.
 
NorCalX,

Just an FYI on those Canna's, they are a Rizome, I.E. they spread by root system. keep this in mind and thin them every year at the end of the growing season. The nodes you dig out can be potted and when you have plants a foot or two tall be planted as replacements or new areas.

Looking great!!!

John
I have no clue about plants.

i told my LS i am going to need an instruction manual for all of these when the project is over.

I think i have to cut back many of these plants in winter and they sprout like good weeds in spring
 

Enjoying this content?

Support TFP with a donation.

Give Support
Yes we discussed and are trying to figure how to get one that doesn't bump our heads when not in use.

i suggested pop up sprinkler type of system (or telescoping bubbler...whatever analogy you preder). Put 1 in each side wall

PB needed to figure out how it would work before diving in.

I would definitely prefer some type of short hose and sprayer, However I could hide this behind some rocks in my grotto where yours is definitely different. So getting the details worked out might be a bit tricky.. It would just be nice to be able to knock down a few spiders and such whenever I was in there..


The other item is what details i want for the interior of the grotto. We do not want tile everywhere. We dont want ledger stone either. PB proposed smooth stucco as an alternative and we are tempted.

I was wondering how you were going to finish the inside . Definitely not tile unless they make a rock face tile... I would be a bit worried about how stucco would hold up inside the Grotto, but that might be the best look...
 
  • Like
Reactions: NorCalX
Have you considered just a different pebble tec in there?
was under the impression pebbletec had to be submerged

to clarify i am talking about the finish for above the water area of grotto (side walls and ceiling basically)

below the waterline will be pebble finish


also this is the one area my PB is not an "expert' and we do lots of confirmation on what will be done.

so please dont hold back any comments or criticism bc it is greatly needed.

*sorry for all the edits i am on my phone trying to reply while playing fetch with the dog
 
Last edited:
Rough plant placement today. LS will do final install next week but told us to put things where we think we want them and he will adjust when he comes.

We have no idea about plants and are randomly thinking where things go. Then we have to google the full size and rethink things.

At least 2 of the new plants are happy in the new home.

One hibiscus and one canna tropicana bloomed today.
 

Attachments

  • Plant placement (1).jpg
    Plant placement (1).jpg
    309.2 KB · Views: 35
  • Plant placement (2).jpg
    Plant placement (2).jpg
    358.8 KB · Views: 49
  • Plant placement (3).jpg
    Plant placement (3).jpg
    299.2 KB · Views: 51
was under the impression pebbletec had to be submerged
Not sure on that one. I know they wanted to do our beach entry in pebbletec when we were considering a beach entry. So I assumed it could survive outside the water. If no experts reply here you could try another post with a appropriate title.
 
It has been 1 week since concrete pour so I am letting my dog explore finally.

I think she dog approves of the new landscaping project.

I enjoyed just watching her go around and investigate all the changes.

I know some of the plants are toxic to animals (and children) if eaten but she has never been a forager and I keep an eye on her.

I find it funny how everyone is drawn to this canna tropicana.

Even dogs...

And yes it has been moved liked 4 or 5 times in all the pictures I am sharing. This is just the "current" location

I have 3 of them but this is the only bloomer. I keep joking this is the extrovert social flower making itself at home while the others are taking time to settle in

The hibiscus that bloomed is on the left and the flower is already wilted and gone. That is a short time period to enjoy the beauty

Plant placement (4).jpg
 
Design change needed.

After LS work this lovely slope is an engineering disaster waiting to happen.

I see drainage and flooding and mudslide potential.

My wife agrees so we are going to fix it.

The question is how.

Option 1 is beef up the boulder work for the grotto and extend it like a wall until it hits the block wall

Option 2 is extend the block wall all the way into the grotto.

Both of these options let me backfill and change the elevation and slope so it goes AWAY from the pool. Will also give enough elevation to put drainage as well

I included some sample pictures I found that implemented options 1/2

We are currently leaning towards OPTION 2 as it seems the simpler and more effective way to accomplish our goal

Any thoughts or feedback?
 

Attachments

  • rock work (2).jpg
    rock work (2).jpg
    272.9 KB · Views: 75
  • rock work (3).jpg
    rock work (3).jpg
    292.3 KB · Views: 78
  • Grotto in progress2.jpg
    Grotto in progress2.jpg
    257.4 KB · Views: 75
  • Sample6X.jpg
    Sample6X.jpg
    52.2 KB · Views: 69

Enjoying this content?

Support TFP with a donation.

Give Support
Thread Status
Hello , This thread has been inactive for over 60 days. New postings here are unlikely to be seen or responded to by other members. For better visibility, consider Starting A New Thread.