
Replacing Liner, Foam Board****Now Done w/Pictures
- Thread starter rob.mwpropane
- Start date
You are using an out of date browser. It may not display this or other websites correctly.
You should upgrade or use an alternative browser.
You should upgrade or use an alternative browser.
So just wanted to thank everyone for their responses. My wife and I started putting in 1" foam from home depot over the weekend. Not too bad. They had a coupon for $25 off, + $25 off for getting a credit card. Also used a gift card I've had in my wallet forever. $300 for 15 sheets (minus the discounts).
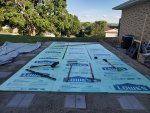
15 sheets is going to work perfect for 32x16 apg.
I'm about 90% done the foam, then need to add the foam cove and liner, then start filling. So far it looks pretty good, way better than it did before. I had used only sand before but after about a week the bottom was all lumpy (I'm sure it was my fault being my first pool install). I had a lot of extra sand that I had to shovel out, that itself took 2 days Shoveling, leveling, tamping, repeat. ~ 4 hr days. Stopped when it got too hot to be working outside on my days off!
I will say if I could give anyone pointers, it was a lot easier to work with wet sand as opposed to dry. I know that's not something new, but I was 1/2 through leveling and it was getting hot and I couldn't figure out why it was getting harder to get things right than it had been that morning. Then I remembered wet sand was easier to level. Could of saved myself at least an hr that day.
I used gorilla tape and taped each seam 3 times, we'll see how that does. I'm thinking I might go over it more with regular duct tape. Does anyone have a recommendation on how many layers of tape to avoid the seams?
Will try and post some pictures when I get some together.
Thanks.
15 sheets is going to work perfect for 32x16 apg.
I'm about 90% done the foam, then need to add the foam cove and liner, then start filling. So far it looks pretty good, way better than it did before. I had used only sand before but after about a week the bottom was all lumpy (I'm sure it was my fault being my first pool install). I had a lot of extra sand that I had to shovel out, that itself took 2 days
Shoveling, leveling, tamping, repeat. ~ 4 hr days. Stopped when it got too hot to be working outside on my days off!I will say if I could give anyone pointers, it was a lot easier to work with wet sand as opposed to dry. I know that's not something new, but I was 1/2 through leveling and it was getting hot and I couldn't figure out why it was getting harder to get things right than it had been that morning. Then I remembered wet sand was easier to level. Could of saved myself at least an hr that day.
I used gorilla tape and taped each seam 3 times, we'll see how that does. I'm thinking I might go over it more with regular duct tape. Does anyone have a recommendation on how many layers of tape to avoid the seams?
Will try and post some pictures when I get some together.
Thanks.
i did 2 layers with gorilla tape. it just about tore my shoulders apart. I think it was over kill. One layer probably would have worked.
Gesh, I only used 1 roll of tape. Got them taped about one and half times. Good work though!So just wanted to thank everyone for their responses. My wife and I started putting in 1" foam from home depot over the weekend. Not too bad. They had a coupon for $25 off, + $25 off for getting a credit card. Also used a gift card I've had in my wallet forever. $300 for 15 sheets (minus the discounts).
15 sheets is going to work perfect for 32x16 apg.
I'm about 90% done the foam, then need to add the foam cove and liner, then start filling. So far it looks pretty good, way better than it did before. I had used only sand before but after about a week the bottom was all lumpy (I'm sure it was my fault being my first pool install). I had a lot of extra sand that I had to shovel out, that itself took 2 days
I will say if I could give anyone pointers, it was a lot easier to work with wet sand as opposed to dry. I know that's not something new, but I was 1/2 through leveling and it was getting hot and I couldn't figure out why it was getting harder to get things right than it had been that morning. Then I remembered wet sand was easier to level. Could of saved myself at least an hr that day.
I used gorilla tape and taped each seam 3 times, we'll see how that does. I'm thinking I might go over it more with regular duct tape. Does anyone have a recommendation on how many layers of tape to avoid the seams?
Will try and post some pictures when I get some together.
Thanks.
1” foamular xps from homedepotWhat foam are you using, I don’t think I wanted anymore thickness then 1 inch
i did 2 layers with gorilla tape. it just about tore my shoulders apart. I think it was over kill. One layer probably would have worked.
Gesh, I only used 1 roll of tape. Got them taped about one and half times. Good work though!
I think we've gone through 3 rolls of gorilla tape, at least 3 layers offset on each seam. Not to mention regular duct tape for odds and ends. It was good work. My wife helped, so it was fun.
Finally got the liner started yesterday afternoon. It was looking really good then the clouds moved in and without the sun I couldn't get the wrinkles out, so we made sure the wall wouldn't blow over and called it a night. So far it feels really good. Fingers crossed today's rain doesn't do any damage
Ok, so I wanted to update this thread in case anyone wanted to follow along. This was a much bigger undertaking than I had originally thought (it always is isn't it?). First I bought the foam board (1"). It's big, thick and expensive ($20 sheet). My 30' x 15' pool took 14 sheets. I'm not sure if I could of gotten away with 1/2" or not. 1/2" is pretty flimsy, and 3/4" wasn't at the local Home Depot.
Getting the old liner out was pretty easy. Just cut it and let it drain, tear it out. I had to remove a good bit of sand to get down to where I wanted the foam to be, so that was a pain. Actually getting the foam in the pool and starting to lay out was time consuming, especially when I got around the sides. Every piece that had to be cut took a while. I think the foam took 2 afternoons after work. I opted to add the wall foam and got the foam coping to go around the corners for a nice clean finish (I hoped).
So here comes the kicker, start to get the liner in and everything was going well. We opted to stop for the night. I've never done a new liner (mine was used when we acquired the pool), but it said best to install when the sun is out to help with wrinkles. So we stopped. The next day it rained, and rained, and rained. A wall of the pool was pulled out of the track and knocked down, and to top it off the water got under the foam and eroded a good bit of sand.....so basically it was an s show. Removed the liner, fixed the wall, had to cut the tape, pull a lot (not all) of the foam boards up and re-level the sand....another day wasted.
Finally came the point where it was nice out and we could complete the liner. My wife an I woke up early and got to it on a Saturday. It was going great. You start at the ends, work your way around. Really looking sharp. As we got around the sides it looked like it was too much, low and behold I had ordered the wrong size liner! Man I felt so dumb, it was Saturday and this was all for my sons birthday party the following Saturday. Hurried, ordered a new liner. Thank goodness the company was willing to work with me.
New liner arrived Wednesday, we installed that evening. Put a shop vac at either end of the pool to remove wrinkled and stated to fill. I have a family member that lives 2 doors down and he allowed me to run a hose from his house (on a timer) and also one from my house...hr on / hr off. By Saturday morning I had a full pool and the party went great.
See pictures;
 www.dropbox.com
Now, if I had to do this over again, I would do it. I would do a good deal different and I learned a lot, but most of the mistakes were my own. I could have easily done this in 3 afternoons if everything went smooth, but it didn't. I replaced all the pool hardware, nuts / bolts w/SS. The pool and liner looks better than it ever has. The liner has not 1 wrinkle anywhere. The bottom is 100% flat. If your walking around the pool you can feel the taped seems raised just a tad, but I offset the layers so it kind of ramps up / ramps down. You can't see it, but slightly feel it with a foot. All in all, I'm satisfied. It really sets off the back yard. The wall foam is a nice touch and the floor feels better than sand. I have a heater, so I can only assume that all this will help.
Entire project was somewhere around ~ $800 I think, but I know to pay to put a liner is around here is anywhere from $1000-$1500, and I was able to add in a lot of extras for about 1/2 what that would cost. I'm young(ish), so for now this is ok
Just figured I would post my experience. I know it's a little long winded, but I would have enjoyed reading someone's thread with pictures when I was getting into this, so hopefully this helps somebody.
Ask any questions, have a great day!!
Getting the old liner out was pretty easy. Just cut it and let it drain, tear it out. I had to remove a good bit of sand to get down to where I wanted the foam to be, so that was a pain. Actually getting the foam in the pool and starting to lay out was time consuming, especially when I got around the sides. Every piece that had to be cut took a while. I think the foam took 2 afternoons after work. I opted to add the wall foam and got the foam coping to go around the corners for a nice clean finish (I hoped).
So here comes the kicker, start to get the liner in and everything was going well. We opted to stop for the night. I've never done a new liner (mine was used when we acquired the pool), but it said best to install when the sun is out to help with wrinkles. So we stopped. The next day it rained, and rained, and rained. A wall of the pool was pulled out of the track and knocked down, and to top it off the water got under the foam and eroded a good bit of sand.....so basically it was an s show. Removed the liner, fixed the wall, had to cut the tape, pull a lot (not all) of the foam boards up and re-level the sand....another day wasted.
Finally came the point where it was nice out and we could complete the liner. My wife an I woke up early and got to it on a Saturday. It was going great. You start at the ends, work your way around. Really looking sharp. As we got around the sides it looked like it was too much, low and behold I had ordered the wrong size liner! Man I felt so dumb, it was Saturday and this was all for my sons birthday party the following Saturday. Hurried, ordered a new liner. Thank goodness the company was willing to work with me.
New liner arrived Wednesday, we installed that evening. Put a shop vac at either end of the pool to remove wrinkled and stated to fill. I have a family member that lives 2 doors down and he allowed me to run a hose from his house (on a timer) and also one from my house...hr on / hr off. By Saturday morning I had a full pool and the party went great.
See pictures;
Dropbox
www.dropbox.com
Now, if I had to do this over again, I would do it. I would do a good deal different and I learned a lot, but most of the mistakes were my own. I could have easily done this in 3 afternoons if everything went smooth, but it didn't. I replaced all the pool hardware, nuts / bolts w/SS. The pool and liner looks better than it ever has. The liner has not 1 wrinkle anywhere. The bottom is 100% flat. If your walking around the pool you can feel the taped seems raised just a tad, but I offset the layers so it kind of ramps up / ramps down. You can't see it, but slightly feel it with a foot. All in all, I'm satisfied. It really sets off the back yard. The wall foam is a nice touch and the floor feels better than sand. I have a heater, so I can only assume that all this will help.
Entire project was somewhere around ~ $800 I think, but I know to pay to put a liner is around here is anywhere from $1000-$1500, and I was able to add in a lot of extras for about 1/2 what that would cost. I'm young(ish), so for now this is ok
Just figured I would post my experience. I know it's a little long winded, but I would have enjoyed reading someone's thread with pictures when I was getting into this, so hopefully this helps somebody.
Ask any questions, have a great day!!
Last edited:
robzkombi
Member
I've been searching for Extruded rigid foam the pink or blue stuff but being from California I think they made this stuff illegal as I cannot find it ANYWHERE. All they have is the Expanded rigid foam .
Does anyone have a lead to his stuff near San Diego county?
.Does anyone have a lead to his stuff near San Diego county?
aboykin2269,
I've been wanting to do this with my 21' Round pool. How did you cut yours so that you got it shape of the pool? I was thinking about laying it all out on the ground and using a string to mark the foam. Any help on how you cut it to fit would be appreciated.
I've been wanting to do this with my 21' Round pool. How did you cut yours so that you got it shape of the pool? I was thinking about laying it all out on the ground and using a string to mark the foam. Any help on how you cut it to fit would be appreciated.
honestly, i just kinda wing'd it. I laid out as many wholes pieces that would fit. Then to fill in the gaps, I used some packing paper to kinda cram into the open spaces and formed it up to the shape of the hole I was filling. Then I laid that on top of a new piece of foam board and just cut it out.aboykin2269,
I've been wanting to do this with my 21' Round pool. How did you cut yours so that you got it shape of the pool? I was thinking about laying it all out on the ground and using a string to mark the foam. Any help on how you cut it to fit would be appreciated.
Thanks I didn't even think about making paper templates. I appreciate the quick response.honestly, i just kinda wing'd it. I laid out as many wholes pieces that would fit. Then to fill in the gaps, I used some packing paper to kinda cram into the open spaces and formed it up to the shape of the hole I was filling. Then I laid that on top of a new piece of foam board and just cut it out.
beachbalm
New member
I was following right along until "you'll need a cove....foam coving from Amazon". what is this?It’s flat and smooth with the exception of the tape lines from using 3 rows of tape on all the joints. I could take a pic, not sure how well the “smoothness” of the floor will show. It’s great though, no lumps, or dips, basically flat.
If you are replacing a liner, you’ll be in a better spot than me. We had to dig out into hard pan, with a lot of clay. So even though my surface was level, I found that it was really uneven. The foam took care of this except where the joints didn’t line up. That took extra work. If you already have sand, smooth it out with a board, and the foam should go over that great. Just remember you’ll still need a cove, I used the foam coving from amazon.
beachbalm
New member
this really looks great and I appreciate the tips. I'll get the extruded foam board, but with 4*8 sheets under a 16*32 pool it is tempting to just line them up. should I offset them instead of just having long joints?
Thread Status
Hello , This thread has been inactive for over 60 days. New postings here are unlikely to be seen or responded to by other members. For better visibility, consider Starting A New Thread.