Replacing check valve and a ball valve- not sure exactly how to do it.

brendanmcaninch

Active member
Jul 6, 2020
26
orinda ca
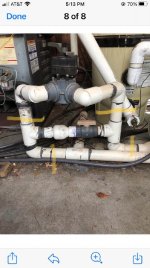
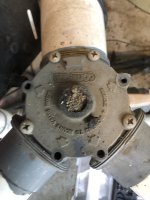
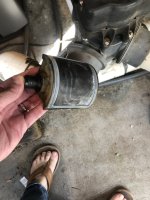
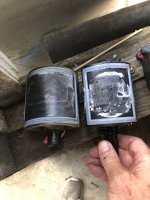
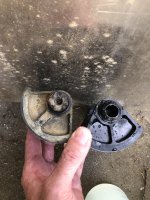
I have a leaking check valve that leaks back into my pool when i run the spa. I am new to the plumbing side but think I have the right areas to make the cuts and what i need to replace.
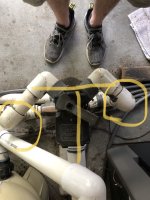
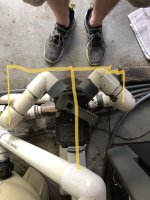
Can someone take a look and see if this looks right. The pool return is on the left side and the spa return is on the right. In the middle are the check valve and ball valve i need to replace. Those are both currently 11/2 " while the rest is 2 inch. I am planning to replace them all identical size. Attached is a photo and i highlighted in yellow where i think i should make my cuts and take out that plumbing and replace with new.
Hope this is correct but if anyone has any suggestions on if a better way and maybe what order I might install the new plumbing. Thank you
 

Attachments

  • Image.pdf
    93 KB · Views: 13
  • Image1024_1.jpg
    Image1024_1.jpg
    110.3 KB · Views: 35
In terms of simply replacing with a new check & ball valve back to the current configuration (upgraded to same size), I think your proposed cut marks make sense.
I was thinking it would be easier to keep everything 2 inch- but wasnt sure the size of 1.5 inch was there for a reason. when the pool return is open so water goes to both pool and spa as spa has waterfall feature into pool- i was thinking it may be because the design wanted more water diverted to the pool than spa? Think it is okay to replace with 2 inch?

Can you suggest a good check valve for that spot? I was thinking a clear one but not sure-

Thanks so much
 
Think it is okay to replace with 2 inch?
In your set-up I really don't think a small change one way or the other will make much of a noticeable difference.

Can you suggest a good check valve for that spot?
There are a variety of check valves on the market. Below is one such example. Just be sure to order the correct size for your plumbing.

 
What automation system do you have? That looks like your makeup for spa spillover. With many automation systems you could activate spa spillover mode which leaves suction side actuator on pool and return actuator on spa.
If you have the ability to enable and schedule that you could permanently close the ball valve on the makeup and not need to replace the check valve.

Other than that, if you are going to replaced, I would look at using a jandy/pentair 2 way diverter and check valve so that it is rebuildable in the future without replumbing everything.
So the ball valve does not close all the way either- this all came with the house i bought 10 years ago. So the ball valve closes off the spa- so the water only returns to pool. I have yet to use the ball valve in the 10 years i have had it but I feel i need to have one. It would be easier with the space requirements in there to have just the check valve. I have one last question. If I am putting in both valves- are there certain plumbing parts I would need between the 2 or just connectors/pipe/glue and cleaner. And is a simple wood saw okay to use? Thank you very much
 
I have one last question. If I am putting in both valves- are there certain plumbing parts I would need between the 2 or just connectors/pipe/glue and cleaner. And is a simple wood saw okay to use? Thank you very much
If they are the same diameter, the PVC pipe should just slip (glue) right in. I would not recommend a wood saw since it would make very rough cuts - not very clean edges. You could use a hacksaw, a powered miter saw, or purchase one of those hand PVC cutting tools (HD or Lowe's) that make a clean cut with no burrs at all.
 
If they are the same diameter, the PVC pipe should just slip (glue) right in. I would not recommend a wood saw since it would make very rough cuts - not very clean edges. You could use a hacksaw, a powered miter saw, or purchase one of those hand PVC cutting tools (HD or Lowe's) that make a clean cut with no burrs at all.
I have done some digging with the various issues i am having. What it looks and sounds like is my diverter valve is not closing entirely when put into spa mode and i can hear the water going down to the pool pipe. I recently replaced the diverter valve with what i was told would replace it. But it was slightly smaller. I think i put in the wrong diverter replacement valve. I have attached photos of my Y valve that i can't find anywhere on the internet anymore. Do you know what diverter i should replace for this valve. Is a two inch. I put in the Pentair 270056. This should fix my plumbing problem i think! Thanks
 

Attachments

  • Pool Diverter.jpg.JPG
    Pool Diverter.jpg.JPG
    337 KB · Views: 8
  • Original Diverter.JPG
    Original Diverter.JPG
    347.2 KB · Views: 8

Enjoying this content?

Support TFP with a donation.

Give Support
I have done some digging with the various issues i am having. What it looks and sounds like is my diverter valve is not closing entirely when put into spa mode and i can hear the water going down to the pool pipe. I recently replaced the diverter valve with what i was told would replace it. But it was slightly smaller. I think i put in the wrong diverter replacement valve. I have attached photos of my Y valve that i can't find anywhere on the internet anymore. Do you know what diverter i should replace for this valve. Is a two inch. I put in the Pentair 270056. This should fix my plumbing problem i think! Thanks
Have you already done the replacement of the check and ball valve? If not, how about just replacing the y valve with a new three way. That would only require 1 additional cut and would remove a 90 from each leg.
Pentair 263028 Three Port Diverter Valve with 2" PVC Pipe - Grey Amazon.com
If you have already done the check and ball valve then I would still buy the above three way and gut it for the diverter, cap and o-rings for your wye. It's cheaper to buy the whole then the parts unless you use the atie replacement diverter which has questionable fitment
I had yet to do the check and ball valve replacement and trying to buy parts. So in speaking to the pool supply guy and i was asking him about the vavle replacements. He thought the the check valve probably wasnt the issue as my pool equipment is some 3-4 feet above my spa and pool. He thought it maybe the calibration of the diverter and maybe it wasn't closing properly. So I remembered when i replaced the diverter(2 weeks ago) it looked slightly smaller that the one i replaced it with. I stuck my ear next to the pipe and heard the water moving into the pool when in spa mode. So that for sure is A problem and could be the total problem. If I can get this done without replacing and cutting the plumbing out- i think that is an easier fix. The ball valve i never use so I am not in a rush to repair as it has remained opened for10 years. So I am looking to find out if you know that there are various widths of these diverters and if there is one that closes a Y type of valve and if that is different that the typical T valve with the 90 degrees. Hope that makes sense- so if i need to just get the proper diverter valve in there- i won't have to replumb. At least that will deal with the spa draining about an inch an hour while in spa mode. Thanks you.
 
I had yet to do the check and ball valve replacement and trying to buy parts. So in speaking to the pool supply guy and i was asking him about the vavle replacements. He thought the the check valve probably wasnt the issue as my pool equipment is some 3-4 feet above my spa and pool. He thought it maybe the calibration of the diverter and maybe it wasn't closing properly. So I remembered when i replaced the diverter(2 weeks ago) it looked slightly smaller that the one i replaced it with. I stuck my ear next to the pipe and heard the water moving into the pool when in spa mode. So that for sure is A problem and could be the total problem. If I can get this done without replacing and cutting the plumbing out- i think that is an easier fix. The ball valve i never use so I am not in a rush to repair as it has remained opened for10 years. So I am looking to find out if you know that there are various widths of these diverters and if there is one that closes a Y type of valve and if that is different that the typical T valve with the 90 degrees. Hope that makes sense- so if i need to just get the proper diverter valve in there- i won't have to replumb. At least that will deal with the spa draining about an inch an hour while in spa mode. Thanks you.
Is it the width or the height that is Different? Sounds like you may have gotten the 270075 instead of the 270056. The 75 part number WILL appear to fit as it's just tall enough (made that mistake lol) but will not seal.
I still say order the Amazon part. Kills 2 birds one stone. It's cheaper and gets you the parts you need now but also gives you the body so should you choose(or need) to redo that section
So the width is different and not the height- also it was from a new 3 way valve and i took out the diverter in the valve(did buy larger part and cannibalized). I was able to finally get the diverter valve to shut- but it has to be precise. So i took off the actuator and replaced the valve in manual mode. I move diverter by hand just to make sure i had the exact spot and marked it with a sharpie- then put the actuator back on and matched it...took a bit to make is work but it closes the valve!! Attached are the diverter pics that are different sizes. So that problem is fixed....now the issue is there is a slow drip coming out of the valve between the valve cover and the valve. Like a drop every 10 seconds. Is there some type of sealant that you can put on that to stop it. A caulk or something? it only comes out of one spot- I know the right thing to do would be to replace the entire valve and replumb it- but i don't trust my re-pluming skills.
The issue with putting in the new 3 way is there are not true 90 degrees that last photo show it is just offset 2 inches back- it looks like that is why the original plumbing must have selected that unique 3 way valve. Long story there. Any way to get something that would be a solution to solving that slow dripping leak? or do i need to figure out new plumbing on all this.
Thank you so much!
 

Attachments

  • old and new diverters front.JPG
    old and new diverters front.JPG
    368.8 KB · Views: 3
  • old and new diverter top.JPG
    old and new diverter top.JPG
    479.2 KB · Views: 3
  • Leak in valve cover.jpeg
    Leak in valve cover.jpeg
    350.8 KB · Views: 3
  • Top view of Valve replacement.jpeg
    Top view of Valve replacement.jpeg
    485.6 KB · Views: 3
The issue with putting in the new 3 way is there are not true 90 degrees that last photo show it is just offset 2 inches back- it looks like that is why the original plumbing must have selected that unique 3 way valve
This looks relatively easy, I would likely do the following
1.the cut line you maked on the right (inner pipe) you'll put a 90 but cant it such that it is pointed put at either a 45 ° or 22.5° angle.
2. Add straight pipe long enough to get it positioned where it will be parallel with the other
3. Add a 45° or 22.5° to get the pipe vertical (match the angle you canted the 90)
I believe you have an easytouch so you could enable a spillway program and delete the current make-up line (ball and check valve which would significantly simplify the plumbing. If you wanted to keep it, you could point the tee's out instead of at eachother which makes everything easier to connect
slow drip coming out of the valve between the valve cover and the valve
Did you use the new o-rings that came with the other valve?
 
This looks relatively easy, I would likely do the following
1.the cut line you maked on the right (inner pipe) you'll put a 90 but cant it such that it is pointed put at either a 45 ° or 22.5° angle.
2. Add straight pipe long enough to get it positioned where it will be parallel with the other
3. Add a 45° or 22.5° to get the pipe vertical (match the angle you canted the 90)
I believe you have an easytouch so you could enable a spillway program and delete the current make-up line (ball and check valve which would significantly simplify the plumbing. If you wanted to keep it, you could point the tee's out instead of at eachother which makes everything easier to connect

Did you use the new o-rings that came with the other valve?
So i used the original valve cover- and it was doing the leaking then I put on the new valve cover that came with the new diverter. So anything caulk or a silicone sealant come to mind might work.

When walking through your replumbing I thought of one that if i come out 2 inches more from the heater then i can just do 90's and go straight back down the original pipes. That might be easier to me as i have never done and pool plumbing replacement other than adding a couple when i was trying to get into my old heaters header. I don't know which plumbing part to put on last(i know that sounds kinda stupid) but not sure on the reassembly. Here is the picture again with the proposed plumbing i just went through. Think that would work?
Thanks again!
 

Attachments

  • IMG_4906 (1).jpeg
    IMG_4906 (1).jpeg
    480.8 KB · Views: 0
Thread Status
Hello , This thread has been inactive for over 60 days. New postings here are unlikely to be seen or responded to by other members. For better visibility, consider Starting A New Thread.