I have a 2006 Raypak 406A with a new board that is having problems firing up(in pretty good shape- enclosed ). Sometimes it does- but mostly it just has these two error codes. Especially when it tries to refire after it has heated the spa from a cold temperature. It will heat for hours with a good flame once it starts. but when it tries to refire it wont fire up. Just the clicking noise - and i can see the pilot light lit and the error codes Ignition failure and no pilot sensed. I have cleaned the pilot as well as the ground wire and wires to the gas valve (robertshaw 700-059), The odd issue is i thought it must be the valve- but it works sometimes. So it must work when it senses the pilot because gas is going through. Any ideas? New pilot or new gas valve? Or new board....how do you figure out what the issue is...? Thanks

Raypak 406 - IGN failure with no pilot light sensed- but pilot light is on
- Thread starter brendanmcaninch
- Start date
You are using an out of date browser. It may not display this or other websites correctly.
You should upgrade or use an alternative browser.
You should upgrade or use an alternative browser.
swamprat69
Well-known member
This should be the manual for your heater... http://cdn.globalimageserver.com/FetchDocument.aspx?ID=c404f1c5-ac50-4209-9457-56246d010b20. Figure 62 on page 34 shows a picture of your pilot assembly. Exactly what did you do when you "cleaned the pilot"?
I used a long thin carbarator brush to try to brush anything off of it- left the pilot in place and cleaned around it. the cleaner came back a little dirty. The pilot burns well it seems when it is on. I did use it to clean all the burners- and they weren't too bad- everything cleaned out with the shop vac. So i used a wire brush on the ground wire and where i could without taking out the pilot assembly myself.
And thank you- i have the manual for my heater. I have the Robertshaw 7000-059 gas valve but its seems very difficult to find what actual pilot light will work with that gas valve and the 406A raypak.
I would just probably start with trying a new pilot light before ordering a gas valve.
I would just probably start with trying a new pilot light before ordering a gas valve.
swamprat69
Well-known member
Your pilot flame is proven to be established through flame rectification. An electric current passes through the pilot flame ( byproducts of combustion are heat, carbon dioxide and water vapor [which conducts electricity]) from the flame rod/electrode to the grounding surfaces. Since there is a large difference in surface area between the flamerod/electrode (small area) and the grounding surfaces (large area) it is easier for the current to travel in one direction than the other and this can be read (basically) as DC current ( to prove that the pilot is lit). As the surface area of the grounding surfaces get dirty/corroded (diminishing the electrical conductivity) the difference in surface area between the flamerod/electrode and the grounding surfaces is reduced and the flame signal is diminished below the point that it can be read. This is why it is important to keep ALL grounding surfaces in the circuit clean and free of dirt/corrosion. In order to clean the pilot assembly correctly you would need to remove it. If you look at the picture of your pilot assembly in your manual you will see that the flame signal will pass from the flamerod/electrode through the flame to the grounding hood ( on the left with 2 extended prongs ) and through the pilot brackett attachment point back to case/cabinet ground. The flamerod/electrode can be cleaned with steel wool or a small metal/diamond file but be sure to support the flamerod/electrode ceramic insulator so as not to crack it while doing the cleaning ( I do not recommend using sandpaper to clean metal surfaces as aluminum oxide [dust] is an electrical insulator). The metal grounding hood can be cleaned with a small metal/diamond file but I normally use a set of dental picks as it is easier for raised surfaces. Also clean the metal mounting surfaces between the pilot bracket and the point that it is attached to the burner assembly (both sides) as this is also part of the grounding circuit. You must also be sure that the ground connection to the burner assembly/cabinet (usually a green wire) is clean bare metal. If you have removed and reattached the pilot assembly (brass compression nut at the gas valve and screws that hold the pilot bracket to the burner bracket) be sure to check for a gas leak at the pilot compression nut on the gas valve while the pilot is on with a mixture of dish soap and water. If you feel comfortable/safe doing this it should give you the strongest pilot flame signal possible with a good/strong pilot flame.
swamprat69
Well-known member
If you are looking to just replace the pilot assembly... Amazon.com : Raypak 002003F Pilot Natural/Propane Lid : Garden & Outdoor
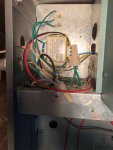
Thank you, I have ordered the pilot and going to replace the assembly. I am a novice messing with the gas- so can I put in the new pilot with just turning off the gas valve and the electrical to the heater? Or do i need to remove the main gas from the gas valve. I would prefer not to do that...but if i do- would i need some plumbers tape or grease the threads before reinserting into the gas valve. And would you recommend replacing the pilot tube? Or if it fits into the gas valve now is there a reason to replace it? And Thanks for the explanation on the pilot sensor....makes sense that is it. And does the pilot stay lit the entire time the heaters main burner is on or no? One more thing...i did open up where my transformer was and there were some wires chewed on it by mice(pic attached). Some of the insulation on the wires was completely removed- would that effect this situation at all? I am not sure what the transformer does other that regulate power going in... Thanks Again!
Attachments
swamprat69
Well-known member
The transformer gets power from the 120/240 V side of the circuit and powers the 24 V circuit. If wires other than the green (ground) wires are bare there is a chance of shorting out either the 120/240 V or the 24 V circuit. If you have enough spare wire in the box, you can cut out the bare portion of the wire then strip the remaining ends and wire nut them back together. You might be able to get away with reusing the pilot tubing, but I would check the connections at both the gas valve and pilot assembly with the pilot on for leaks with soap bubbles after replacing the pilot assembly. If you have a gas leak, then you would want to replace the pilot tubing and brass compression fittings. If you need to replace the pilot tubing reference this Meter Star 1/4" Aluminum Tubing with compression olive Fittings M10x1 female and Male Length 1 meter/39 inch gas water heater parts - - Amazon.com , although it only comes with 1 male compression fitting it looks like a second male fitting comes with the pilot assembly. If the male compression fittings are of different lengths, do not interchange them as the depth of the insertion can be critical to sealing. If you replace the pilot tubing, form the new tubing to be the same as the pilot tubing you removed. Cut to length with a tubing cutter as the ends of the tubing must be square https://www.amazon.com/RIDGID-32975...+aluminum+tubing+cutter&qid=1594853323&sr=8-2 . When installing tubing with compression nuts, slip nut over the end of the tubing 1-2 inches. Insert tubing into female recepticle (pilot assembly or gas valve) until it bottoms out and hold it there. Hand start compression nut. Tighten compression nut with a wrench ( you will need a backup wrench on the pilot assembly). At some point when tightening the compression fitting you will feel a resistance..keep tightening and you will feel less resistance like something broke. This is the ferrule snapping off the main body of the compression nut. Now tighten snuggly but do not overtighten as the hex of the brass nut may round off if you tighten too much. As before check gas connections with soap bubbles
swamprat69
Well-known member
Best to turn off gas and electric when working on heater unless troubleshooting electrically. When troubleshooting electrically you must feel comfortable and safe in all your actions.
Thanks You!. It was the pilot replacement that worked. Sorry so long to get back. It was a 80 dollar part for the pilot on this version. There was a heat issue with the wire it looked like that was pretty undetectable until you took out the pilot. It melted a little and some wire was exposed- barely. Anyways- now the 2006 Raypak working like a champ thanks to you. Appreciate your help.
Thread Status
Hello , This thread has been inactive for over 60 days. New postings here are unlikely to be seen or responded to by other members. For better visibility, consider Starting A New Thread.