pvc bushing leak

Jul 20, 2013
299
Northeast
I cracked the bushing when I tried to tighten the spigot. Then I covered cracks with epoxy which lasted for a few years, but it leaks now when pump is on and sucks air into filter when pump is off (but not into pump, not sure why).
I don't need spigot, want to remove it and use some plug (like this?) it and put some cap (like this?) on the whole thing. Never done plumbing myself, looking for simplest and cheapest way to fix this and the expected cost of parts and labor if I end up hiring somebody to do it? I assume any plumber could do it, don't need a pool tech?

please see this video

Thanks
 
Is the Tee cracked? Hard to tell from the video.
If so it could just be replaced with an elbow.
Any plumber can do this
What does this spigot do/control?
 
It looks like the the bushing is glued in so no way to replace it. The plug won't stop the leak and the cap you posted won't work on the tee-fitting.

The tee-fitting needs to be replaced with an elbow. For the job, you'd need two couplers, an elbow, a handsaw, [a short section of PVC pipe] and PVC cement/primer. Your cost is about $25 in parts. Are you capable of doing the repair?

Anyone with basic DIY skills can do the repair. The PVC work is basic, but it's important to get the measurements right. A handyman or plumber should be able to do the job in an hour. Do you have a gardener that does sprinkler repair?
 
Last edited:
  • Like
Reactions: Mdragger88
If u can get the bushing out u can just put in a plug like the 1st one u linked. I can’t tell if thats glue, liquid teflon, or pipe dope.
If u can’t get it out then u will need to cut out the Tee & just replace it w/ a slip elbow. Have some spare pvc & a couple slip couplings handy - they sell short pieces of pvc @ Home Depot & lowes. Be sure to get schedule 40 pvc pipe & fittings not dwv - they can look similar.
Lay it out before cutting anything. Measure twice, cut once!
Be sure to drain the line so there’s no pressure on it before beginning any thing
 
  • Like
Reactions: Rancho Cost-a-Lotta
It looks like the the bushing is glued in so no way to replace it. The plug won't stop the leak and the cap you posted won't work on the tee-fitting.

The tee-fitting needs to be replaced with an elbow. For the job, you'd need two couplers, an elbow, a handsaw, [a short section of PVC pipe] and PVC cement/primer. Your cost is about $25 in parts. Are you capable of doing the repair?

Anyone with basic DIY skills can do the repair. The PVC work is basic, but it's important to get the measurements right. A handyman or plumber should be able to do the job in an hour. Do you have a gardener that does sprinkler repair?
so the couplers would extend the pipes and then the elbow needs to be slighly larger in diameter to attach to couplers? Are there longer elbows so the couplers would not be needed?
Sorry, I'm clueless, never dealt with plumbing except for connecting threaded hoses to washers and heaters.

thanks.

P.S. Is there a glue I could add to the bushing to stop the leak? I used epoxy about 10-12yr ago and it stopped the leak for may be 10 years.
This is probably a stupid question but I'll ask anyway - Is there something like a butterfly screw, umbrella like thing I could insert through the threaded hole with glue on it and glue from the inside (in addition to outside+threaded spigot plug)?
 
Last edited:
P.S. Is there a glue I could add to the bushing to stop the leak? I used epoxy about 10-12yr ago and it stopped the leak for may be 10 years.
This is probably a stupid question but I'll ask anyway - Is there something like a butterfly screw, umbrella like thing I could insert through the threaded hole with glue on it and glue from the inside (in addition to outside+threaded spigot plug)?
There's no magical fix that will hold. If the bushing is threaded in, you could simply remove it and replace with a 2 in. threaded PVC plug. It looks to me like it's glued. Can you tell, glued or threaded?

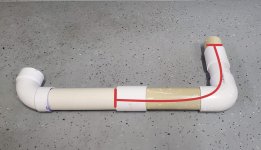
I had some scraps laying around so I mocked up what you're repair would look like. You're adding the section between the red lines. The elbow on the left goes to the filter. The new section consists of two couplers, an elbow, and two sections of new pipe. The pipe slips into the fittings sockets 1.25" to 1.5".

20220515_160617.jpg

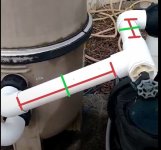
First take accurate measurements between the red lines shown in the photo below. Then cut at the green lines. From there, start with the couplings and build from there. When cutting the pipe to match the measurements taken, account for the length of the sockets in the fittings. You can detach the union on the filter to give yourself room to make the final connection. You'll have a few seconds after applying cemeny to adjust the angle of the elbow and pipe to meet with the filter union.

Screenshot 2022-05-15 155636.jpg

If you don't think you can get through it alone, maybe there's someone handy in the family that can help. You don't have much room to make a mistake between the existing tee and the elbow at the valve.

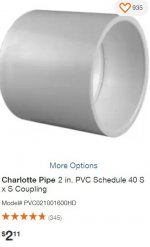
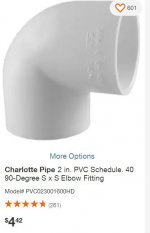
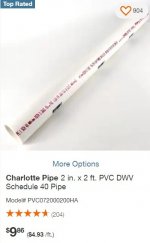
Here are pics of some parts you'd need:
Screenshot 2022-05-15 161352.jpgScreenshot 2022-05-15 161411.jpgScreenshot 2022-05-15 161527.jpgScreenshot 2022-05-15 161621.jpg
 
Last edited:
  • Like
Reactions: Mdragger88
There's no magical fix that will hold. If the bushing is threaded in, you could simply remove it and replace with a 2 in. threaded PVC plug. It looks to me like it's glued. Can you tell, glued or threaded?

I had some scraps laying around so I mocked up what you're repair would look like. You're adding the section between the red lines. The elbow on the left goes to the filter. The new section consists of two couplers, an elbow, and two sections of new pipe. The pipe slips into the fittings sockets 1.25" to 1.5".

View attachment 411104

First take accurate measurements between the red lines shown in the photo below. Then cut at the green lines. From there, start with the couplings and build from there. When cutting the pipe to match the measurements taken, account for the length of the sockets in the fittings. You can detach the union on the filter to give yourself room to make the final connection. You'll have a few seconds after applying cemeny to adjust the angle of the elbow and pipe to meet with the filter union.

View attachment 411105

If you don't think you can get through it alone, maybe there's someone handy in the family that can help. You don't have much room to make a mistake between the existing tee and the elbow at the valve.

Here are pics of some parts you'd need:
View attachment 411110View attachment 411111View attachment 411112View attachment 411113
Thank you very much!
it looks like it's a 15 min job for a plumber
 
Thread Status
Hello , This thread has been inactive for over 60 days. New postings here are unlikely to be seen or responded to by other members. For better visibility, consider Starting A New Thread.