
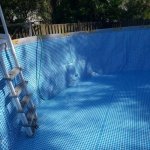
Pool start up March 2015 - just for posterity's sake.
- Thread starter Vince-1961
- Start date
You are using an out of date browser. It may not display this or other websites correctly.
You should upgrade or use an alternative browser.
You should upgrade or use an alternative browser.
Yes. Already ordered new liner. Didn't much like paying Intex $77 for shipping, but all its retailers didn't have a 22'x52" liner in stock (liner only, that is.) AND . . . .
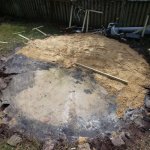
The good news is that my brain is already cogitating ideas on how to improve and make it better, starting with leveling out the ground better and, maybe, putting some styrofoam sheets or maybe something else under it in order to eliminate all the divots and depressions from where we walked and left impressions in the sand, before filling last time. A flat bottom is easier to clean than one with dimples. Going to start a new thread on that project.....")
The good news is that my brain is already cogitating ideas on how to improve and make it better, starting with leveling out the ground better and, maybe, putting some styrofoam sheets or maybe something else under it in order to eliminate all the divots and depressions from where we walked and left impressions in the sand, before filling last time. A flat bottom is easier to clean than one with dimples. Going to start a new thread on that project.....
Glad you found a liner and not giving up!
I would think you could continue this thread, so that future readers can see exactly what transpired
I would think you could continue this thread, so that future readers can see exactly what transpired
Several people have used house foam board for their bottoms. It works great and holds up well. Just know you need to triple tape it to keep it together so the liner does not slip down between the pieces.
Kim
Kim
Kimkats, when you say foam board, are you meaning those 4'x8'x1" (maybe 1.5") sheets of pink stuff? I squeezed one at Home Depot with my fingers and was wondering whether walking on it would leave a permanent impression just like walking on the sand before filling with water had made dimples in the floor.Several people have used house foam board for their bottoms. It works great and holds up well. Just know you need to triple tape it to keep it together so the liner does not slip down between the pieces.
Kim
The pink or blue stuff (R-40, about 3/4" thick), not the white styrofoamKimkats, when you say foam board, are you meaning those 4'x8'x1" (maybe 1.5") sheets of pink stuff? I squeezed one at Home Depot with my fingers and was wondering whether walking on it would leave a permanent impression just like walking on the sand before filling with water had made dimples in the floor.
cfherrman
TFP Guide
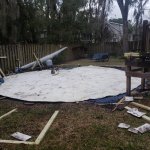
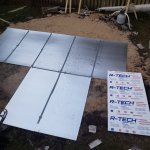
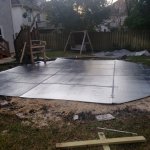
Deconstructed. Added half a yard of sand to elevate the side that was low and purchased 4'x8'x1/2" white styrofoam boards. New liner has arrived. Did n't have the outlet holes I anticipated...grr. More work.
Attachments
cfherrman
TFP Guide
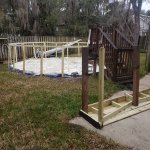
And so the rebuild begins ..... Yes, I am using the EPS polystyrene, 1/2" thick. I know it won't biodegrade anytime soon and it's significantly less expensive. Stick building, one stick at a time...... Unfortunately, trying to re-use the same wood that has already been screwed once makes the job a lot harder.
Attachments
-
 20190308_064951 (640x640).jpg89.7 KB · Views: 20
 -
 20190308_072234 (640x640).jpg100.1 KB · Views: 20
 -
 20190308_073433 (640x640).jpg101.5 KB · Views: 19
 -
 20190308_074415 (640x640).jpg133.9 KB · Views: 18
 -
 20190308_154421 (640x640).jpg141 KB · Views: 19
 -
 20190308_162444 (640x640).jpg138.3 KB · Views: 19
Last edited:
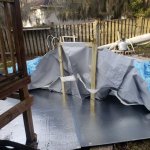
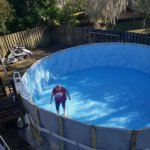
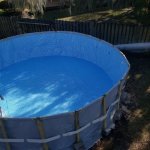
Done with the hard part. Tried a suggestion from another thread to elevate the legs as a means of getting wrinkles out of liner. Would've worked better at twice the elevation. Still got one wrinkle that I can't get out. Unfortunately the lower side is now the higher side. Added too much sand. Even worse, there are some lumps or mounds and some divots from uneven sand that I can feel through the styrofoam. Oh well. I can't deconstruct it again as the wood wouldn't hold up to another unscrewing and rescrewing.
Wide mouth thru-wall skimmer arrives in a few days. Will finish filling next weekend after making arrangement with the local water commission not to charge me sewage fees on 12K gallons of of water. First time I filled it, I didn't think of that and got a $250 water bill.
Notice that I added the metal cross-tie this time. Once it is filled and the whole thing expands, into a nice round round circle I'll add the "outer ring" and the shelf for the garden hose solar heater.
Attachments

I am sorry I did not see this until just now............I have not used the foam so I can only tell you what I have seen others use which is the pink or blue house foam boards.
For the last wrinkle use the plunger idea and see if that will help you "walk" it out.
For the last wrinkle use the plunger idea and see if that will help you "walk" it out.
cfherrman
TFP Guide
I did some quick searches and it looks like eps will be fine, largely xps and eps are the same with xps having slight edges.
Let us know how it goes over time, eps is cheaper
Let us know how it goes over time, eps is cheaper
Took legs down off the cinderblocks today. The liner looked loose. This liner is supposed to be 22'x52". Measured height. 52" Measured legs. 52" Measured diameter in several locations - anywhere from 21 to 21.5 feet but never 22 feet. Now that was curious. So I did some math. 22' = 264" Circumference is Pi x diameter, so 829.34" There are 22 legs with crossbars. Each leg = 3" and each cross bar is 33", so (33"+ 3") x 22 = 792" or 37.34" too small. How short is each crossbar? 37.34" divided by 22 = 1.7" too short.
Double check the math going in other direction. 3" + 33" + 1.7" = 37.7" multiplied by 22 = 829.4.
How did I manage to get this math wrong the first time?
This is turning into a nightmare, because they don't sell just the frame. Could've gotten a new Coleman brand in same size for $490 from Walmart. GRR.
Hey, on the bright side, I actually used all that junior high / high school math!
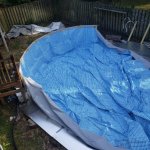
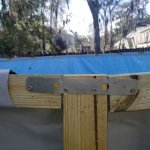
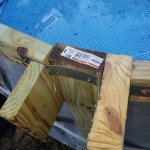
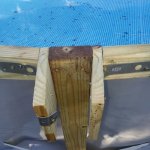
How tight is the liner supposed to be on the upper ring before filling? About all I remember from the first time is that making that final connection for the ring was really difficult, took some brute force, but I concluded that was because the metal pieces, not connected, were longer than they were connected. OR? Is it because the ring was really tight on the liner?
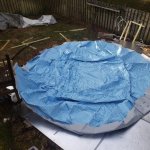
I got a mere 9 inches of additional circumference added and it looks like the liner is stretched really tight, but it's hard to imagine the ring of the frame exerting more outward pressure on the liner than the water does. The first photo is what I was originally thinking, namely 22 x 1.5" = 33" and then at 4 points I would add an extra 1" from 1" thick decking to the other side of the leg. The second photo is a re-think to add 3/4" to each side of the leg. (The idea here is to provide support for a 1x6 shelf around the top on which I will be adding garden hose for a solar heater, plus the right angle might just suffice as a gusset of sorts.) I tried adding a 1" decking piece to the left side of the first photo in between the crossbar and the leg, but that stretched the liner so much that I reverted to what you see.
Also I am somewhat unsure of the strength of the 3/4" pieces. They look like they'd snap under pressure.
Not sure how to proceed. Will sleep on it. Any ideas anyone?
Attachments
Last edited:
I have an above ground pool. The liner is VERY tight. There is no way I could pinch a part and pull it away from the side. What is your air temp there? Is the sun shining on the liner while you work on it? I know it is said to not work on liners when it is cold/cool as it needs to be warm so it can stretch as needed. Just so info on mine and something to think about as far as the temps there.
Thread Status
Hello , This thread has been inactive for over 60 days. New postings here are unlikely to be seen or responded to by other members. For better visibility, consider Starting A New Thread.