Replacing the complete Top Assembly (Pentair P/N 270067) didn't take long, probably ~10-15 minutes. That assumes you have the complete Top Assembly available to install. A small power driver tool is also great to have handy
")
.
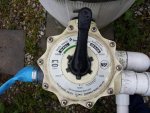
If it's your first time to replace the part, insure that you install the replacement assembly oriented correctly. On my valve, there's an alignment pin that mates with the Top Assembly.
Spider Gasket...well.... that's another story

*lol* . I went into some detail in the other thread about it. My main issue was twofold:
- First time replacing the Gasket
- I was replacing the original Gasket which was completely glued into the entire Gasket Channel.
That made it a project for me but I ended up using a small Utility Knife to slice out the old Gasket. Mainly, I cut the outer edge of the Gasket from the outer wall of the Gasket Channel.
I previously tried an online suggestion to use a non-acetone Nail Polish solution to help dissolve and remove the old Gasket material. That procedure wasn't successful for me. I also tried filling the Channel area with the Nail Polish liquid and allow soaking time but that also didn't help much for me.
The main concern I had was preventing or reducing the amount of Channel scarring as I removed the Gasket. I was unable to prevent some minor damage to the Valve Gasket Channel area but after talking with my pool guy (runs his own store, used him for years for major pool issues), he told me that it was almost impossible to prevent minor scarring in the Channel and it wouldn't affect the Gasket operation (wouldn't create leakby issues).
I found that to be true with my valve. The pool guy also said that subsequent Gasket replacements would be a lot easier since a lot of the original factory Gaskets are completely glued into the Channel which isn't necessary to keep the Gasket from dislodging from the Channel during proper Valve cycling actions.
The other issue that concerned me was that I couldn't completely remove all of the old Gasket material from the Channel. I was concerned because I figured that would cause leakby issues.
I asked my pool guy about this as I was removing the old Gasket and he said "No problem, as long as you remove most of the old material and there's no big portions remaining that would prevent the replacement Gasket to seat into the Channel."
That turned out to be true for me. I've used the Valve several times since replacing the Gasket last December with no leakby issues having been seen.
Many Gasket issues arise as a result of the pool owner operating the Valve improperly, ie, attempting to rotate the Valve with the Pump still on.
Here's my routine, in rotating my Valve:
- Turn off Pump. Wait about 5 seconds for the pressure to fully equalize while observing the Valve Handle relaxing (slightly moving upward).
- Rotate to desired position.
I haven't practiced a common recommendation of rotating the Valve only in one direction, ie, only rotating Clockwise. I don't have any issues with the recommendation
. It's that I haven't noticed any issues arising as a result of rotating my Valve direction in both directions.
Note about Spider Gasket replacement: I allowed a lot of time for that task as it was my 1st time doing that and although I had anticipated difficulty removing the factory-glued-in Gasket, I didn't expect it to be one of those "longer" projects, at least for me
.
I also allowed an overnight "curing" time to allow the new Gasket to bond with the advesive that I used in the installation process. I also wanted to keep the area dry (as recommended in Spider Gasket replacement procedures).
I used a couple of old t-shirt rags to plug the Valve ports to keep the Gasket Channel area dry after I removed and glued in the new Gasket.
I also used my lawn leaf/grass Blower to dry out the Channel area and also to remove small pieces of the old Gasket material and glue before applying the new Gasket adhesive.