Pentair IntelliCenter Pool Control Dashboard Instructional Guide
(nodejs-poolController and nodejs-poolController-dashPanel)

- Table of Contents –
1. Purpose and Background
There are a growing number of IntelliCenter users that are becoming increasingly dissatisfied with the lack of reliability and functionality regarding the Pentair IntelliCenter webClient, mobile apps and the Amazon Alexa Skill. Not to mention the complete unavailability of once advertised features such as the Apple WatchOS app, Google Assistant, Siri/HomePod, Google Home and Apple HomeKit.
I have certainly experienced the same dissatisfaction with Pentair’s "Human to Machine Interfaces (HMI's)" ever since my initial IntelliCenter installation in the fall of 2018. Given this fact, I began to explore the possibility of other “alternative” controllers / interfaces in late 2019.
Presently, there are several "alternative options", that can be employed for use with the Pentair IntelliCenter as well as IntelliTouch and EasyTouch (*Touch). These options allow users the ability to no longer rely on the Pentair IntelliCenter production (prod) servers and consequently the Pentair webClient/mobile apps for their controller and interface needs.
Besides the Pentair controllers and interfaces (and all of the restrictions and reliability issues that those present to the user), there are two other IntelliCenter controller/HMI's, that I am presently familiar with and which are listed below:
 www.troublefreepool.com


2. Credits
Although I just happened to be the one that began the initial development of this instructional guide outline, and performed the instructional steps validation and the formatting and posting of this thread, I certainly cannot take all that much credit for much of the technical details contained within.
This was a collaborative effort between myself, @cmc0619 and @Katodude, who both contributed a great deal of time, knowledge and expertise. Not only towards this goal, but also for providing me with quite a bit of Raspberry Pi and Linux command-line assistance as well.
I would personally like to give @tagyoureit many thanks and credit for his development of the nodejs-poolController and its associated webClient. The poolController is the primary means to which to communicate with and control the Pentair compatible pool equipment. This latest release of version 6.0.0, takes this pool controller to new heights and now natively supports IntelliCenter up to and including the latest firmware beta releases, as well as the controlling of IntelliTouch and EasyTouch now. Thanks again @tagyoureit for the many hours of dedicated work on this controller!! Awesome!
Lastly, an enormous amount of credit (and thanks) go to @rstrouse. Without his advanced technical prowess in this realm and his incredible time devotion to this interface, the Pool Control Dashboard would not exist.
I would also like to thank him for his many hours of direct poolController and dashPanel assistance to me. This was due in large part to my “non-standard” IntelliCenter configuration and non-standard equipment setup requirements. Also, many thanks go out to him, for his assistance in providing much of the needed technical information scattered throughout this instructional guide as well as the final “proofing”.
And to all of the above, thanks so much for all of the patience with this Raspberry Pi/Linux command-line noob and for showing me how to “color between the lines” correctly. I have and I continue to learn a tremendous amount from you all!
3. Theory
Currently, most IntelliCenter users utilize a Pentair developed webClient (browser), and/or a mobile application to interface with their IntelliCenter panels (OCP). This is normally accomplished via or “through” the Pentair IntelliCenter prod servers. As most have sadly discovered, the reliability of these servers is at times, “marginal-at-best”. In addition, although they are functional to some extent, many would agree that the Pentair IntelliCenter webClient, mobile apps as well as the ScreenLogic app are cumbersome, outdated, lacking in advanced functionality and are not supported by necessary improvements and upgrades.
In order to combat this unfortunate reality, the IntelliCenter and *Touch user has the option to utilize other user controllers and/or interfaces now. One such alternative is the node.js-poolController-dashPanel (Pool Control Dashboard), which utilizes a computer to act as a host instead of using the Pentair servers. In other words, the host computer works as a server in the same way essentially, as do the Pentair Prod Servers.
However, unlike the Pentair servers, which utilize an internet connection to communicate with the users’ IntelliCenter OCP, the host computer is connected directly to the IntelliCenter RS485 bus (Serial COM Port) which will be explained in more detail below. This fact, greatly enhances the “reliability” factor since the user has complete “control” over connectivity with their automation system.
The actual nodejs-poolController-dashPanel UI is also a webClient but again, unlike the Pentair webClient, the internet is not necessary for connectivity. The nodejs-poolController-dashPanel typically only requires the utilization of the users’ local area network (LAN) in. In addition, through the use of VPN technology, remote access (outside of the LAN) to the control panel can also be realized.
There are two (2) components to this free software which is located on the GitHub repository hosting service and which also provides access control and several collaboration features as well as “WiKi” pages and task management tools.
4. Hosting Platform Options
The nodejs-poolController-dashPanel can be hosted from a Windows platform, Apple Mac or a Linux machine.

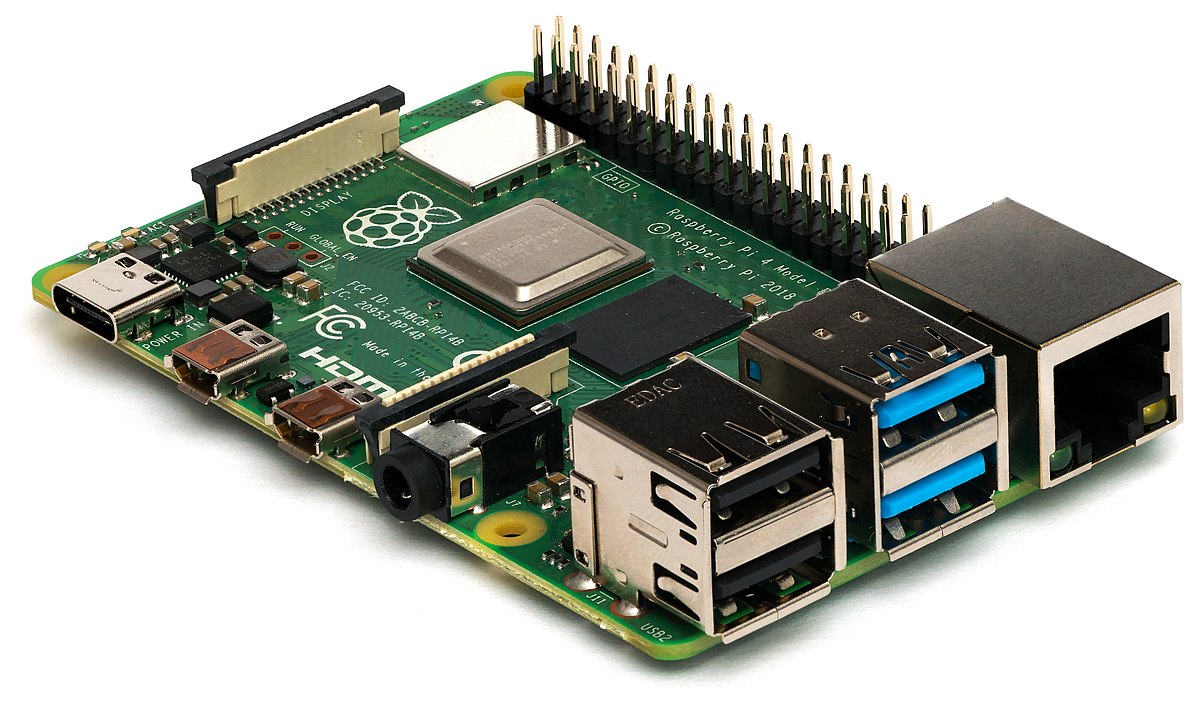
However, in this guide, the platform that will be discussed in detail is the “Raspberry Pi” or otherwise known as a “Pi” and abbreviated as RPi in this instructional guide. The RPi is a low cost, credit-card sized computer that can utilize a standard computer monitor or TV, and can use a standard computer keyboard and mouse (I/O devices).
However, typically a monitor, keyboard and mouse are not particularly necessary once the RPi has been properly configured to run a remote desktop program such as RealVNC or some other suitable remote desktop server/viewer.
More information regarding the Raspberry Pi computer can be found in the following link.

5. Location and Connectivity Considerations and Options
There are several options available to the user when it comes to selecting an applicable permanent location for the Raspberry Pi, as well as how the Raspberry Pi will connect to both the users’ LAN and the users’ Pentair automation system (IntelliCenter, IntelliTouch, EasyTouch) - RS485 bus (Serial COM Port).
This instructional guide will list some possibilities and combinations that are typical, however there are always “outliers” that may have been missed here.
Lastly within this section, I will document my experiences and reasoning behind selecting the location for my own Raspberry Pi, as well as my personally chosen connectivity options between the RPi, my LAN and my IntelliCenter RS485 bus.
Location options and considerations
The typical location options for the Raspberry Pi are either in the users’ residence or located at the pool equipment pad.
Considerations when selecting the appropriate location for your particular requirements should be based on the following:
/GettyImages-679173642-176560fbd3794169988d028209bdf114.jpg)
 www.lifewire.com
 - There is very little room in the low-voltage compartment of the IntelliCenter Load Center for the RPi to begin with. In addition, I could not mount the RPi on the back wall of the low-voltage compartment because my Serial COM Port Expansion Board is already mounted on the back wall of that compartment. Hence, I would need to mount a NEMA type box and connect that box via flex conduit to the bottom of the IntelliCenter Load Center Low-Voltage Raceway (side knockout was already in use). In addition, I already have enough NEMA type boxes hanging on that wall, so the outside option just did not look all that viable to me.

(nodejs-poolController and nodejs-poolController-dashPanel)
- Table of Contents –
2. Credits
3. Theory
11. References and Links
1. Purpose and Background
There are a growing number of IntelliCenter users that are becoming increasingly dissatisfied with the lack of reliability and functionality regarding the Pentair IntelliCenter webClient, mobile apps and the Amazon Alexa Skill. Not to mention the complete unavailability of once advertised features such as the Apple WatchOS app, Google Assistant, Siri/HomePod, Google Home and Apple HomeKit.
I have certainly experienced the same dissatisfaction with Pentair’s "Human to Machine Interfaces (HMI's)" ever since my initial IntelliCenter installation in the fall of 2018. Given this fact, I began to explore the possibility of other “alternative” controllers / interfaces in late 2019.
Presently, there are several "alternative options", that can be employed for use with the Pentair IntelliCenter as well as IntelliTouch and EasyTouch (*Touch). These options allow users the ability to no longer rely on the Pentair IntelliCenter production (prod) servers and consequently the Pentair webClient/mobile apps for their controller and interface needs.
Besides the Pentair controllers and interfaces (and all of the restrictions and reliability issues that those present to the user), there are two other IntelliCenter controller/HMI's, that I am presently familiar with and which are listed below:
A. IntelliCenter Gateway and associated Control App
According to the developer, the “IntelliCenter Gateway and associated Control App” is a secured proxy to the IntelliCenter Application Programming Interface (API). It uses a basic web interface to view and control equipment that is password protected for remote access. The Android Control uses the “gateway” to communicate with the IntelliCenter securely.
One of the advantages of the IntelliCenter Gateway and associated Control App is that NO physical connection to the IntelliCenter RS485 bus (Serial COM port) is required. However, there may be certain advantages to this RS485 physical connection for some IntelliCenter and *Touch users’ and which will be examined in further detail below.
Further information on this “gateway” UI can be found in the following thread. Credit: @guinness and @rmontgomery
IntelliCenter Gateway and Control Apps
Since we hijacked the thread located here (IntelliCenter Webclient and Possible Alternatives)(credit: @MyAZPool), I decided to open a new thread for the IntelliCenter Gateway and Control Apps. IntelliCenter Gateway Repo is located here: IntelliCenter Gateway Credit: @guinness IntelliCenter...
www.troublefreepool.com
B. Pool Control Dashboard (nodejs-poolController-dashPanel)
The utilization of this particular controller/interface requires the employment of a physical connection between a computer and the RS485 bus (Serial COM Port) of the IntelliCenter or *Touch. Some users may consider this requirement a disadvantage but when examined more closely and compared to the advantages of the nodejs-poolController, then possibly it's not all that much of a disadvantage for some users.
Although the employment of a small single-board Raspberry Pi computer is not necessarily a requirement to utilize the Pool Control Dashboard, the Raspberry Pi computer actually serves a useful purpose. This is because it will easily allow for other pool-related automation features to be realized (such as additional temp/pressure “add-ons’) and allows for all pool-related automation to be run from a dedicated “java-script ready” machine rather than using a PC or Mac.
On a PC or Mac, those platforms require the correct configuration in order to run nodeJS, whereas the Raspberry Pi OS is specifically suited for that purpose.
Other advantages in utilizing a Raspberry Pi vs a PC or Mac are cost and physical portability leverages as well.
Note: node.js is a run-time environment used for executing JavaScript outside of the browser. npm is a JavaScript package manager commonly used for installing packages for node.js.
Listed below are but some of the advantages with regards to the Pool Control Dashboard while utilizing the required RS485 physical connection to the Pentair IntelliCenter and IntelliTouch or EasyTouch automation systems.
(1) No requirement to run .NET core. The nodejs-poolController application does much more than just act as an interface because it does not merely inject itself between the Control Panel (OCP) and the Pentair webClient. This essentially means that the nodejs-poolController can perform many more tasks, since it is not just limited to only those functions that are controllable through the Pentair webClient or in the case of *Touch system - ScreenLogic.
(2) The nodejs-poolController will not only function with and control the Pentair IntelliCenter but it is fully compatible with the Pentair IntelliTouch and Pentair EasyTouch automation systems as well. In fact, the nodejs-poolController actually adds capabilities that do not currently exist with the IntelliTouch/EasyTouch control boards as well as most other webClients. Additionally, the nodejs-poolController can be utilized to control DIY/"Home-Brew" Pool Automation Systems as well.
In reality, the only difference that will be witnessed within the Pool Control Dashboard between the IntelliCenter and the IntelliTouch/EasyTouch automation systems, is the fact that *Touch systems only have one IntelliBrite controller that works with all the lights presently. This means that the theme and color pallet controls only show up on the Lights topic. You don't get control for each light and/or group. However, in the future, this minor inconsistency between IntelliCenter and *Touch systems, will be addressed and color support for the IntelliBrite compatible systems should be corrected, which will in turn, force *Touch systems into the better paradigm.
(3) Since the “dashPanel” was written in raw JavaScript and CSS, the primary goal of the nodejs-poolController-dashPanel, was to get as much control over the pool and onto a single page without all the “navigating around” that you typically find with every other Pentair controller/interface. And without all of the scrolling (which seems to be the very nature of all of the “web libraries” that currently exists).
(4) The nodejs-poolController is completely compatible and integrates with other commercial and DIY home automation clients/bindings/platforms such as SmartThings/Hubitat, Vera Home Automation Hub, Homebridge/Siri/EVE, etc. All of these platforms can operate separately and support the same common functionality and if the interface is done correctly, then it’s not dependent on the original hardware that it is supporting. The (OCP) or the lack thereof, is not relevant here.
(5) The Pool Control Dashboard (nodejs-poolController-dashPanel) is a highly dynamic platform since it is completely “scalable” and adaptable to various other advanced pool automation functionality projects recently being realized or which are currently being developed to include future projects as well.
The following are current or future improvements and enhancements that are currently in various stages of planning and/or development. -
a) relayEquipment manager – Allows for other types of relays (besides the relays within the Pentair Automation panel) to be controlled.
Note: The relayEquipment manager will allow for “Serial Peripheral Interface” (SPI) and will also support "Inter-Integrated Circuit" (I2C) functionality in the future for external sensors related to pool automation and control. Currently REM will allow for as many valve or other relays as one has available GPIOs. That sensor information is currently fed over SPI. The advantage here is ease of configuration and no additional programming is required. And the real advantage will be that it will communicate with the nodejs-poolController via the socket interface.
However, when I2C is fully implemented, the Atlas Scientific Tentacle T3 “stackable” add-on board for the RPi can host up to five (5), EZO-class devices to measure pH, ORP, DO, control dosing (MA, Chlorine) peristaltic pumps, pressure sensors (PRS), color sensors etc.
Note: REM is in advanced stages of beta-testing.
b) Control of the IntelliValve “multi-positional” feature irrespective of any Pentair support.
c) Control of “other than Pentair” SWCGs, MA and Chlorine dosing and other chemistry controllers to include the DIY or “homegrown” variety.
d) Adding additional valve actuator support above and beyond the ten maximum, that the OCP currently supports.
e) Extending the scheduling functionality well above current Pentair limitations.
f) A “room moniker” feature which will allow for various types of pool equipment to be moved into specific pages.
g) User defined sorting of AUX Circuits, Feature Circuits, Circuit Groups and Schedules.
h) iPhone CSS support. COMPLETED
i) Additional Heater support.
j) Additional Solar support.
k) Cover and Remote support.
l) Security Option support.
m) User notification (email and sms) support.
n) pH and FC sensor support. COMPLETED THROUGH REM
o) Filter Gauge Pressure Transducer support. COMPLETED THROUGH REM
p) Uploading of “user-defined” backgrounds for the Pool Control Dashboard. COMPLETED
q) Enhanced “Graphical” support to include virtual gauges, dials and graphs.
C. Within this instructional guide however, the intent here is to concentrate efforts towards the nodejs-poolController-dashPanel controller/interface, with an emphasis on the Pentair IntelliCenter Automation System.
However, this guide will also provide some detail or instructions (when applicable) for the Pentair IntelliTouch and EasyTouch end-user as well, since the nodejs-poolController-dashPanel can be utilized for all three of these Pentair Automation Systems.
D. Much of the methodology explored here are based upon my own experiences. There are always different methods at which to arrive at the same solution. So if other options are not specifically mentioned here, it does not necessarily indicate that they can’t be realized. If you think that you might have an improved option or solution, please explore it and share it for the benefit of all concerned.
I would like to think of this project as a “one team-one fight” effort in order to benefit all Pentair automation system end-users who wish to improve on the quality and the functionality of their control and interface experiences with their pool automation systems.
E. The instructions and information contained within this guide are meant to be dynamic rather than static. In other words, a “living instructional guide” that will reflect various changes or improvements in methodology, future pool-related equipment, software/firmware releases, and to address any information that may become outdated.
F. Lastly, although experienced Raspberry Pi users may find some material within this guide useful, it should be noted that this is a “step-by-step” instructional guide that targets the type of user that has little or no experience with a Raspberry Pi (RPi) computer and/or the use of the Linux command-line. Both of which are utilized and explained in detail within this guide.
2. Credits
Although I just happened to be the one that began the initial development of this instructional guide outline, and performed the instructional steps validation and the formatting and posting of this thread, I certainly cannot take all that much credit for much of the technical details contained within.
This was a collaborative effort between myself, @cmc0619 and @Katodude, who both contributed a great deal of time, knowledge and expertise. Not only towards this goal, but also for providing me with quite a bit of Raspberry Pi and Linux command-line assistance as well.
I would personally like to give @tagyoureit many thanks and credit for his development of the nodejs-poolController and its associated webClient. The poolController is the primary means to which to communicate with and control the Pentair compatible pool equipment. This latest release of version 6.0.0, takes this pool controller to new heights and now natively supports IntelliCenter up to and including the latest firmware beta releases, as well as the controlling of IntelliTouch and EasyTouch now. Thanks again @tagyoureit for the many hours of dedicated work on this controller!! Awesome!
Lastly, an enormous amount of credit (and thanks) go to @rstrouse. Without his advanced technical prowess in this realm and his incredible time devotion to this interface, the Pool Control Dashboard would not exist.
I would also like to thank him for his many hours of direct poolController and dashPanel assistance to me. This was due in large part to my “non-standard” IntelliCenter configuration and non-standard equipment setup requirements. Also, many thanks go out to him, for his assistance in providing much of the needed technical information scattered throughout this instructional guide as well as the final “proofing”.
And to all of the above, thanks so much for all of the patience with this Raspberry Pi/Linux command-line noob and for showing me how to “color between the lines” correctly. I have and I continue to learn a tremendous amount from you all!
3. Theory
Currently, most IntelliCenter users utilize a Pentair developed webClient (browser), and/or a mobile application to interface with their IntelliCenter panels (OCP). This is normally accomplished via or “through” the Pentair IntelliCenter prod servers. As most have sadly discovered, the reliability of these servers is at times, “marginal-at-best”. In addition, although they are functional to some extent, many would agree that the Pentair IntelliCenter webClient, mobile apps as well as the ScreenLogic app are cumbersome, outdated, lacking in advanced functionality and are not supported by necessary improvements and upgrades.
In order to combat this unfortunate reality, the IntelliCenter and *Touch user has the option to utilize other user controllers and/or interfaces now. One such alternative is the node.js-poolController-dashPanel (Pool Control Dashboard), which utilizes a computer to act as a host instead of using the Pentair servers. In other words, the host computer works as a server in the same way essentially, as do the Pentair Prod Servers.
However, unlike the Pentair servers, which utilize an internet connection to communicate with the users’ IntelliCenter OCP, the host computer is connected directly to the IntelliCenter RS485 bus (Serial COM Port) which will be explained in more detail below. This fact, greatly enhances the “reliability” factor since the user has complete “control” over connectivity with their automation system.
The actual nodejs-poolController-dashPanel UI is also a webClient but again, unlike the Pentair webClient, the internet is not necessary for connectivity. The nodejs-poolController-dashPanel typically only requires the utilization of the users’ local area network (LAN) in. In addition, through the use of VPN technology, remote access (outside of the LAN) to the control panel can also be realized.
There are two (2) components to this free software which is located on the GitHub repository hosting service and which also provides access control and several collaboration features as well as “WiKi” pages and task management tools.
A. The nodejs-poolController is a JavaScript application developed to communicate and control your Pentair compatible pool equipment. Primary and collaborating developer credits are noted on the repository website.
B. The nodejs-poolController-dashPanel is the webClient controller, designed and developed to operate the actual nodejs-poolController server backend. Primary and collaborating developer credits are noted on the repository website.
4. Hosting Platform Options
The nodejs-poolController-dashPanel can be hosted from a Windows platform, Apple Mac or a Linux machine.
However, in this guide, the platform that will be discussed in detail is the “Raspberry Pi” or otherwise known as a “Pi” and abbreviated as RPi in this instructional guide. The RPi is a low cost, credit-card sized computer that can utilize a standard computer monitor or TV, and can use a standard computer keyboard and mouse (I/O devices).
However, typically a monitor, keyboard and mouse are not particularly necessary once the RPi has been properly configured to run a remote desktop program such as RealVNC or some other suitable remote desktop server/viewer.
More information regarding the Raspberry Pi computer can be found in the following link.
Raspberry Pi Documentation
The official documentation for Raspberry Pi computers and microcontrollers
www.raspberrypi.org
5. Location and Connectivity Considerations and Options
There are several options available to the user when it comes to selecting an applicable permanent location for the Raspberry Pi, as well as how the Raspberry Pi will connect to both the users’ LAN and the users’ Pentair automation system (IntelliCenter, IntelliTouch, EasyTouch) - RS485 bus (Serial COM Port).
This instructional guide will list some possibilities and combinations that are typical, however there are always “outliers” that may have been missed here.
Lastly within this section, I will document my experiences and reasoning behind selecting the location for my own Raspberry Pi, as well as my personally chosen connectivity options between the RPi, my LAN and my IntelliCenter RS485 bus.
Location options and considerations
The typical location options for the Raspberry Pi are either in the users’ residence or located at the pool equipment pad.
Considerations when selecting the appropriate location for your particular requirements should be based on the following:
- Accessibility
- Environmental
- LAN connectivity for the RPi (wired vs wireless (Wi-Fi)
- RS485 bus (Serial COM port) connectivity (This is the physical (wired) connection between the RPi and the RS485 bus (Serial COM port)
- Power considerations for the Raspberry Pi
A. Accessibility – As noted above, the RPi can typically be located within your residence or at the pool equipment pad. If you decide to make your RPi live outdoors, then typically the RPi should always be configured near your desktop/laptop computer initially. But once near final completion of the RPi configuration, then the RPi can be moved to its final pool equipment pad location.
Note: If your RPi location is to be outdoors, then you should move it prior to performing the necessary “npm start&” commands with the command-line editor on the RPi near configuration completion (further explanation will be provided in detail below) so that you can make the physical RS485 connection between your RPi and the RS485 bus. This will mean that you will have already configured the remote desktop client and ensured that you can control your RPi remotely from your desktop/laptop.
If the RPi lives outdoors, you must decide where exactly. In a NEMA 4 enclosure perhaps? Or in the low-voltage compartment of the IntelliCenter or *Touch Load Center or Power Center? Will you have enough room in that low-voltage compartment?
Personally, I could not find a suitable location in my low-voltage compartment, so that idea was out for me. If I was determined to locate it in the low-voltage compartment, then the only thing I could do was just let it flop around somewhere in there and hope that it would not eventually “short” something out on the mother or daughter card or the valve expansion module as I closed the IntelliCenter fold-down access panel. No thanks.
If you are considering some sort of NEMA enclosure, then that should work out pretty well. You will need to provide a conduit between the NEMA enclosure and the low-voltage raceway of the Load or Power Center to run your physical RS485 and LAN connections (if not utilizing Wi-Fi). And don’t forget about power requirements for your “power hungry” (5v 2.5A) RPi.
Comment: The only way that I would consider placing the RPi in the low-voltage compartment of my IntelliCenter is IF I did not employ the use of the optional Serial COM Port Expansion Board, which is normally mounted on the back wall of the low-voltage compartment. Then I may have tried to use some sort of industrial strength double-sided tape to mount an RPi case to that back wall and which would still allow for the removal of the RPi if need be.
Caution: Personally, I would NEVER consider mounting the RPi within the High-Voltage Compartment of the Load Center, as has been suggested elsewhere. But to each their own I guess. It’s your equipment and personal safety that you must consider.
Accessibility should not be a concern if your RPi lives indoors.
B. Environmental – Heat is the primary consideration here. The Raspberry Pi specifications note that the operating temperature range is between 0*C (32*F) and 85*C (185*F). Specifically, the CPU is rated for -40*C (-40*F) to 85*C (185*F) and the Ethernet Chip is rated for 0*C (185*F) to 70*C (185*F).
What are the typical summers like in the area in which you live? Are you mounting the RPi in a nearly air-tight enclosure? Is there other equipment mounted in the enclosure that will contribute to the overall ambient temperature within the enclosure?
Note: I know of a couple of users that have RPi’s mounted outside (within enclosures), in the Phoenix Metro area (very warm summers) and I have not heard of any issues encountered so far. In fact, your IntelliCenter processor is mounted outside in a metal enclosure right? And the IntelliCenter mother and daughter cards are much more valuable than a $50.00 RPi. So, this may be a non-issue in most cases. However, if this remains a concern for you, then you may consider the purchase of any of the following inexpensive accessories which should help with RPi cooling.
(1) Thermal Pads and/or Heatsink kits for the RPi CPU, SoC, Memory, USB and Ethernet Chip.
(2) Single or double cooling fans with or without alloy-case type heatsinks.
(3) “ICE” type tower cooling fans (liquid).
All of the above can be purchased on Amazon or elsewhere..
Environmental concerns should not be an issue if your RPi lives indoors.
C. LAN Connectivity for the RPi (wired vs wireless (Wi-Fi) – If you choose to make your RPi live outdoors, then considerations here are Wi-Fi connectivity. If you are already using Wi-Fi for your IntelliCenter or *Touch, then this should not be an issue.
If you are utilizing the IntelliCenter Wi-Fi Link Kit (Primary Client Bridge) to connect your IntelliCenter to your Wi-Fi router, Wireless Access Point or Wi-Fi mesh network, then I understand that there is a second LAN connection available there which will allow you to connect the RPi to that ethernet port.
If your IntelliCenter is “hardwired” to your LAN, then you have a choice of using a Cat5E or Cat6 splitter or you can choose to run a second Cat5E or Cat6.
LAN connectivity for the RPi should not be an issue I would think, if your RPi lives indoors. The Raspberry Pi (Pi 3, 4 and ZeroW) are Wi-Fi capable and you have the option to hardwire it to your LAN as well.
D. RS485 bus (Serial COM port) connectivity (This is the physical (wired) connection between the RPi and the RS485 bus (Serial COM port) – If you choose to make your RPi live outdoors, then the only consideration here is properly wiring and connecting the required USB to RS485 adapter to the RS485 bus (Serial COM Port) which will be covered in more detail below.
UPDATE: If an RS-485 Wireless connection is preferred or necessary, user's have reported success with the following device.
https://www.amazon.com/Smallest-Elfin-EW11-Elfin-EW11-0-Wireless-Networking/dp/B0833XTK92

UPDATE: If an RS-485 Wireless connection is preferred or necessary, user's have reported success with the following device.
https://www.amazon.com/Smallest-Elfin-EW11-Elfin-EW11-0-Wireless-Networking/dp/B0833XTK92
However, if you would like your RPi to live inside, then there is more to it. You must provide for a physical connection between the RS485 bus and the RPi. If you are utilizing a low-voltage conduit from the IntelliCenter or *Touch Load or Power Center for a hardwired LAN connection, then this shouldn’t be much of an issue. But if not (you are using Wi-Fi for LAN connectivity), then it becomes much more of an issue if you prefer the RPi inside.
Note: The last sentence above is a factual statement however there is a “caveat” involved. IF, you are currently employing either an optional IntelliCenter “Indoor Control Panel” (P/Ns 522035, 523058 or 523059) or in the case of *Touch systems and are you are utilizing the ScreenLogic Protocol Adapter (with or without the Wireless Connection Kit) and/or one of the Indoor Wired Control Panels (P/Ns 520138 or 520548), then you should already have an existing RS485 connection within your residence. You would then need to only run a 2-conductor (3 if you prefer a ground) from one of these devices to your Raspberry Pi (or another computer if you prefer). You then would have the necessary physical RS485 connection challenge solved.
Note: Use UL approved conductor cable minimum 22 AWG (Cat-5e meets this spec). However use UL approved conductor cable minimum 18 AWG for distances longer than 200 ft.
E. Power Considerations for the Raspberry Pi – Although the Raspberry Pi uses a whopping 5V 2.5 amps, it still needs to be powered. If you are opting to have your RPi live outdoors, then there are a variety of ways that you can power your RPi, depending on where exactly you plan to mount/place your RPI. In the Load/Power Center? A NEMA enclosure? etc. You can get fairly creative here.
The RPi typically uses an AC-DC power adapter or what I like to refer to as a “Wall Wort”. Typically, a 100-240 Va.c. 0.6A input to 5.1Vd.c. 2.5A adapter. This adapter is “bundled” in many of RPi “kits” available or it can be purchased separately.
If the RPi is to be mounted in the Load or Power center, one option would be to plug the RPi Power Supply into the female end of some sort of suitable heavy-duty type power cord. Cut the male end off at the appropriate length and then wire the other side to the load-side of the installed GFCI in the High Voltage compartment of the Load Center. Then run the low-voltage power cable from the wall wort up through the provided cut-outs and into the low-voltage compartment and plug the wall wort into the female end of the power cord.
Note: Use caution when considering the above method of providing power to the RPi. Personally, I’m not really a fan of running low-voltage cables throughout the High-Voltage Compartment of the Load Center. So if you choose the above method of powering the RPi, please consider running the low-voltage power cable that extends from the wall wort, as far away from any high-voltage wiring and especially the circuit breakers. “Murphy” always has a way of attempting to “void your warranty”, so be careful.
Warning: Always remove power from the Automation System Load/Power Center at the house Main Circuit Breaker Panel, before removing the Load/Power Center High Voltage Cover Panel. It’s also referred to as a “Dead Front” panel for a very good reason. In addition, if you are not qualified and/or proficient in electrical installation practices and procedures or lack the skill sets necessary to work with 100-240 Va.c. wiring, please consult with a licensed professional that IS.
There are many other options to provide suitable power for the RPi to include small solar panels specifically designed for this purpose, such as the Adafruit Industries models. USB to USB-C adapters, Power-over-Ethernet add-on boards, etc. round out the list of available options.
10 Ways to Power your Raspberry Pi
The Raspberry Pi packs a lot of capability in a small package—including options to use at least 10 different solutions as sources of external power.
Once again, if you are kind enough to allow your RPi to live indoors, the power consideration for your RPi, should not be an issue.
The following are my personal experiences at selecting the location for my Raspberry PI and my subsequent RS485 connectivity solution between the RPi and the IntelliCenter RS-485 bus.
So, I had initially thought that I would be placing or mounting the RPi in the low-voltage compartment of my IntelliCenter Load Center because most of the other threads here that utilize an RPi in their “DIY/Home Brew” automation systems, indicate that the RPi’s are typically mounted at the equipment pad. But after some careful thought and research, I became increasingly convinced that this “outdoor” option presented some unique challenges for me, and which I outline below.
- There is very little room in the low-voltage compartment of the IntelliCenter Load Center for the RPi to begin with. In addition, I could not mount the RPi on the back wall of the low-voltage compartment because my Serial COM Port Expansion Board is already mounted on the back wall of that compartment. Hence, I would need to mount a NEMA type box and connect that box via flex conduit to the bottom of the IntelliCenter Load Center Low-Voltage Raceway (side knockout was already in use). In addition, I already have enough NEMA type boxes hanging on that wall, so the outside option just did not look all that viable to me.
- In addition, it would require that I plug the RPi Power Supply into the female end of some sort of extension cord and then wire the other end to the load-side of the installed GFCI in the High-Voltage compartment of the Load Center as discussed above.
- I live in Arizona where highs in the summer can reach extreme temperatures. Yes, although I operate other electronic equipment outside (to include the IntelliCenter electronics), I just ultimately decided against it.
- There would be no “easy” way to remotely power reset the RPi if I needed to.
Note: Once the RPi is configured, this would normally not be an issue.
- Lastly, initial setup still requires the RPi be co-located near a computer anyway.
So, based upon those considerations and limitations that I listed above, I ultimately decided that I would allow my RPi to live indoors with the rest of the family. Specifically, in my home office with my other “toys”. Comment: I now feel that was the right decision especially due to the fact, that in the meantime, I have since added three additional Raspberry Pi’s to the mix, just so the first one would not get too lonely.
The following challenges however would need to be tackled based upon my decision to keep the Raspberry Pi indoors.
Since the Pool Controller RPi requires that physical connection to the IntelliCenter RS-485 bus when utilizing the nodejs-poolController, I would require an appropriate serial communication method.
Note: The RS485 bus is the same “bus” that the IntelliFlo pumps, IntelliChlor SWG, MasterTemp Heaters, UltraTemp Heat Pumps, IntelliChem and eventually the IntelliValves (one way or the other), use for their communication protocols, between them and the IntelliCenter processor.
The only option here was to “hard” wire the connection from my house to the IntelliCenter Load Center. I decided this would be a better choice for me personally, especially since my IntelliCenter LAN connection is already hard-wired to my Local Area Network (LAN) via an existing ¾” low-voltage conduit which connects between a bottom knockout of the IntelliCenter low-voltage raceway and my attic.
I considered various conductor / wire options for the connection but finally settled on a shielded Cat-5e while  incorporating an RJ45 to Terminal Screw Adaptor on both ends of the Cat5e.
incorporating an RJ45 to Terminal Screw Adaptor on both ends of the Cat5e.Amazon.com: Poyiccot RJ45 Screw Terminal Adaptor Connector, 2pack RJ45 /8p8c Female Jack to 8 Pin Screw Terminal Connector for Cat7 Cat6 Cat5 Cat5e Ethernet Extender CCTV Digital DVR Network Adapter: Electronics
Buy Poyiccot RJ45 Screw Terminal Adaptor Connector, 2pack RJ45 /8p8c Female Jack to 8 Pin Screw Terminal Connector for Cat7 Cat6 Cat5 Cat5e Ethernet Extender CCTV Digital DVR Network Adapter: Network Cards - Amazon.com ✓ FREE DELIVERY possible on eligible purchases
amazon.com
Anytime I run cable/wiring through a conduit, I always attempt to pull an extra pull/zip line just in case, so thank goodness the pull line was already there in my low-voltage conduit, which of course made pulling another Cat-5e extremely easy. In fact, while I was at it, I pulled a third Cat-5e just for good measure (you never know).
Once I pulled the two additional Cat 5e’s, I then had one for the IntelliCenter LAN connection, a second one for the physical connection from the IntelliCenter RS-485 bus to the RPi and a spare Cat-5E for possible future use.
I then ran the Cat-5e to be used for the RS485 connection thru the attic and down the wall which adjoins my office and terminated the connection to a Shielded Inline Modular Coupler w/Keystone Latch as illustrated.
Amazon.com: CableCreation 10-Pack Cat6 Shielded Inline Modular Coupler with Keystone Latch, RJ45 Modular Coupler for Panel Connection,Cat6 8P/8C Female to Female Class D: Computers & Accessories
Buy CableCreation 10-Pack Cat6 Shielded Inline Modular Coupler with Keystone Latch, RJ45 Modular Coupler for Panel Connection, Cat6 8P/8C Female to Female Class D: Cat 6 Cables - Amazon.com ✓ FREE DELIVERY possible on eligible purchases
amazon.com
As you can see  the Cat-5e, connectors, etc. are all of the “shielded” variety, so that way I could ground the connection from the RPi to the IntelliCenter. I’m not really sure this method is absolutely necessary, but I thought it might be a good idea based on some research that I did.
the Cat-5e, connectors, etc. are all of the “shielded” variety, so that way I could ground the connection from the RPi to the IntelliCenter. I’m not really sure this method is absolutely necessary, but I thought it might be a good idea based on some research that I did.
The following diagram illustrates the connectivity method that I used to connect the RPi to the IntelliCenter RS-485 bus due to the fact that I utilized a Cat5e for the connection.
Note: The Pentair Serial COM Port Expansion Board is NOT necessary to make the physical connection to the RS485 Bus. It can be made to any of the COM Ports as well.
Last edited: