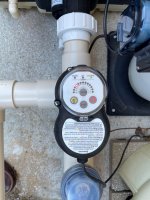
New SoCal IG shotcrete pool build - equipment set, Final Inspection Passed, Pebble Done! Salt added. Back deck in process

So, plumber is "done" but I now have a problem which just really has me annoyed but hopefully I'm just missing something. It would appear that he did not leave enough room for the Intellivalve on my heater bypass 🤬. @Turbo1Ton since believe you have an auto bypass, am I missing something? Can I change the orientation of the intellivalve?

He also did not run the rs485 cable to pump 2 even though I mentioned it several times. He stated it was not needed, I showed him in the manual where it was. While I was gone he left as finished so I ran it myself. I also had some 18/5 sunlight resistant sprinkler wire so I ran that to the heater to get the three wired for rs485
20220518_200357.jpg
Deck jets were also finally installed yesterday. I insisted he run them in a loop as he was not going to and that did not give me warm fuzzies.
20220517_170722.jpg
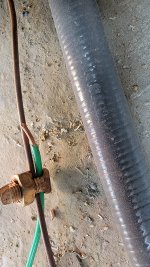
I'll leave you with this little gem that I found just wtf. The plumbers son was helping yesterday and I'm sure we can attribute this to him...
20220518_175617.jpg
 
The plumbers son was helping yesterday and I'm sure we can attribute this to him...
Second thread today where the plumber and electrician were one and the same. I also believe that bonding wires are supposed to be bare copper.

Regarding the Intellivalve, you can adjust the end stop positions of the actuator to be wherever you need it, through 180 degrees. Might have to hold it over the valve body and rotate the actuator until you can get it in place and see how the range of motion will allow the motion you need.

I can't tell what the flow direction is. From what I can see, I am assuming that is a 3 way valve and the inlet flow direction for the valve is up from the bottom, and it needs to go either left or right? If this is correct, then you would set your actuator motion for either the green, 180 degrees (no flow through the heater all flow through the bypass, not recommended by the instructions or TFP plumbing experts), or the red, 135 degrees (partial flow through the heater at all time, the rest through the bypass). In this case your actuator would be mounted so that the body hangs straight down. Then set your end positions from 24 to 0 (green), or 18 to 0 (red).

Heater bypass sketch.jpg

Let me know if this doesn't make sense.

--Jeff
 
Second thread today where the plumber and electrician were one and the same. I also believe that bonding wires are supposed to be bare copper.

Regarding the Intellivalve, you can adjust the end stop positions of the actuator to be wherever you need it, through 180 degrees. Might have to hold it over the valve body and rotate the actuator until you can get it in place and see how the range of motion will allow the motion you need.

I can't tell what the flow direction is. From what I can see, I am assuming that is a 3 way valve and the inlet flow direction for the valve is up from the bottom, and it needs to go either left or right? If this is correct, then you would set your actuator motion for either the green, 180 degrees (no flow through the heater all flow through the bypass, not recommended by the instructions or TFP plumbing experts), or the red, 135 degrees (partial flow through the heater at all time, the rest through the bypass). In this case your actuator would be mounted so that the body hangs straight down. Then set your end positions from 24 to 0 (green), or 18 to 0 (red).

View attachment 412416

Let me know if this doesn't make sense.

--Jeff
Thank you, flow is from the right, down is bypass , straight thru goes to the heater. Do I need to unscrew the valve lid and rotate it to orient such that the arrows for actuator install are in the right spot?
 
Thank you, flow is from the right, down is bypass , straight thru goes to the heater.
Also, the bonding wire is bare copper. I had a zinc anode installed in line (Best case $50 in insurance, worst case a $50 paper weight) the green wire is the wire going from the anode to the bond wire.
 
  • Like
Reactions: Turbo1Ton
Heater bypass actuator.JPG

Here's a pic of mine. Water comes in from the bottom, and bypass is to the left, or heater is to the top. Valve actuator is shown in the bypass position. It moves between 18 and 24 to close the bypass. 24 is full flow through the heater. 18 is split flow through both the heater and bypass.

Maybe this helps?

--Jeff
 
Ok so your flow direction is similar to mine then.

You should just be able to rotate the valve stem to get it into position, no need to remove the valve top. In your case, I think you will wind up mounting the actuator so the cable is up. This isn't ideal as I don't like cable entries being on top of devices as it can allow water ingress. Can always run some silicone sealant around the cable though.

Actuator mounted with the cable up, you would then program so your end stops are either 12 to 0 or 6 to 0.

--Jeff
That makes sense, I'll play with it today and throw some silicone on the cable gland.
For the heater I ran and connected the rs485 cable, do i leave both it and the firemans switch connected, that is unclear in the manual? The fact that there is a valve headed on the heater that should work but doesnt is just crazy. I know it's that " what's another $200 in the scheme of things" but spending $200 for a valve expansion card for one valve just really sits wrong. I'm sure what will happen is that $200 will turn into $1200 as I figure out 5 more valves that "need" to be automated since I will have spots for them 🤣

@MyAZPool , I was playing with setup last night and trying to get the features right for the pool lights. The microbrite manual references using the circuit "Intellibrite" for easy touch and intellitouch do you know if it is the same for intellicenter?

On another subject, am I allowed to offer my extra Intellicenter i10ps for sale on here?
 
On another subject, am I allowed to offer my extra Intellicenter i10ps for sale on here?
Yup. Post it in the coffee bar. Many have had luck locally on FB marketplace and the offer up app, so hit those up too.
 
For the heater I ran and connected the rs485 cable, do i leave both it and the firemans switch connected, that is unclear in the manual?
No need to leave the fireman's switch connected. It does nothing when communicating via RS485. Install the fireman's switch jumper in the heater and leave the RS485 connected up.

The fact that there is a valve headed on the heater that should work but doesnt is just crazy. I know it's that " what's another $200 in the scheme of things" but spending $200 for a valve expansion card for one valve just really sits wrong. I'm sure what will happen is that $200 will turn into $1200 as I figure out 5 more valves that "need" to be automated since I will have spots for them 🤣
I mean, it kinda works. It at least closes the bypass and puts the heater into the loop. That's good enough, right? :laughblue:

It won't get you anything quickly but you might consider reaching out to Pentair and complaining about it. I would hope that the more complaints/issues they take on a specific issue that it gets moved up the priority list, but I wouldn't bet on that.

You could also just give it a shot, and see if they have fixed the firmware already. Not sure what the build date is on your heater. It won't hurt anything, if it doesn't work. It'll just leave your heater in the loop instead of bypassed. Just don't shorten the actuator cable until you know for sure. Then you can always add the valve card once you know for sure.

I totally understand about automating everything. How do you think I wound up with 7 actuators?!? LOL

--Jeff
 

Enjoying this content?

Support TFP with a donation.

Give Support
Just spoke with the pb (amazing how well he answers now that the draws are back in my favor 🤣) final inspection is scheduled for monday. In our jurisdiction the "pre-plaster" inspection is the final.
I put a call into the inspector but havent heard back yet, does the metal gas line need to be attached to the bonding grid as it did for the house?
 
Ok so your flow direction is similar to mine then.

You should just be able to rotate the valve stem to get it into position, no need to remove the valve top. In your case, I think you will wind up mounting the actuator so the cable is up. This isn't ideal as I don't like cable entries being on top of devices as it can allow water ingress. Can always run some silicone sealant around the cable though.

Actuator mounted with the cable up, you would then program so your end stops are either 12 to 0 or 6 to 0.

--Jeff
I was able to get it installed and programmed as you stated with the gland up and it seems to be functioning (though we dont have plaster yet so the true test is to come)
20220519_130635.jpg
My intelliph also came today , wholly @!?* its bigger than I thought! It only fits one place which is roughly where I intended but man is it crowded. Before I drill the holes and mount it am I overlooking any reason not to install it here?
20220519_130523.jpg20220519_130541.jpg
 
  • Like
Reactions: Turbo1Ton
Good job on getting the valve situated.

Regarding the IpH, that is almost exactly where mine is installed, in relation to my heater.

Equipment Pad OCT 2020.JPG


Make sure to run the vent tube a good ways away. In the photo above, I had not yet ran the vent, but it runs up the wall to the eave, and then to the left about 15' or so and I have it exiting from under the eave by 2"-3" so that it is in the open air. That way all of the acid vapors that may escape are up high and out in the air to get carried away.

--Jeff
 
I just looked back at your pics, and the only thing I can see being an issue with mounting the IpH there is access to that j-box. But I wouldn't expect you would need to be in there very often at all.

--Jeff
 
I just looked back at your pics, and the only thing I can see being an issue with mounting the IpH there is access to that j-box. But I wouldn't expect you would need to be in there very often at all.

--Jeff
Highly unlikely, I'm not even sure why he put it there as he ran separate conductors for everything from the panel. The only possible reason I could see is this resulted in 1 3/4" conduit from the panel for the two pumps and heater instead of 3 1/2" flex conduits.
 
  • Like
Reactions: Turbo1Ton
Trying to find the least bad spot for the intelliph controller and the best I could come up with is this as the cable is just too darn short for anywhere else
20220520_110257.jpg20220520_105926.jpg
I think this will have to do for now but ultimately I will likely sink some 4x4's for the panel support and mount the controller above the panel.
Adjusted all our gates today to ensure they self close and pb is enroute with door alarms. So ready for pebble so I can find a new project to obsess about 😆
 
I will say, you will likely access the IpH controller more than you think you will. You at least want to look at it. And they are darn near impossible to read with the door closed with that smoked door.

Live with it for a bit and you can always move it if you find it's inconvenient.

--Jeff
 
Jst-xh crimper came in from Amazon yesterday so I shortened the valve wires and re-terminated them. They all work! 😆 and now the low voltage race way is much less crowded. If anyone opts to do this in the future, make sure you leave the green and yellow wires long to reach the expansion card in the event pentair decides to make our intellivalves intelligent 20220521_100648.jpg20220521_110825.jpg
Pool alarms are up and today I am repairing the garage man door (which has access to the pool) installing self closing hinges and moving the handle to 54". Should be ready for inspection Monday!
Now we have to pick a new pebble color as I'm told what we had previously picked is not available 😑
 
Last edited:

Enjoying this content?

Support TFP with a donation.

Give Support
Thread Status
Hello , This thread has been inactive for over 60 days. New postings here are unlikely to be seen or responded to by other members. For better visibility, consider Starting A New Thread.