
New Pool project in Frisco, TX
- Thread starter shcuck
- Start date
You are using an out of date browser. It may not display this or other websites correctly.
You should upgrade or use an alternative browser.
You should upgrade or use an alternative browser.

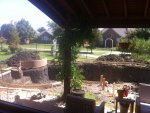
Dig is complete... No major issues encountered, other than my front yard getting completely destroyed 
Check out the Pool Dig Time Lapse view in the link below:
[youtube:19tfyi11]ihKv8NNuQyk[/youtube:19tfyi11]
They will start on the Rebar and Plumbing tomorrow morning and if all goes well, inspection on Monday
Check out the Pool Dig Time Lapse view in the link below:
[youtube:19tfyi11]ihKv8NNuQyk[/youtube:19tfyi11]
They will start on the Rebar and Plumbing tomorrow morning and if all goes well, inspection on Monday

shcuck - I have a question about how close your pool is to your existing patio cover & post? I will have the same scenario and trying to determine how close I can come to the po? How many feet is the pool away from the post? I'm thinking I will be roughly 3 or 4 feet and trying to determine if that will be to close or not.
Hi msujohn,
It is my understanding that the city requires 1 foot away per feet of pool depth. So in this case, the spa is "I believe" 4 feet, then I have a 4 foot gap between the waters edge and the patio. Make sense? You can also do a search on the Frisco City website for Swimming pool laws and regulations, and it will detail what is required.
Hope this helps
OK... Day 2 is done. They finished the steel work, but was hoping they would also do the plumbing today.... Monday will be the Plumbing and hopefully Tue the inspection so we can go to the Gunite phase on Wed or Thur.
Here is the Time Laps Vid of the Steel work.
[youtube:3stjug1l]dYkhtgOBl30[/youtube:3stjug1l]
Here is the Time Laps Vid of the Steel work.
[youtube:3stjug1l]dYkhtgOBl30[/youtube:3stjug1l]
Thanks that does make since. I have an existing patio that is 10 - 12 feet away from the house foundation as it is. I'll have more than enough feet from the house (per Frisco code) - I'm trying to figure out if 3 or 4 feet from the existing patio will be to close or not. It's hard for me to visualize what it will look like. I've been playing around with hoses to visual it and seem to think 3 or 4 feet will be plenty. Good luck with the project. I'll be watching it daily.
Hi MSUJOHN,
Regarding the 3-4 feet in your case. It really all depends on what your plans are. In our case we wanted to have the Spa as close to the patio as possible to allow for interaction from the different groups. for example, if you have a pool party or something, and you have people that don't want to swim or get be in the spa, then they can sit in patio, and still be part of the conversations that are taking place in the spa/pool, without having to yell Again it all comes down to how you are planning to use your pool/sap. Best of Luck, looking forward to following your build once you start.
Regarding the 3-4 feet in your case. It really all depends on what your plans are. In our case we wanted to have the Spa as close to the patio as possible to allow for interaction from the different groups. for example, if you have a pool party or something, and you have people that don't want to swim or get be in the spa, then they can sit in patio, and still be part of the conversations that are taking place in the spa/pool, without having to yell
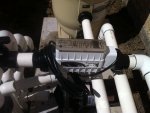
Again it all comes down to how you are planning to use your pool/sap. Best of Luck, looking forward to following your build once you start.Day 4... Plumbing and Equipment
All Pentair
[attachment=2:uhw6xr1n]Equipment.jpg[/attachment:uhw6xr1n]
[attachment=1:uhw6xr1n]Equipment2.JPG[/attachment:uhw6xr1n]
Salt Water System IC40
[attachment=0:uhw6xr1n]SWG.JPG[/attachment:uhw6xr1n]
Any thoughts or observations are welcome
All Pentair
[attachment=2:uhw6xr1n]Equipment.jpg[/attachment:uhw6xr1n]
[attachment=1:uhw6xr1n]Equipment2.JPG[/attachment:uhw6xr1n]
Salt Water System IC40
[attachment=0:uhw6xr1n]SWG.JPG[/attachment:uhw6xr1n]
Any thoughts or observations are welcome
Attachments


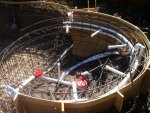
Day 4 continuation...
[attachment=2:1nhvebyh]SPA Plumbing.jpg[/attachment:1nhvebyh]
[attachment=1:1nhvebyh]Main Drains.jpg[/attachment:1nhvebyh]
[attachment=0:1nhvebyh]rsz_skimmer.jpg[/attachment:1nhvebyh]
[attachment=2:1nhvebyh]SPA Plumbing.jpg[/attachment:1nhvebyh]
[attachment=1:1nhvebyh]Main Drains.jpg[/attachment:1nhvebyh]
[attachment=0:1nhvebyh]rsz_skimmer.jpg[/attachment:1nhvebyh]
Attachments


It's looking good! Isn't it amazing looking out in your backyard and seeing that huge hole? I am still amazed when I walk by the window and at times I wonder what have I got myself into as the backyard is completely destroyed!
It appears your equipment pad sits away from your foundation a few inches (ours does too). Have you thought about what you are going to do to keep weeds/grass from growing back there that you can't mow/weed eat? I was thinking either gravel or mulch but not sure :?:
It appears your equipment pad sits away from your foundation a few inches (ours does too). Have you thought about what you are going to do to keep weeds/grass from growing back there that you can't mow/weed eat? I was thinking either gravel or mulch but not sure :?:
You know, what gets me the most, is how destroyed my front and side yards are. I kind of expected the back to be completely destroyed, but did not think the front would be the same.
regarding the equipment pad, I had not thought of that.. hehehe... I might just add gravel with a weed liner (you know those black fabric roles that they sell to put under the flower beds?) and lots of weed killer. But the weed liner should do the trick. I used that in my mulch beds up front and I am weed/grass free.
Also it is very interesting how we seem to have the EXACT same system. one thing that is kind of bugging me, is that they put the heater on the right instead of the left of the pad, so the little control panel faces the wall instead of the front. I know I will prob not use that very often, but still, it is bugging me.
regarding the equipment pad, I had not thought of that.. hehehe... I might just add gravel with a weed liner (you know those black fabric roles that they sell to put under the flower beds?) and lots of weed killer. But the weed liner should do the trick. I used that in my mulch beds up front and I am weed/grass free.
Also it is very interesting how we seem to have the EXACT same system.
one thing that is kind of bugging me, is that they put the heater on the right instead of the left of the pad, so the little control panel faces the wall instead of the front. I know I will prob not use that very often, but still, it is bugging me.It is reassuring to watch your build happen the same as mine. It makes me confident they are doing a great job! You might end up liking the control panel in the back if you have little kids because they won't be able to mess with it as easily. Our set-up is opposite of yours, heater on the left and filter on the right. I haven't paid any attention to the control panel. It is much equipment I don't know what to think lol!
I will probably due the weed liner, weed killer and gravel as well. I don't want to fight weeds growing back there all the time. I thought they would pour the pad directly next to the house, not bring in a pre-made pad.
We got lucky and they have accessed the backyard through the greenbelt. With the lack of rain the ground was dry so the tracks aren't too bad. Your poor front yard, yikes!
Ok so end of Day 4...
Plumbing and equipment all setup and lines pressurized to 20 psi. Tomorrow we wait for the inspector. If he makes it out here and "approves" before 10 am, then there is a nice chance that they will Gunite tomorrow. If not, then we will have to wait until Wed morning.
Included is a time lapse vid of the plumbing process.
[youtube:unbd15hp]kaQ4aQMlXJI[/youtube:unbd15hp]
Monkey's Mom, I agree with you about how reassuring it is to compare builds at relatively the same time. I have been going back to your build thread a few times to compare notes :-D
Also found the Users manual for the Heater online and read that the heater top panel can be rotated in any direction, so i can change the control panel to face the front when they are done
Well I will keep taking pictures and videos as the process unfolds and will post them for all to see.
Inspection passed this morning and we shoot the gunite tomorrow morning. Very excited as it will now start looking like a real pool and not just a big hole î—
Will post pics and a time lapse vid tomorrow.
Will post pics and a time lapse vid tomorrow.
For the swcg it's supposed to have a stretch of straight pipe in front and after it. Maybe ask them to move it to the middle of the straight section coming from the heater?
Day 6 starts off VERY early. The Gunite crew was here at around 6:15 am and started shooting at around 7 am.
Here are a few starter pics
[attachment=1:2ehu0nyw]Gunite Trucks.JPG[/attachment:2ehu0nyw]
[attachment=0:2ehu0nyw]rsz_shooting_gunite.jpg[/attachment:2ehu0nyw]
Here are a few starter pics
[attachment=1:2ehu0nyw]Gunite Trucks.JPG[/attachment:2ehu0nyw]
[attachment=0:2ehu0nyw]rsz_shooting_gunite.jpg[/attachment:2ehu0nyw]
Attachments


Approx 5 hours later, we are finished with the Gunite.
[attachment=2:213nzdw6]Shooting Gunite 2.jpg[/attachment:213nzdw6]
[attachment=1:213nzdw6]Finished Gunite.jpg[/attachment:213nzdw6]
[attachment=0:213nzdw6]Finished Gunite 2.jpg[/attachment:213nzdw6]
[attachment=2:213nzdw6]Shooting Gunite 2.jpg[/attachment:213nzdw6]
[attachment=1:213nzdw6]Finished Gunite.jpg[/attachment:213nzdw6]
[attachment=0:213nzdw6]Finished Gunite 2.jpg[/attachment:213nzdw6]
Attachments


Thread Status
Hello , This thread has been inactive for over 60 days. New postings here are unlikely to be seen or responded to by other members. For better visibility, consider Starting A New Thread.