New member pool planning in N. Atlanta - Construction Completed 7/2022

Hi and welcome to the world of pools with TFP in your back pocket! I am trying to catch up on all of the build threads since I changed jobs and have more time now!

I am finding YOUR build just in time to share a set of links I put together got new builds:

The first set is all about what to do and ask about to get a great plaster job. The second set is all about how to care for your pool after you get the plaster.

Plaster links:
Ten Guidelines for Quality Pool Plaster Best one of all
All Plaster Finishes Should Last 20 Years
Not All Color Pigments are Good for Pools How to pick a good color for plaster.
A Plastering 'Watch List' | Professional Watershaping | Watershapes
Trouble Free Pool
Trouble Free Pool

Pool care links:
Print these out:
Pool School - Basic Pool Care Schedule
Pool School - Recommended Levels

Bookmark these:
Pool School - Recommended Pool Chemicals
Trouble Free Pool
Pool School - ABCs of Pool Water Chemistry

Now is also a good time to ask what test kit your PB will be providing so we can fill in any holes.

Your waterline tile will go great with your whole concept. I would dig through the boxes to remove and hide any "ugly" tiles and to find and set out the extra pretty ones to put on the part of the wall your eyes will fall on as you walk out to the pool from the house!

Kim:kim:
Thanks for the links Kim. Your timing is perfect! I do need to order a new test kit, and have been going back and forth between the TF-100 Pro with Salt or the K2006C and add the salt test. I currently have a base K2006 that I've used for several years for my hot tub, and a number of the reagents are due for replacement. My tub measures salt separately, and truthfully, it's pretty hard to mess up when it only takes about 8 cups at startup, so. :LOL: Either way, I know the importance of a good test kit, and have already been subscribing to the TFP philosophy for a number of years!

Great suggestion on the tile as well! There are always a few ugly duckling tiles that pop up, so better to remove them up front. Electrical crew is here today for main hookups and to run landscape lighting wire for deck lights. I got off easy on the watering yesterday, as we had steady rain for the better part of the day. I'll get my 3x in today though.
 
and have been going back and forth between the TF-100 Pro with Salt or the K2006C and add the salt test.
FWIW, the seen difference in the 2 kits is all the extra reagents for CYA / TA / CH that will be leftover at expiration time. The TF100 lasts most people until they expire and they don't need the extras.

The unseen difference in the kits is that the TF100 has a known, quick turnaround so the reagents are fresh. The K2006C is widely resold and spends time on each shelf/warehouse. It's luck of the draw if you get fresh bottles.
So you think just a regular TF100 with smart stir and add the salt test?
 
I will be getting the pro-salt for the nifty case. By the time you add up the extras, the package is better
I appreciate the feedback. I think that's how I'm leaning as well, and it will force me to stay organized! Like you said, the one time cost really is pretty much a wash when you add things up. Afterwards, you're just ordering seasonal refills.
 
  • Like
Reactions: Newdude
Here are some of the electrical pics. They decided it was easier to trench the back side of the house and run 60 amp service from the main with a separate disconnect. They'll also be able to piggyback and use the trench for the drainage pipe.

20220228_120605.jpg20220228_120354.jpg20220228_120330.jpg20220228_120339.jpg
 
Question for any of the electrical gurus. I have a line that was severed during my initial dig that goes to my shed. It's 10/2 UF-B and the PB cut out the section that runs through the pool. It runs under my underdeck patio that was poured well after the line was in place and has a junction box on the patio where it connects to the inside romex. I plan to check first, but I'm guessing the conduit does not stretch the depth of the patio making a new pull very difficult. I wanted to get your opinions on either an under ground splice or an above ground junction box. The wire will run directly under our pool decking, so I'm leaning toward a raised junction box (12" high in a garden bed outside the patio) and running a new wire all the way to the shed. I think this will give the best long term reliability. I could splice in just a 25' section of new UF-B to reconnect the severed wire using the terminal/heatshrink wrap style splice kits. I could do one buried in the same garden bed I was considering for the junction box, and the other at the back side of the pool past the decking leaving both accessible. However, I'm not sure how the long term reliability is with underground splices? Any input appreciated.
 
The PB uses the same company for the gasline hookup as the electrical, which makes the process pretty easy. I did find out I'll need an upgraded meter going from standard 7" WC to 2 PSI. I contacted Atlanta Gas Light and filled out the increased demand form, so I'll let everyone know how that goes.
 
Not much to see in the way of progress... I heard back from the gas company, and they have approved the swap for a 2psi meter. No cost, but it could take up to two weeks as they are currently backlogged. Electrical trenches and panel/pad hookups passed inspection, and electric has been restored at the shed. The electrician needs to finish up installation of the new 60 amp cutoff at the main panel. It's supposed to be a rainy week here, so I'm hoping they work the permanent drainage solution this week, as I have corrugated tubing from our downspouts running over the trench for now. However, depending on how much rain we get, I may still need to drop the sump pump in the trench to keep it pumped.
 
  • Like
Reactions: kimkats

Enjoying this content?

Support TFP with a donation.

Give Support
I heard back from the gas company, and they have approved the swap for a 2psi meter. No cost, but it could take up to two weeks as they are currently backlogged.
I'm curious about this. I called and got a larger capacity meter. The guys who came and installed it said I should probably step up to a 2psi system. I didn't want to have to install a regulator on every one of my lines to my appliances. Most of my house is ran on NG. Range, 2 furnaces, tankless water heater, pool heater, and plumbed but not used, fireplace, dryer, stub out in garage for a heater. That was going to be a lot of money for just regulators, not to mention if I paid a plumber to install them.

Do you not have many NG appliances or what is your plan for managing the additional pressure coming in once the meter is swapped?

--Jeff
 
Nevermind... I think I just answered my own question. I'm guessing they install a 2psi meter, then you tap off at the meter for your pool heater, then a single regulator downstream of that tap to drop the pressure to 9" or so for the rest of the house.

Mine wouldn't have worked like that since they tapped off of my NG manifold in my garage to run to the pool heater. My manifold would have had to be 2psi and then I would have had to step down to each fixture.

Just had to talk it through.

--Jeff
Yep, that's exactly how it was explained to me. They use a single regulated line going into the house that steps the pressure back down to the 7WC mark (approx .25 PSI), and have a tap before the regulator so that the PB can run the full 2 PSI pressure line going to the heater.
 
  • Like
Reactions: Turbo1Ton
I came up from meetings yesterday, and apparently we had a pretty big hardscape delivery. No progress due to rain, but at least the stuff is arriving! It looks like it's the materials for the walls (blocks, stacked stone and toppers, leveling material and mortar). Not the best pics due to rain, but it will give you an idea.
20220307_164959.jpg20220307_170557.jpg20220307_165413.jpg20220307_165422.jpg
 
This morning I met with the designer, PM, and masonry crew to finalize the hardscapes. We had some minor changes to stair design/layout and retaining walls, but overall it will be very close to the original plan. They were also going to start grading today, but it was far too soupy with all of the rain. The current plan is to start waterline tile in the next couple of days, and once the ground dries out, they'll start grading and walls.
 
  • Like
Reactions: Newdude
I confirmed that the changes will be included on both the plan and the drawings/renderings before the decking starts. I'll be sure a copy gets put into the job box as well.

The tile guys are here today, so I'll have update pics later this afternoon. The ground is still too wet to do the grading work, so that will likely be later in the week. Kimkats, I went out to meet with the tile crew this morning, and they had already opened the boxes and set several "ugly duckling" tiles aside. They said I was free to go through them as well, as it's less work for them. They're even arranging to make the transitions more gradual. (y)
 
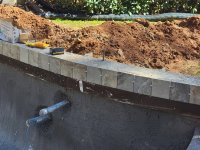
Here are some progress pics. I was wondering how they would handle the skimmers, since the opening is slightly larger than the 6" tile. They mixed cement and built a downward sloping ramp. Once it sets, they will tile the inside of the throat and the sides. You can also see in some of the sunlight pics that some of the tile has a slight texture to it.
20220314_124134.jpg20220314_124206.jpg20220314_124210.jpg20220314_124349.jpg20220314_131936.jpg
 
  • Like
Reactions: HermanTX

Enjoying this content?

Support TFP with a donation.

Give Support
Thread Status
Hello , This thread has been inactive for over 60 days. New postings here are unlikely to be seen or responded to by other members. For better visibility, consider Starting A New Thread.