You have to look HARD to even think you see it! You would need to use some good calipers to know for sure it was done that way! NICE job and thanks for sharing!

New Build - SE Houston Area - Adding Salt too soon to Pool
- Thread starter Mbb04
- Start date
You are using an out of date browser. It may not display this or other websites correctly.
You should upgrade or use an alternative browser.
You should upgrade or use an alternative browser.
- Jul 31, 2021
- 94
- Surface
- Plaster
- Chlorine
- Salt Water Generator
- SWG Type
- Pentair Intellichlor IC-40
Thanks very much Kim. We are going with the tile on the right and the travertine decking on the left. Too many concerns with the white marble.You rang??? Love your pool design so far! Well done!
Tiles-I like the both but the one on the right is my fav. One big thing you will want to think about and play around with will be the grout color-white will make each tile pop out where a darker gray will help them blend in better. BOTH are very pretty but wanted you to think about it ahead of time. They should have grout sticks for you to borrow to help you see what each one will look like.
Another thing is the tile installers. They are going to have to be top shelve installers to get good placement and even sized on the end runs and in the skimmer area. Have them really think about where the end tiles will be so there are not tiny tile cut that will show up too much.
Thanks I will definitely discuss that with the tile installers prior to them starting.
- Jul 31, 2021
- 94
- Surface
- Plaster
- Chlorine
- Salt Water Generator
- SWG Type
- Pentair Intellichlor IC-40
Very nice@kimkats You'll have to excuse the Crud angle, because I wasn't going to hop in for this picture.
I forgot that he actually cut the backing to make it even smaller than sheets when he did this. You can see every ~3 tile-widths or so, the pattern has a complete vertical line. Every single one of them is slightly widened. As I said, it's definitely something you can see, but very subtle.
And yes, I'm quite happy with all the subs my PB used. Good quality work all around.
View attachment 379163
- Jul 31, 2021
- 94
- Surface
- Plaster
- Chlorine
- Salt Water Generator
- SWG Type
- Pentair Intellichlor IC-40
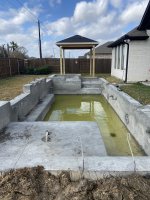
Well today was finally dig day. Unfortunately I didn’t get any pictures as we had to jump mid dig from one entry point to my yard to another because of a POS home builder they revoked our access midway through the dig. Luckily for awesome neighbors that accommodated us on the fly. The pool builder covered the pool and rebar/stub plumbing is scheduled for tomorrow and hopefully all inspections on Thursday to shoot gunite by friday before the rain this weekend. I’ll snap some pics when I can tomorrow.
Glad your neighbors stepped up and let you use their access! GURRRRRRRRRR on the builder that let you start but not finish...........now both sides of your yard are going to need to be fixed!
- Jul 31, 2021
- 94
- Surface
- Plaster
- Chlorine
- Salt Water Generator
- SWG Type
- Pentair Intellichlor IC-40
I was actually accessing an empty lot two houses over and they were going through a drainage easement through the back of my yard. Oh well we are on to the next step thanks to awesome neighbors.Glad your neighbors stepped up and let you use their access! GURRRRRRRRRR on the builder that let you start but not finish...........now both sides of your yard are going to need to be fixed!
- Jul 31, 2021
- 94
- Surface
- Plaster
- Chlorine
- Salt Water Generator
- SWG Type
- Pentair Intellichlor IC-40
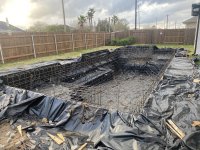
This is the first time I've seen a plastic lining be used. Interesting!
Did the PB explain why they went with that?
Did the PB explain why they went with that?
- Jul 31, 2021
- 94
- Surface
- Plaster
- Chlorine
- Salt Water Generator
- SWG Type
- Pentair Intellichlor IC-40
Yes it’s because we building within 5’ of our house and it’s a new city code when you build that close. The thought is to keep a water barrier between the pool and foundation to prevent any erosion.This is the first time I've seen a plastic lining be used. Interesting!
Did the PB explain why they went with that?
- Jul 31, 2021
- 94
- Surface
- Plaster
- Chlorine
- Salt Water Generator
- SWG Type
- Pentair Intellichlor IC-40
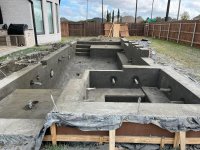
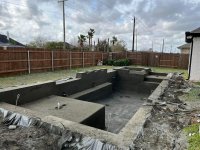
Gunite was completed on Friday. We got a bunch of rain Saturday and left a few feet in the pool. Gunite cleanup and long plumbing/equipment pad set up scheduled to start this coming week. Also our patio is going to get started this week.
Attachments
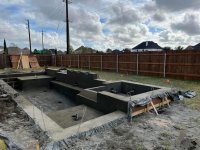
SWEET!!! That looks great! Have you started bonding with it yet? aka watering it to help slow down the curing.
It is time for your set of links! The first set is all about what to do and ask about to get a great plaster job. The second set is all about how to care for your pool after you get the plaster.
Plaster links:
Ten Guidelines for Quality Pool Plaster Best one of all
All Plaster Finishes Should Last 20 Years
Not All Color Pigments are Good for Pools How to pick a good color for plaster.
A Plastering 'Watch List' | Professional Watershaping | Watershapes
Trouble Free Pool
Trouble Free Pool
Pool care links:
Print these out:
Pool School - Basic Pool Care Schedule
Pool School - Recommended Levels
Bookmark these:
Pool School - Recommended Pool Chemicals
Trouble Free Pool
Pool School - ABCs of Pool Water Chemistry
Now is also a good time to ask what test kit your PB will be providing so we can fill in any holes.
Kim
- Jul 31, 2021
- 94
- Surface
- Plaster
- Chlorine
- Salt Water Generator
- SWG Type
- Pentair Intellichlor IC-40
Yes I have. We got about 3” of rain yesterday so nothing for me to do. But I’ve started today with watering. Going to set a sprinkler up to help me out this week.SWEET!!! That looks great! Have you started bonding with it yet? aka watering it to help slow down the curing.
It is time for your set of links! The first set is all about what to do and ask about to get a great plaster job. The second set is all about how to care for your pool after you get the plaster.
Plaster links:
Ten Guidelines for Quality Pool Plaster Best one of all
All Plaster Finishes Should Last 20 Years
Not All Color Pigments are Good for Pools How to pick a good color for plaster.
A Plastering 'Watch List' | Professional Watershaping | Watershapes
Trouble Free Pool
Trouble Free Pool
Pool care links:
Print these out:
Pool School - Basic Pool Care Schedule
Pool School - Recommended Levels
Bookmark these:
Pool School - Recommended Pool Chemicals
Trouble Free Pool
Pool School - ABCs of Pool Water Chemistry
Now is also a good time to ask what test kit your PB will be providing so we can fill in any holes.
Kim
Well the rain came at a good time after you had gunite. Even though it rained Saturday - keep watering your gunite daily to have it cure properly.Gunite was completed on Friday. We got a bunch of rain Saturday and left a few feet in the pool. Gunite cleanup and long plumbing/equipment pad set up scheduled to start this coming week. Also our patio is going to get started this week.
Watering New Gunite and Concrete - Further Reading
 www.troublefreepool.com
- Jul 31, 2021
- 94
- Surface
- Plaster
- Chlorine
- Salt Water Generator
- SWG Type
- Pentair Intellichlor IC-40
- Jul 31, 2021
- 94
- Surface
- Plaster
- Chlorine
- Salt Water Generator
- SWG Type
- Pentair Intellichlor IC-40


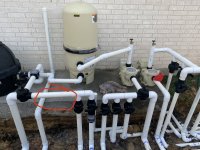
I like the use of all the same make of 2-way and 3-way valves. Plumber did a great job. You indicate that you will have a SWCG but I do not see where the plumber inserted a dummy with unions for that?Plumbing and equipment set. Electrical should be completed today
- Jul 31, 2021
- 94
- Surface
- Plaster
- Chlorine
- Salt Water Generator
- SWG Type
- Pentair Intellichlor IC-40
They didn’t have the swg when they initially plumbed it so they ate going to have to come back and do it. What’s the best location for it? Downstream of the heater and equipment?I like the use of all the same make of 2-way and 3-way valves. Plumber did a great job. You indicate that you will have a SWCG but I do not see where the plumber inserted a dummy with unions for that?
- Jul 31, 2021
- 94
- Surface
- Plaster
- Chlorine
- Salt Water Generator
- SWG Type
- Pentair Intellichlor IC-40
This is where they are saying it will go. Does that make sense? That’s where I would think it should go but maybe I’m nothing thinking through it correctlyI like the use of all the same make of 2-way and 3-way valves. Plumber did a great job. You indicate that you will have a SWCG but I do not see where the plumber inserted a dummy with unions for that?
Attachments
- May 3, 2014
- 62,676
- Pool Size
- 6000
- Surface
- Fiberglass
- Chlorine
- Salt Water Generator
- SWG Type
- Pentair Intellichlor IC-40
What does the line go to from the three way valve before the SWCG location?
After seeing you have a spa, I suppose that line to the left is for the spa. Then your SWCG should be BEFORE the three way valve. Not after.
After seeing you have a spa, I suppose that line to the left is for the spa. Then your SWCG should be BEFORE the three way valve. Not after.
- Jul 21, 2013
- 65,132
- Pool Size
- 35000
- Surface
- Plaster
- Chlorine
- Salt Water Generator
- SWG Type
- Pentair Intellichlor IC-60
Then your SWCG should be BEFORE the three way valve. Not after.
And you program in your ET to reduce the SWG output when in SPA mode versus POOL mode.
Thread Status
Hello , This thread has been inactive for over 60 days. New postings here are unlikely to be seen or responded to by other members. For better visibility, consider Starting A New Thread.