While this is pretty straightforward, I thought I would share my install just in case it sparks any ideas for someone else. All in all, it was pretty simple and easy to get done.
First the bits:
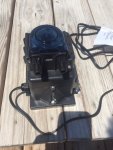
One Stenner Econ T pump with timer. I also purchased the mounting bracket, which makes sense with my install as you'll read in a bit.
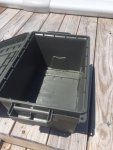
One $17 Ammo box from Amazon:
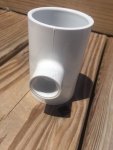
One 1.5" slip fitting with a 1/2" NPT threaded female port:
One very heavy 13 gallon barrel:
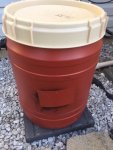
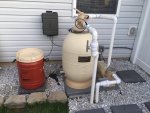
I bought this on FB market place for $8. I just couldn't make myself pay $200 for a Stenner tank when these are so readily and cheaply available. I used an 18" paver for the pedestal. The barrel has a nice, large screw-top lid, which makes pouring in the bleach very easy and prevent spilling, I wanted to drill the vent port as high as possible to allow for the most volume, so I drilled it just below the lid. I was a little worried about the angle of the barrel in that location. So, I grabbed a 58 cent plastic elbow at Lowe's to redirect the opening and prevent rain from getting in the barrel.
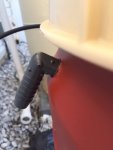
In deciding where to place the injection port, I felt that injecting after the filter and directly into the return would be the least invasive and safest for my equipment in the event of an error. Fortunately, my "package" from the pool installer included this beautiful $300 combination inaccurate thermometer and paperweight, so it was my target of interest in deciding the location. It was installed with buttress fittings, so I was able to remove it without cutting any of the plumbing. I do admit that the uselessness of this thing was most of what drew me to this site. So, I have that to thank it for.
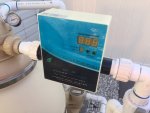
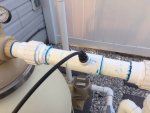
Using a couple of short lengths of pipe, two 1.5" slip-to-buttress fittings and the T fitting above, I fashioned a system that matched the length and fitting style of the ionizer and it's associated transition fittings. I almost decided not to post this pic because my PVC gluing job was embarrassingly messy. So much so, that I may get more fittings and make another one. I just have to decide if it's worth $15 dollars to not see the blue slop all over it every time I look at it. But, it doesn't leak, so I guess that's not too awful for a first timer.
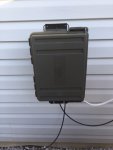
The purpose of the ammo box is to serve as a protective housing for the pump and its power supply. The mounting bracket allows the pump to be very easily removed for reprogramming. It's two-part design has a plate that mounts to the mounting surface and a second one that mounts to the pump. One plate is slotted and the other features a tenon. So, you simply slide the pump up and out of the slot to pull it free from its mounted position.
I also mounted a short outdoor grade extension in the box. This was necessary to accommodate the wall wart style power supply for the Stenner. If I have any criticism of this pump, it is the power supply. It makes protecting the power supply in outdoor conditions more difficult. Although, it is probably the right design. The pump runs on low voltage DC, so including the transformer in the pump housing would just make it bulkier and heavier, along with it being less serviceable should that power supply fail.
I notched the bottom edge of the box with a rotary tool to accommodate the power chord, and drilled two holes for the lines, making them over-sized enough that they will easily slide up and down when pulling the pump to reprogram or service. I considered (and still am) simply cutting a square opening in the bottom of the box roughly the width of the pump exits just in case the pump were to leak, hoping it would prevent it from accumulating on the bottom of the box. The down side it that it makes it easier for creepy crawlies and other critters to get in and take up residence. The jury is still out on that one.
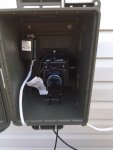
So, it shuts up nicely with everything safe and sound:
It's not the most glamorous setup for sure, but I think it is going to work well for us:
The system is setup to inject during a time which the pump is running. The pump features a built-in timer, which has proven to be remarkably reliable. (until it isn't) Further, the Stenner is powered from the same GFCI outlet that powers the pump. (it only draws .75 amps) So, if the GFCI or breaker trips, both are disabled, as the battery backup in the Stenner only preserves the time and injection programming. It will not power the pump. That said, there are obviously scenarios where the Stenner could inject anyway even if the pump failed or the main pump timer start and end time was inadvertently changed. This could happen, as the pump timer is pretty rudimentary in design.
So, I have debated what sort of additional precautions I should take to prevent damage to the equipment should I get injection when the pump isn't running. I know that all of the electronics wizards could generate many elaborate designs, but I just don't think that works for me right now. Plus, if I was regularly interrupting power to the Stenner, I would be changing batteries in it all the time. I also considered installing a check valve in that new part I fashioned so that if chlorine is injected in a standing system, at least it would only flow down and stand in the return line plumbing and not back to the filter.
I ultimately decided that even if chlorine flows into the filter, there would be enough dilution with the water in the system that it would be fine. I am injecting @48 oz of fluid daily. So, I am thinking even 2-3 days wouldn't do great harm. If it happened for many days, I understand that would be an issue. But, I don't see a scenario where the pool goes several days unattended. I suppose the perfect storm of an eight-day vacation and the pump exploding as we leave the driveway exists, but I may just gamble on that.
Any thoughts on better precautions are greatly appreciated.
If you've made it this far, thanks for reading! I hope this inspires someone else to take this on. It is going to make managing the pool a much simpler chore.
First the bits:

One Stenner Econ T pump with timer. I also purchased the mounting bracket, which makes sense with my install as you'll read in a bit.
One $17 Ammo box from Amazon:

One 1.5" slip fitting with a 1/2" NPT threaded female port:

One very heavy 13 gallon barrel:

I bought this on FB market place for $8. I just couldn't make myself pay $200 for a Stenner tank when these are so readily and cheaply available. I used an 18" paver for the pedestal. The barrel has a nice, large screw-top lid, which makes pouring in the bleach very easy and prevent spilling, I wanted to drill the vent port as high as possible to allow for the most volume, so I drilled it just below the lid. I was a little worried about the angle of the barrel in that location. So, I grabbed a 58 cent plastic elbow at Lowe's to redirect the opening and prevent rain from getting in the barrel.

In deciding where to place the injection port, I felt that injecting after the filter and directly into the return would be the least invasive and safest for my equipment in the event of an error. Fortunately, my "package" from the pool installer included this beautiful $300 combination inaccurate thermometer and paperweight, so it was my target of interest in deciding the location. It was installed with buttress fittings, so I was able to remove it without cutting any of the plumbing. I do admit that the uselessness of this thing was most of what drew me to this site. So, I have that to thank it for.

Using a couple of short lengths of pipe, two 1.5" slip-to-buttress fittings and the T fitting above, I fashioned a system that matched the length and fitting style of the ionizer and it's associated transition fittings. I almost decided not to post this pic because my PVC gluing job was embarrassingly messy. So much so, that I may get more fittings and make another one. I just have to decide if it's worth $15 dollars to not see the blue slop all over it every time I look at it. But, it doesn't leak, so I guess that's not too awful for a first timer.

The purpose of the ammo box is to serve as a protective housing for the pump and its power supply. The mounting bracket allows the pump to be very easily removed for reprogramming. It's two-part design has a plate that mounts to the mounting surface and a second one that mounts to the pump. One plate is slotted and the other features a tenon. So, you simply slide the pump up and out of the slot to pull it free from its mounted position.
I also mounted a short outdoor grade extension in the box. This was necessary to accommodate the wall wart style power supply for the Stenner. If I have any criticism of this pump, it is the power supply. It makes protecting the power supply in outdoor conditions more difficult. Although, it is probably the right design. The pump runs on low voltage DC, so including the transformer in the pump housing would just make it bulkier and heavier, along with it being less serviceable should that power supply fail.
I notched the bottom edge of the box with a rotary tool to accommodate the power chord, and drilled two holes for the lines, making them over-sized enough that they will easily slide up and down when pulling the pump to reprogram or service. I considered (and still am) simply cutting a square opening in the bottom of the box roughly the width of the pump exits just in case the pump were to leak, hoping it would prevent it from accumulating on the bottom of the box. The down side it that it makes it easier for creepy crawlies and other critters to get in and take up residence. The jury is still out on that one.

So, it shuts up nicely with everything safe and sound:

It's not the most glamorous setup for sure, but I think it is going to work well for us:

The system is setup to inject during a time which the pump is running. The pump features a built-in timer, which has proven to be remarkably reliable. (until it isn't) Further, the Stenner is powered from the same GFCI outlet that powers the pump. (it only draws .75 amps) So, if the GFCI or breaker trips, both are disabled, as the battery backup in the Stenner only preserves the time and injection programming. It will not power the pump. That said, there are obviously scenarios where the Stenner could inject anyway even if the pump failed or the main pump timer start and end time was inadvertently changed. This could happen, as the pump timer is pretty rudimentary in design.
So, I have debated what sort of additional precautions I should take to prevent damage to the equipment should I get injection when the pump isn't running. I know that all of the electronics wizards could generate many elaborate designs, but I just don't think that works for me right now. Plus, if I was regularly interrupting power to the Stenner, I would be changing batteries in it all the time. I also considered installing a check valve in that new part I fashioned so that if chlorine is injected in a standing system, at least it would only flow down and stand in the return line plumbing and not back to the filter.
I ultimately decided that even if chlorine flows into the filter, there would be enough dilution with the water in the system that it would be fine. I am injecting @48 oz of fluid daily. So, I am thinking even 2-3 days wouldn't do great harm. If it happened for many days, I understand that would be an issue. But, I don't see a scenario where the pool goes several days unattended. I suppose the perfect storm of an eight-day vacation and the pump exploding as we leave the driveway exists, but I may just gamble on that.
Any thoughts on better precautions are greatly appreciated.
If you've made it this far, thanks for reading! I hope this inspires someone else to take this on. It is going to make managing the pool a much simpler chore.
Last edited:

