My Above Ground Pool Modifications

lightmaster

0
TFP Guide
Jun 22, 2017
859
Baxley, GA
Pool Size
35000
Surface
Vinyl
Chlorine
Salt Water Generator
SWG Type
CircuPool RJ-45
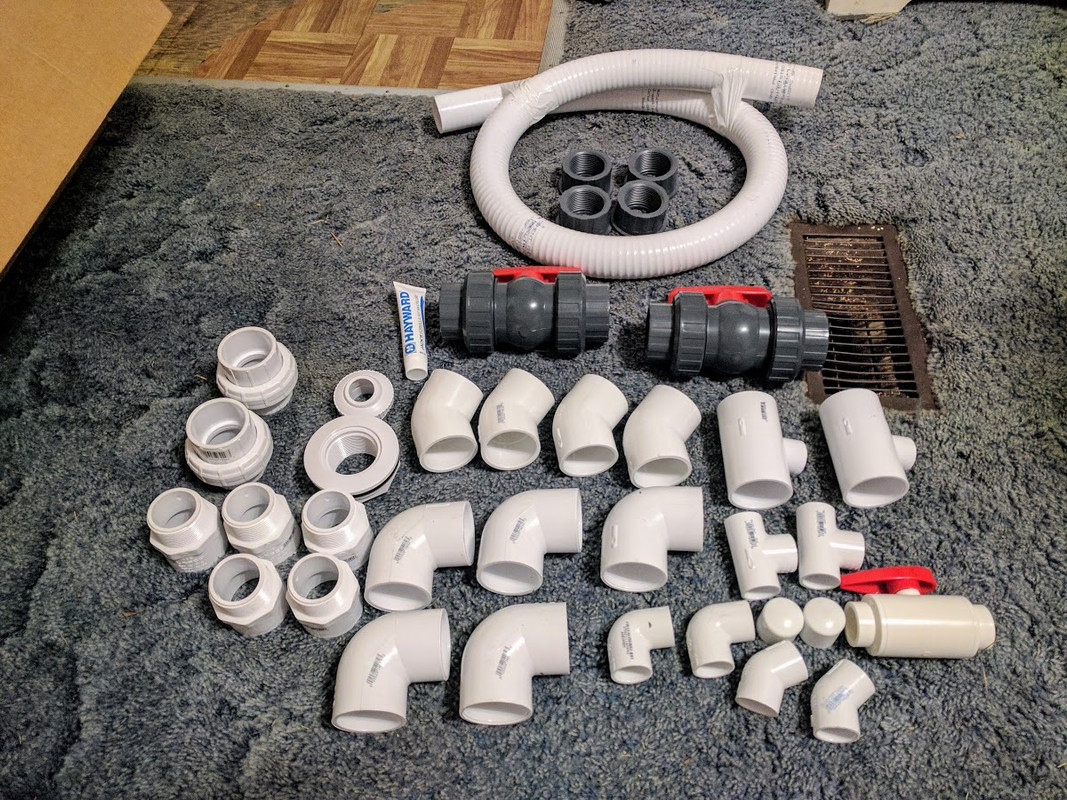
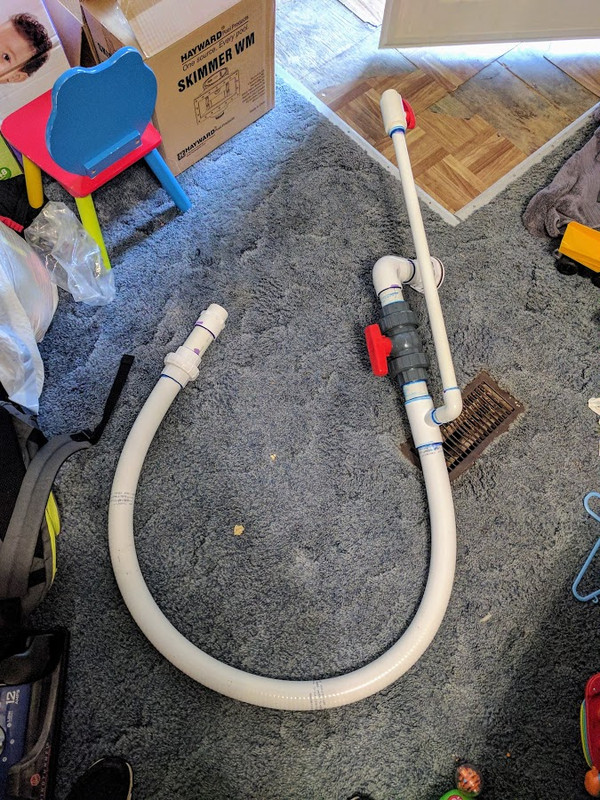
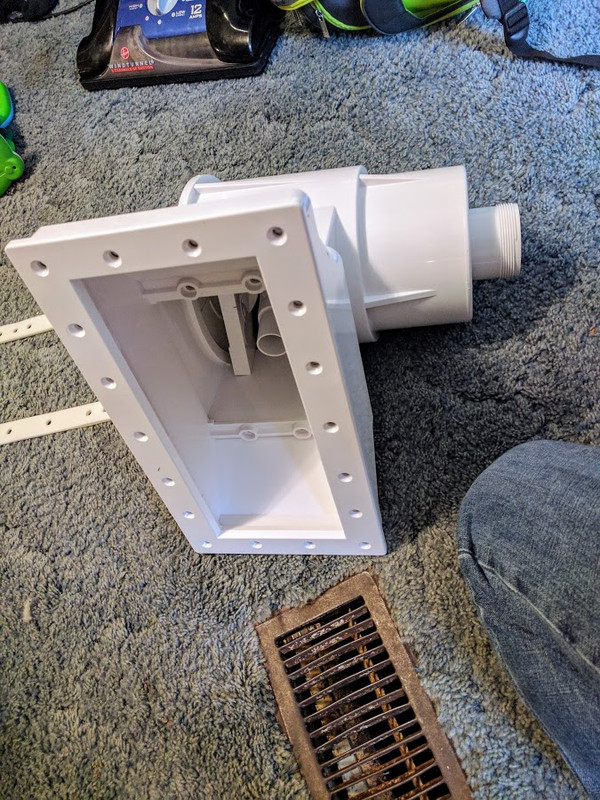
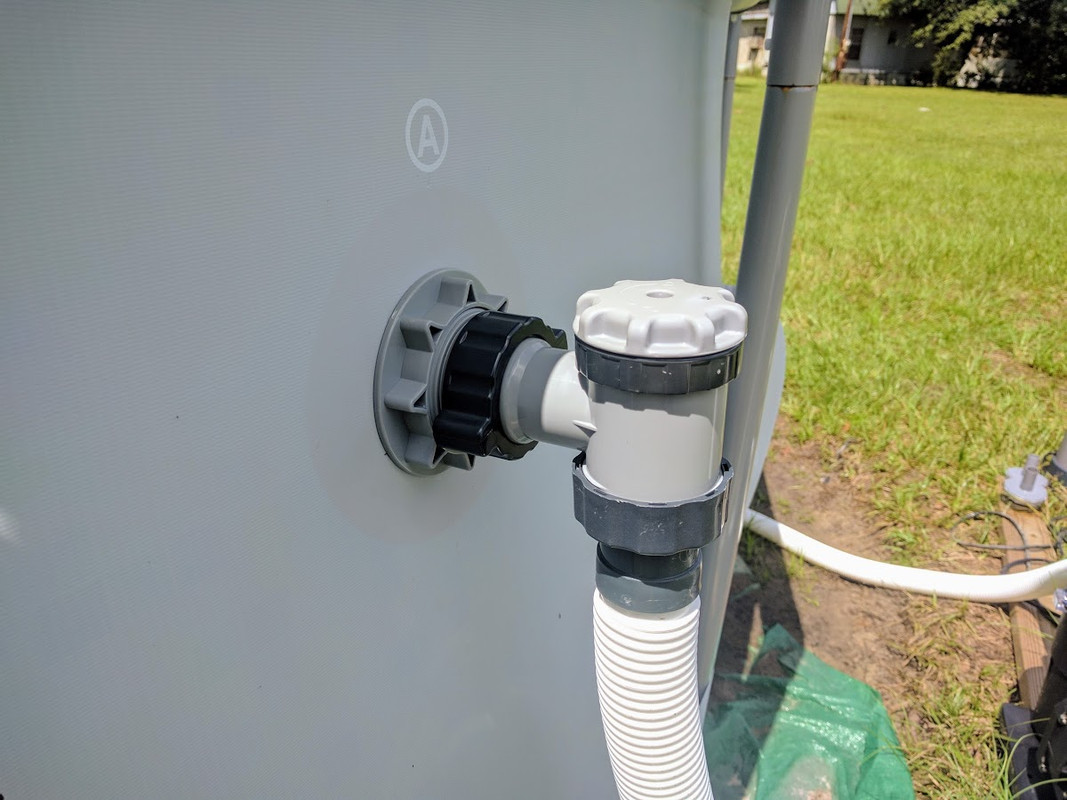
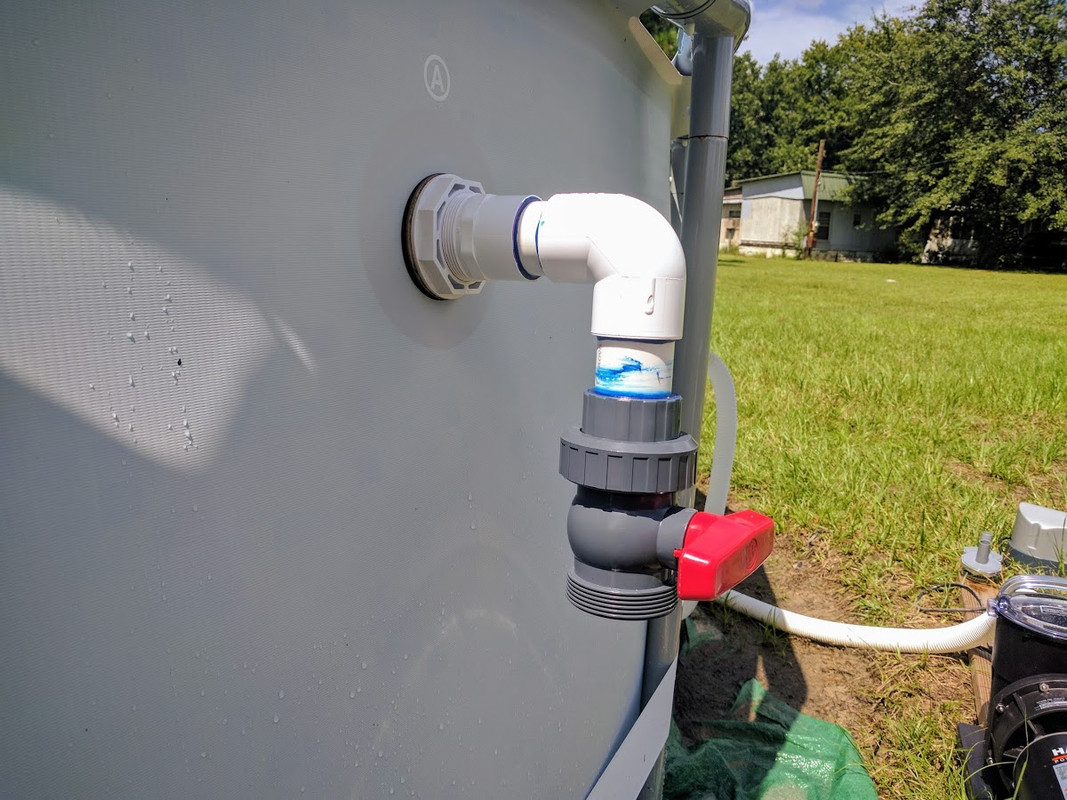
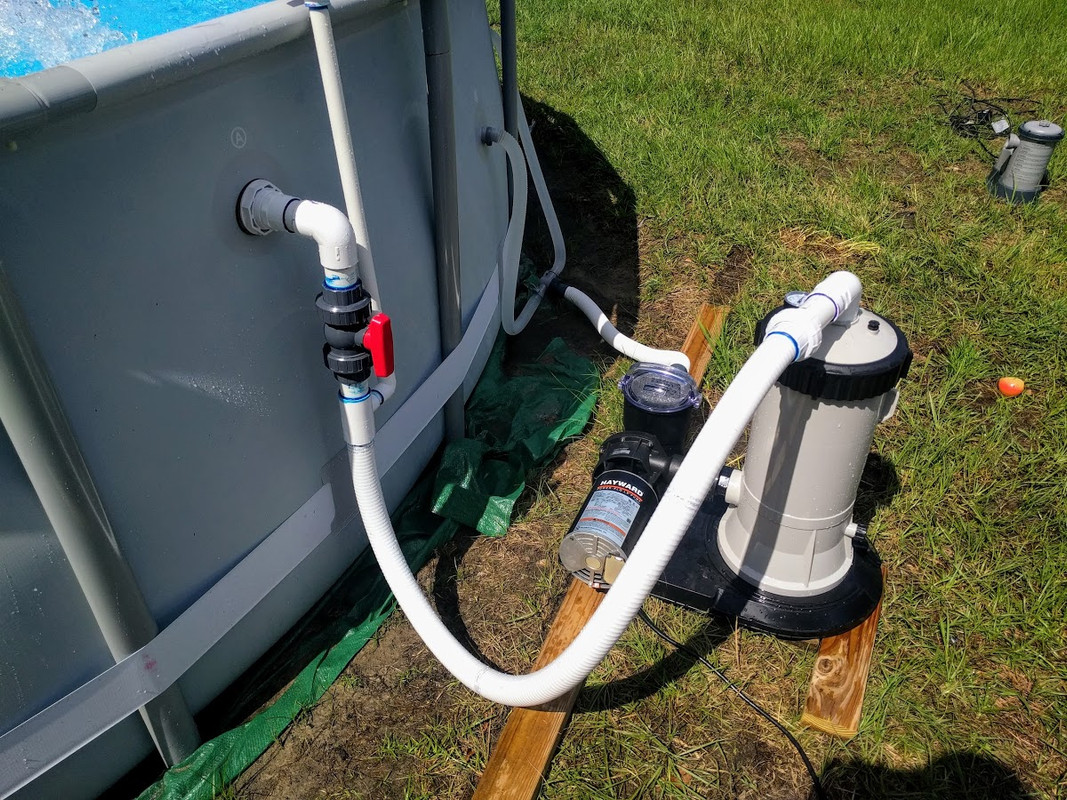
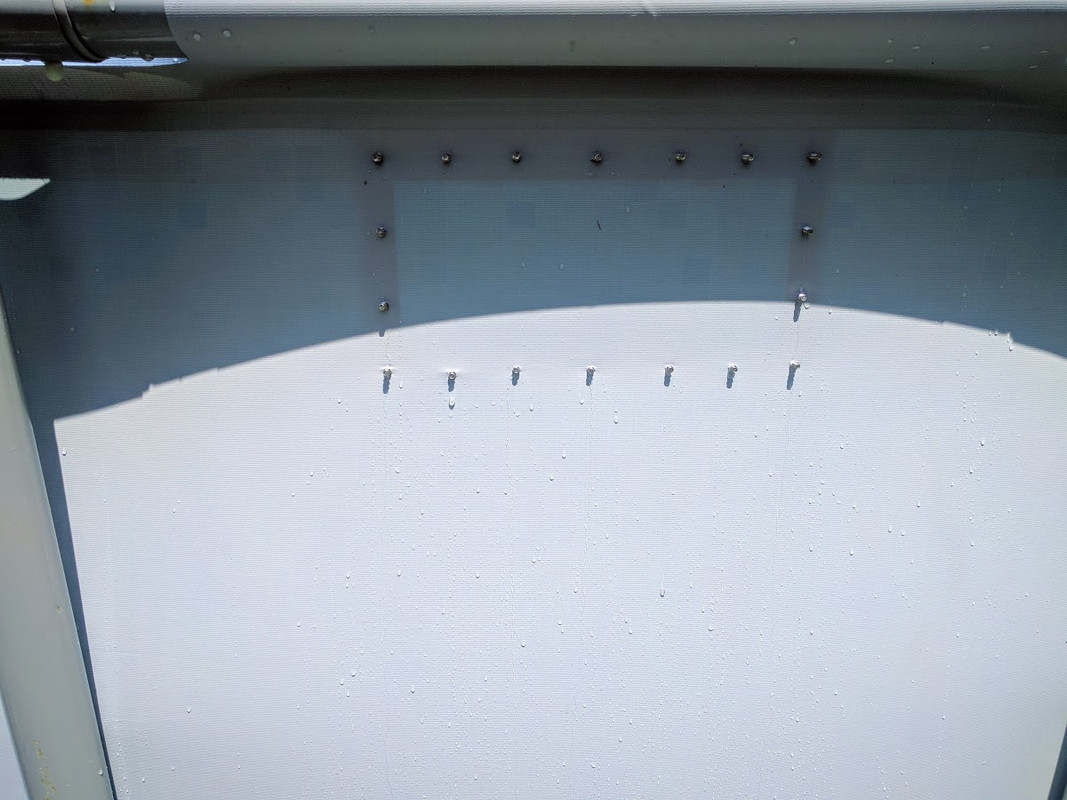
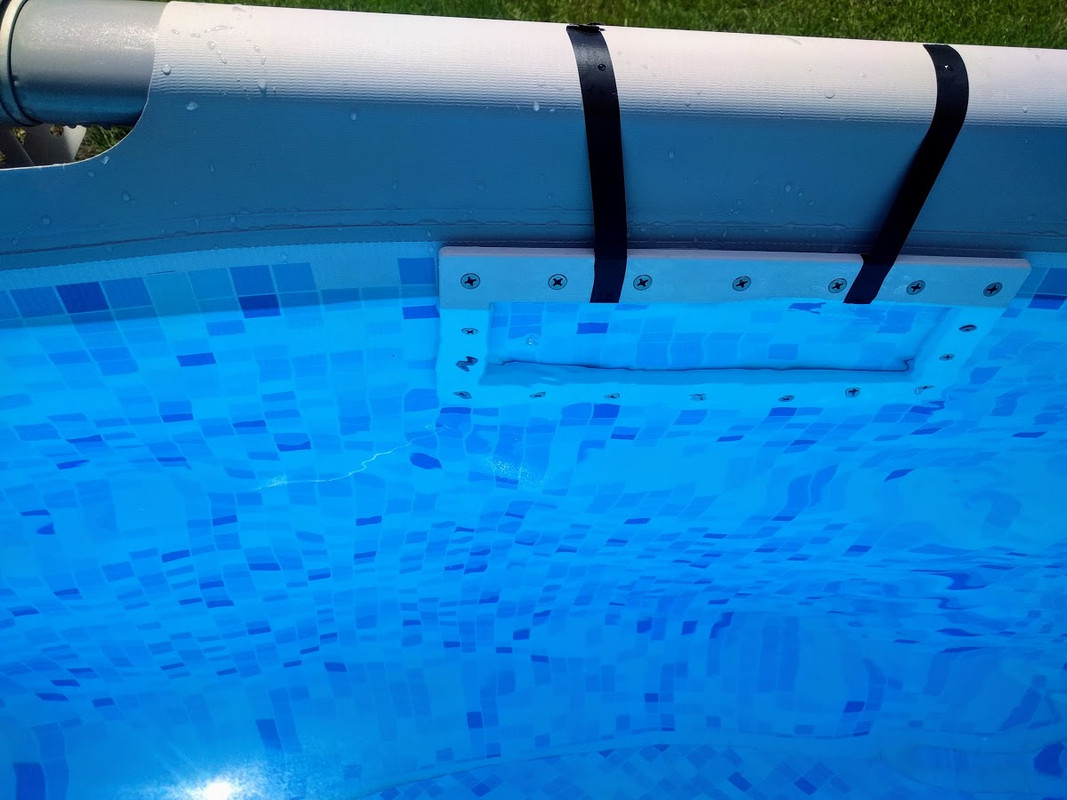
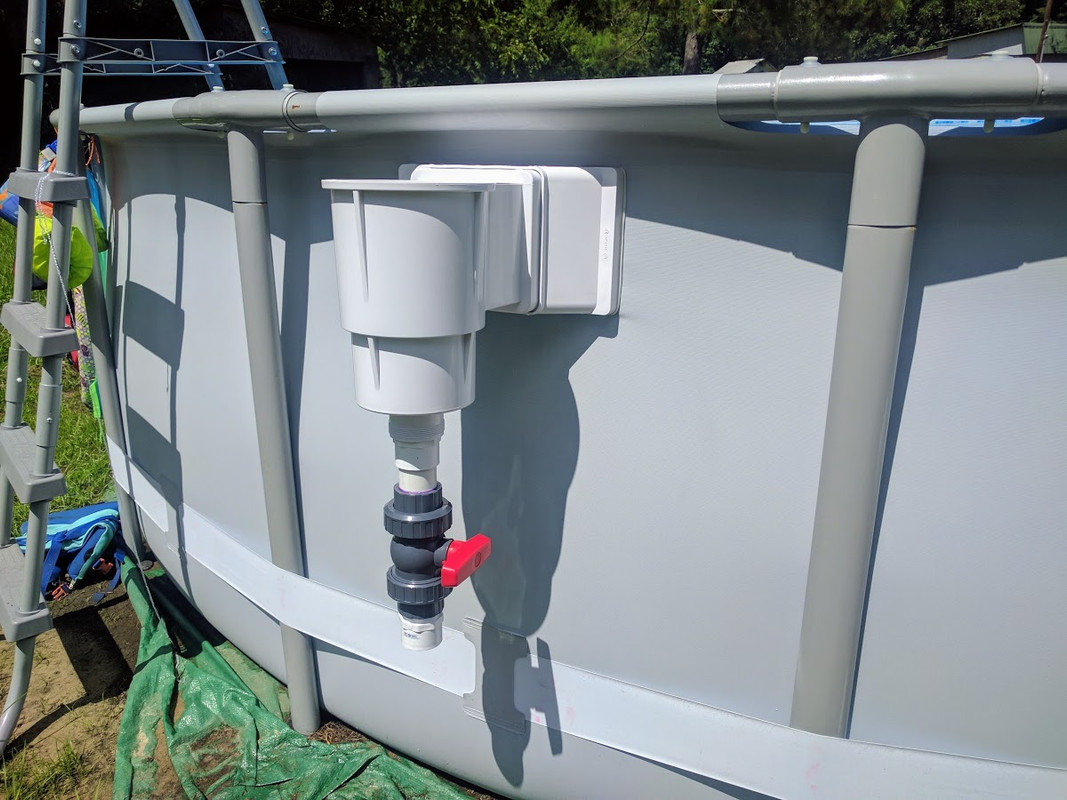
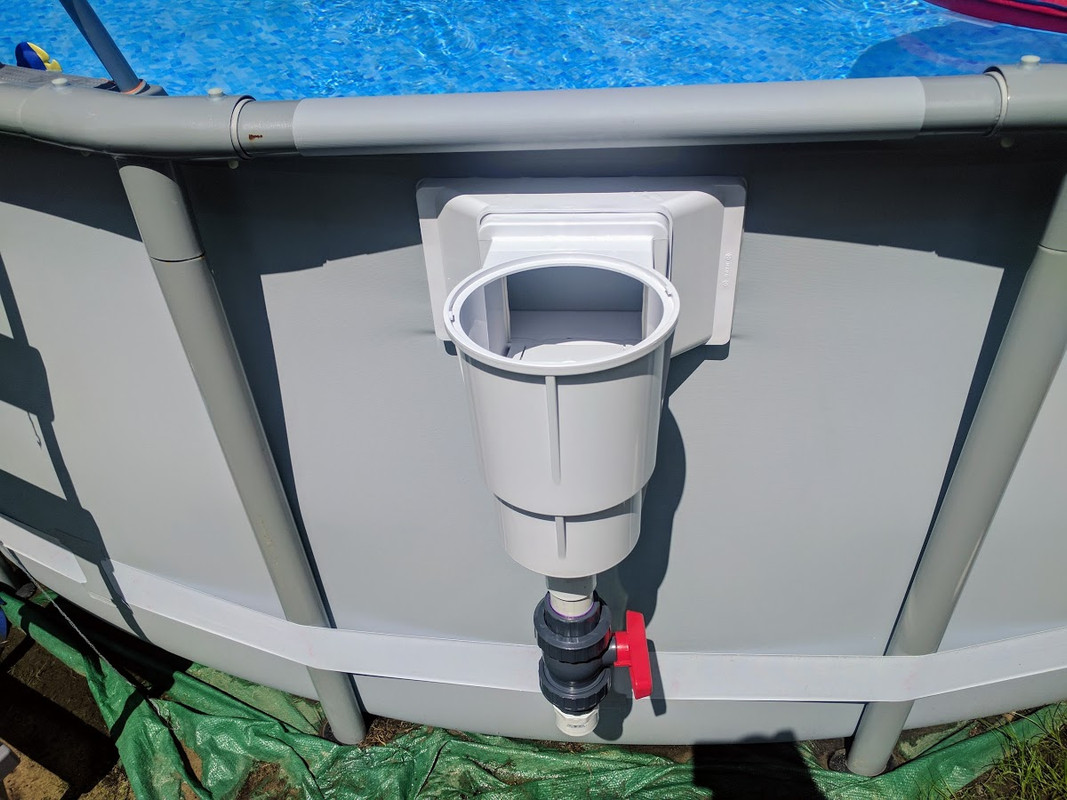
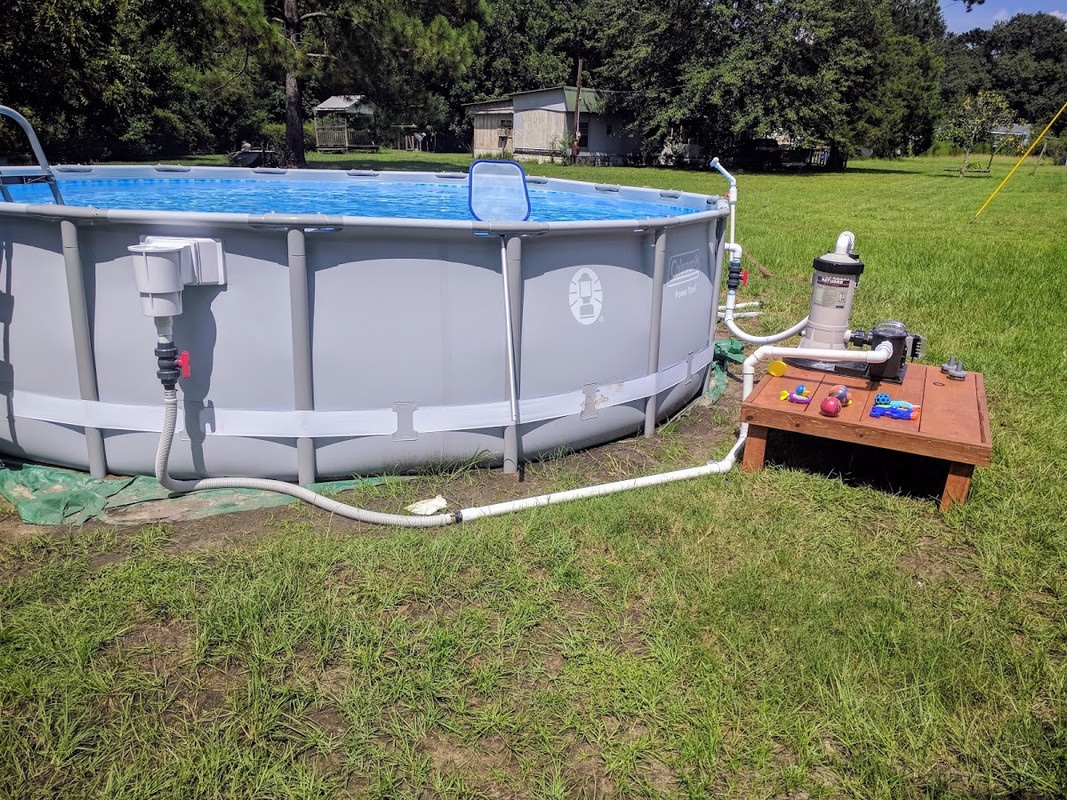
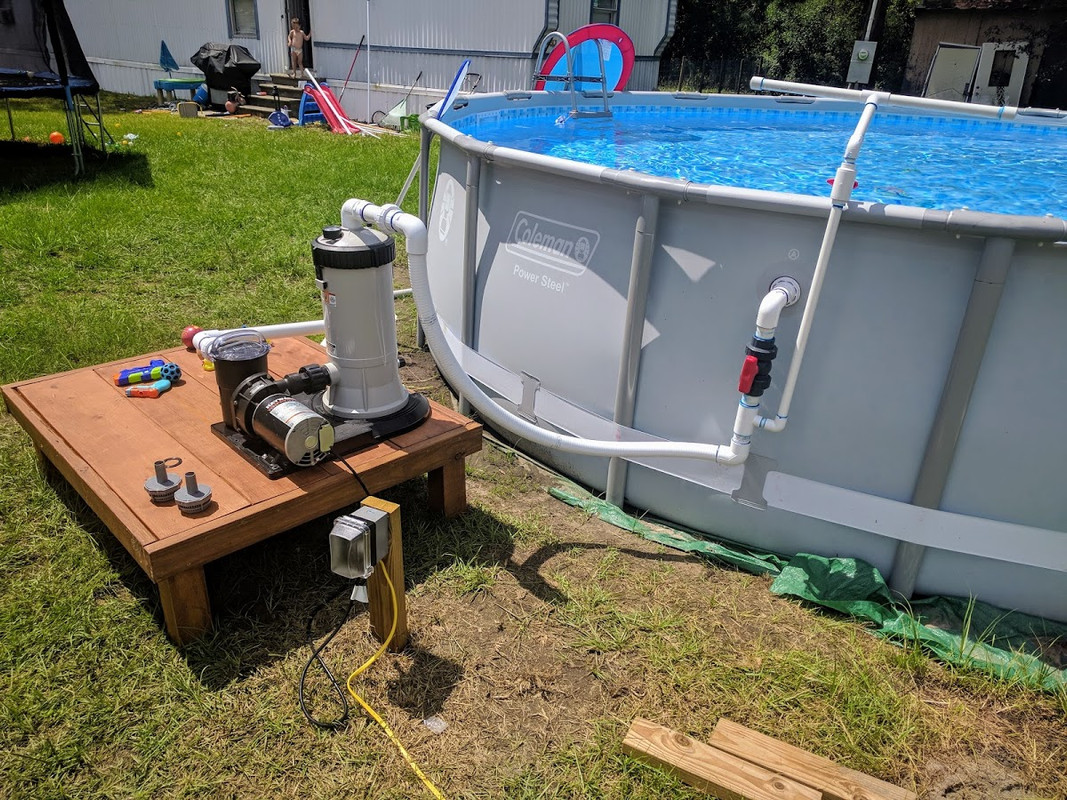
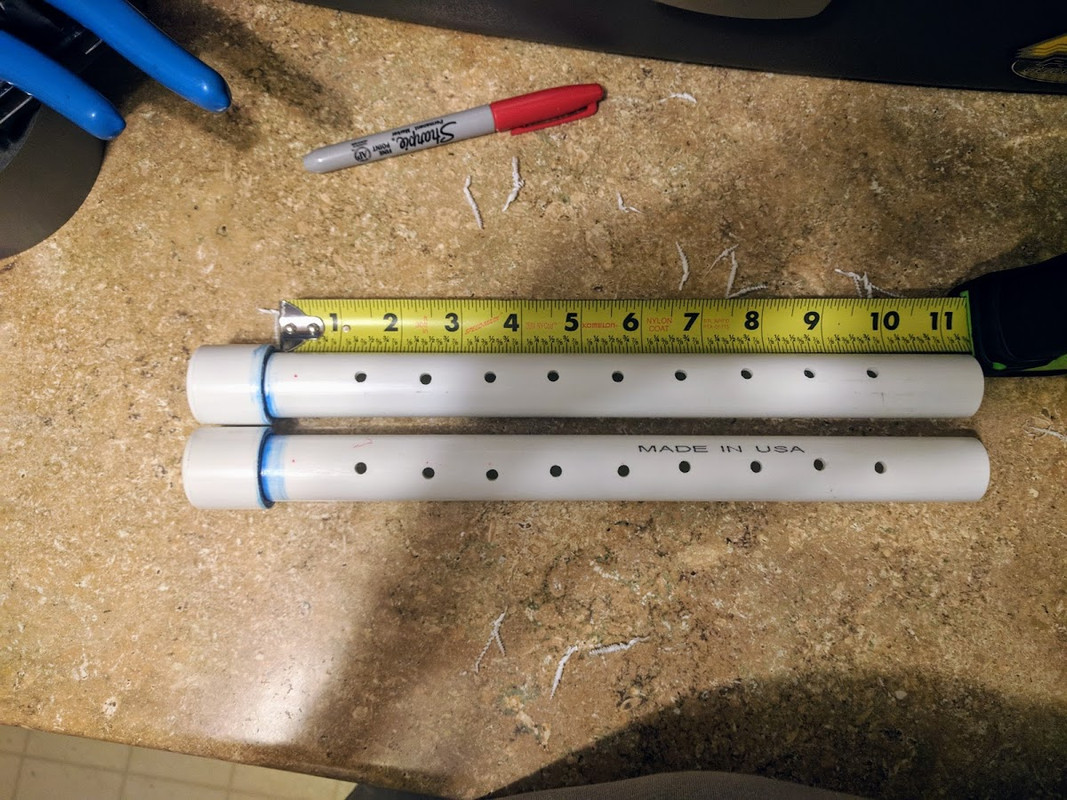
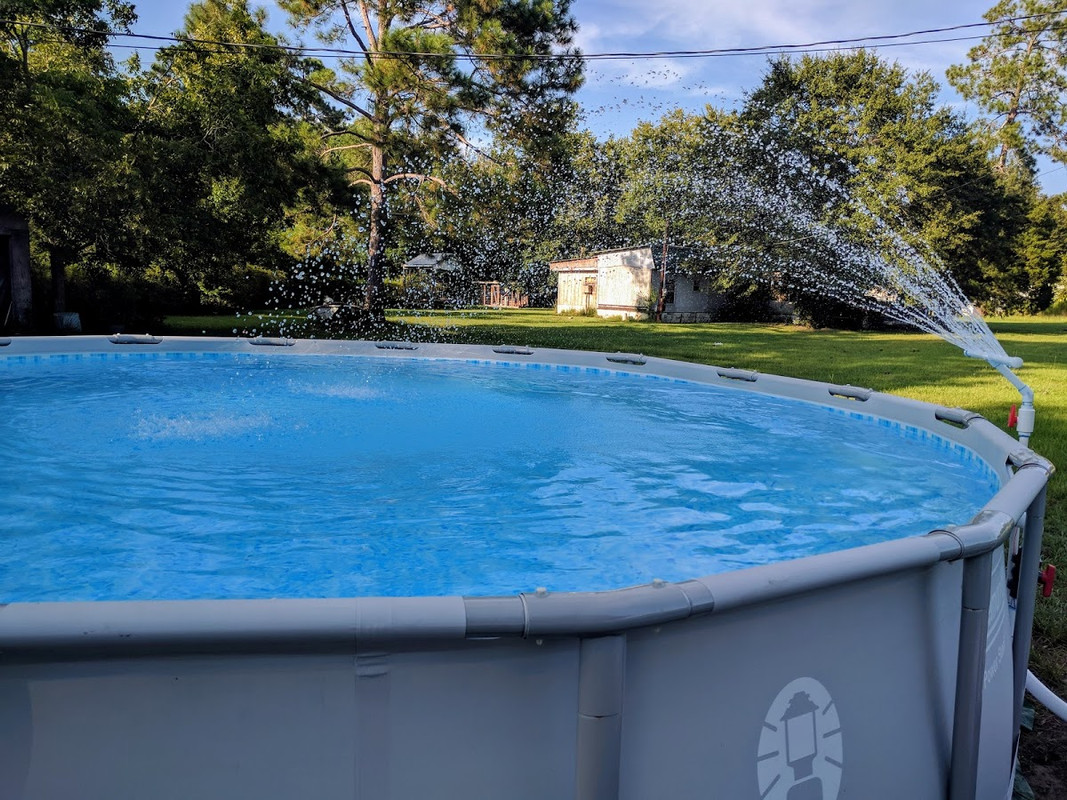
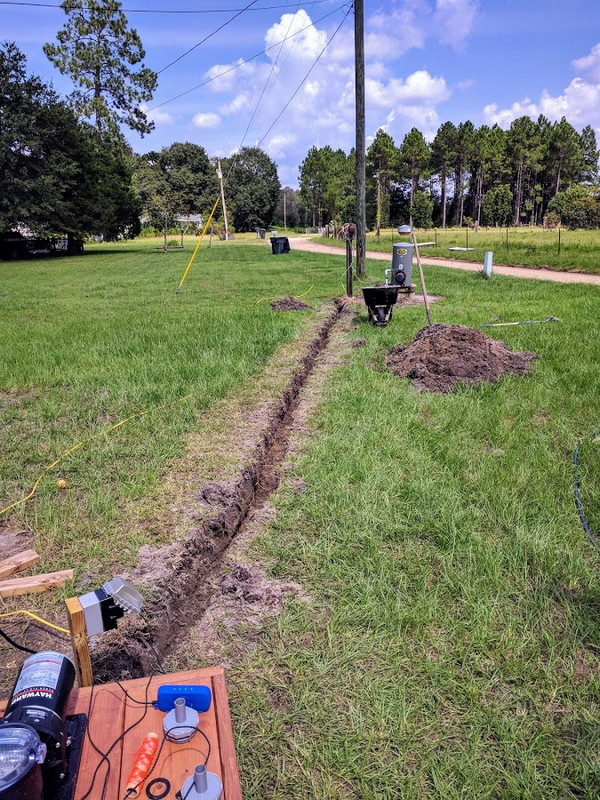
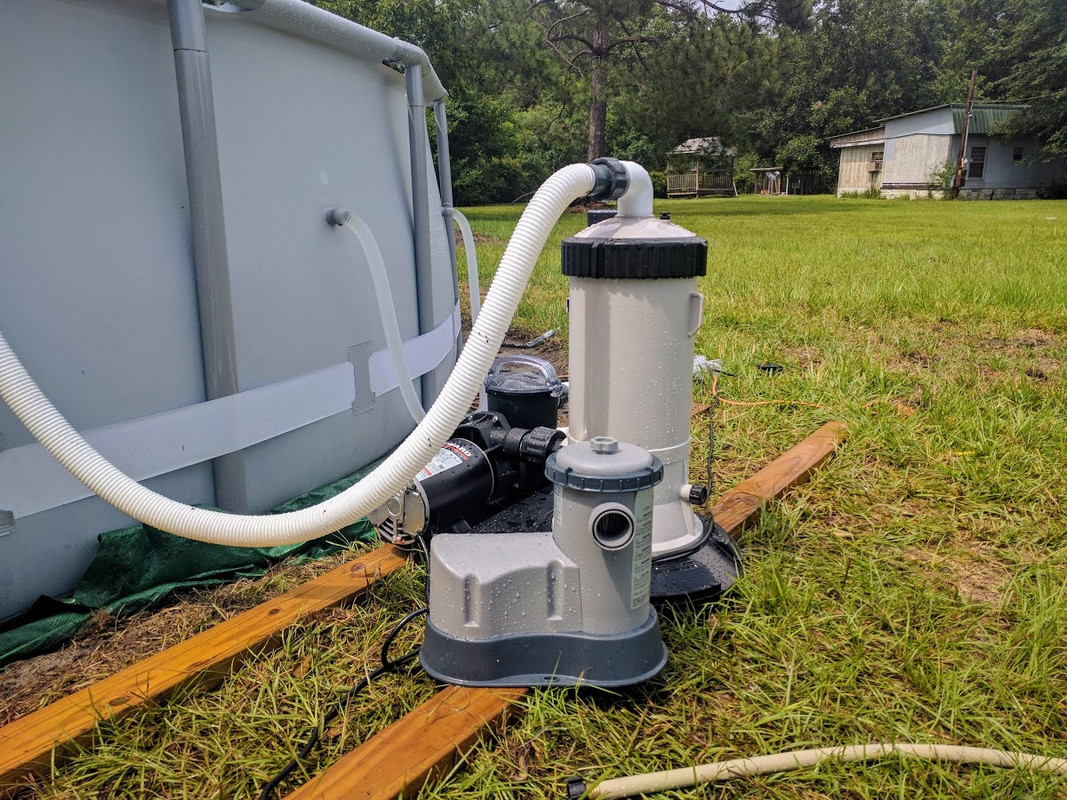
Been planning to install a skimmer and hard plumb my 18'x48" AG pool for a while now, and now I'm finally getting around to it. I've already connected my new Hayward Power-Flo LX 1HP and Hayward Easy-Clear filter, but its still using the hoses that came with my pool. Once all the parts arrive in the mail next week, I'll be installing skimmer and cutting the liner, using just the skimmer as the inlet for the pump, and I'll be replacing the plunger valve and odd jet that came with my pool with a normal ball valve and a 1" eyeball jet. Gonna use 1-1/2" PVC for the skimmer to support the weight of the water in it, since my pool's soft vinyl liner won't be able to support it on its own, and I'll be using a combination of 1-1/2" PVC and 1-1/2" flexible PVC on the return so it has a bit of play in case we get rough in the pool. I'll also be burying the electrical wire inside some PVC conduit for the power outlet for the pump (whenever the ground decides to dry up from 3" of rain every few days :(). I'll post pictures as I do all this, since I know I've looked at plenty of pictures to get an idea of what I'm doing here (especially with installing skimmer and cutting the liner) and I'm sure others will want to as well.

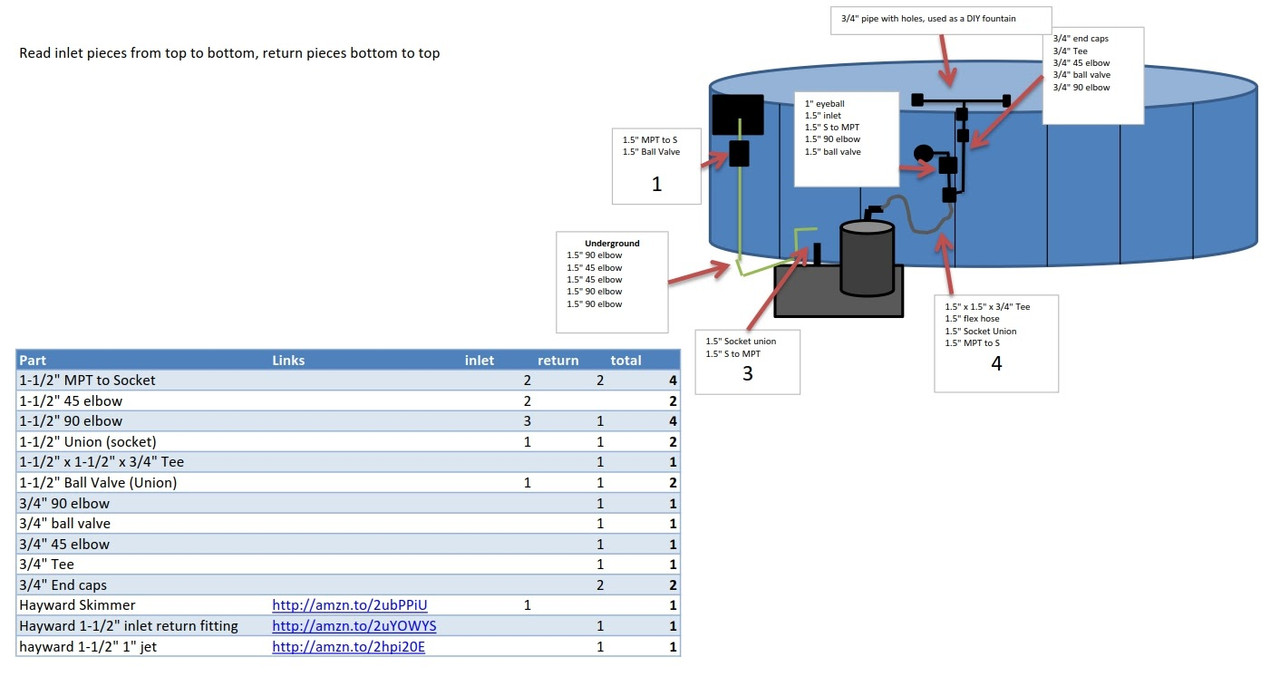
Plumbing "blueprints"


New pump and filter vs old pump and filter
 
Last edited:
Got all the PVC fittings in the mail today, got the PVC in the back waiting, got my 2x10s with Thompson waterproof stain drying on them. Just gotta waterproof and stain the other boards for a small pump platform, and wait on my skimmer to come in the mail, and then I can get on with finishing my pool.

got a lot more fittings than I was expecting, especially for just a 10 foot and 5 foot runs of PVC.
 
Last edited:
Halfway done building my platform for my pump and filter. Using some 2x10x4s that I stained with Thompson's Waterseal and Stain. Stupidly used a spongy roller, so the stain has a bit of a spongy effect to it, but its waterproof nonetheless and definitely looks better than it originally did. Ran out of time before work and screws, but still need to screw in the other 2 2x10s, the support brace on the back, and the 4 4x4 legs.


Got the return PVC cemented together, just need to attach it to the pool tomorrow (weather permitting) and then I can measure out how long the 3/4" PVC needs to be to extend over the pool for the fountain.


The skimmer came in the mail today, so need to put all the screws in for the wide mouth extension, then install it on the side of the pool and measure out the PVC so I can cut it all to length and cement it together.
 
Last edited:
I got my return line installed today. I had my wife in the pool with a large mixing bowl pressed up against the side of the pool over the Coleman return fitting. Inside the mixing bowl, I'd already placed the inner part of the return fitting with the inside o-ring around the threading. I removed the cheap hose and let most of the water inside the mixing bowl drain out, then unscrewed the plastic nut holding the plunger on. Unscrewed the nut holding the entire Coleman fitting on the pool and pushed it all the way into the mixing bowl. Thankfully, while the inner diameter of the plunger is much narrower than the 1-1/2" hose that's attached to it, the hole in the liner is exactly the right size for a 1-1/2" return fitting. Wiggled the fitting into the hole from inside the mixing bowl and threaded the PVC nut onto it and tightened it down very tight with some channel locks. (Finally found a use for the 2-1/2" channel locks that have been laying around my house :D) Screwed on the union fitting with the ball valve and once my wife had removed the mixing bowl, no water leaked out at all. I'd say that part was a great success. Didn't have time today to work on the skimmer, but I did hook up the flex hose and connected the pump back up. My filter pressure has now dropped from 10PSI with Coleman return, to 9.5PSI with the 1" eyeball jet, and 8PSI with no eyeball.


The original Coleman plunger and return fitting


My newly installed return fitting and ball valve


Here's what the return plumbing looks like after its all connected an running.


Quite a powerful jet when the eyeball is pointed up. Click to watch a video of it.


My new platform for my pump to sit on once its shifted over and the skimmer is installed.
 
Last edited:
LOL I can see your wife's thought bubbles.............."I hope I can hold this bowl tight enough! Is he done yet? Hurry! My arms are getting tired" Very good team work there! SWEET!

Well done! That water is moving!

Kim:kim:
 
LOL I can see your wife's thought bubbles.............."I hope I can hold this bowl tight enough! Is he done yet? Hurry! My arms are getting tired" Very good team work there! SWEET!

Well done! That water is moving!

Kim:kim:

Actually, the weight of the water above and beside the bowl was enough to keep the bowl in place for the most part. I was nervous as h-e-double-hockey-stick (stupid curse filter lol) though, fully expecting to have to fight a constant full force flow of water trying to rush out from around the bowl. Once the water drained inside the bowl tho, almost no more water came out, and can't see any decline on the sides of the pool now.
 

Enjoying this content?

Support TFP with a donation.

Give Support
WIn-win then! Easy and will pay off in the end!

KIm:kim:

Not necessarily hard, but the really nervous part will be cutting the liner for the skimmer without draining the pool. I know it will be fine, but still nervous.

Oh, and wife did get startled when bubbles started coming out of the return fitting when I broke the seal taking the original off. Thought she was about to drop the bowl and take off lol.
 
Got the skimmer installed today, and the fittings for the PVC cemented together, just gotta let them dry while at work. I installed the skimmer without draining any water, which I would not recommend anyone do unless they don't have a choice. With all the iron that's in my well water, I didn't want to fill it back up and deal with that again. The water didn't really leak out any when I was pushing the screws through, I just couldn't use a power drill, had to use a normal Philips head screwdriver underwater. Worst part was that the plastic holes that the screws are held in by don't have any threads, so its very difficult to drive those screws especially underwater and leaning over the edge of the pool, lol. Got that finished in the end though. Just gotta wait for the PVC cement to dry so I can cut the liner inside the skimmer and let the water in.

After advice from domct203's thread Hayward Skimmer in Intex Ultra Frame AGP, I changed my original design again and I'm using a 1-1/2" flex hose that came with my pump until some more flexible PVC pipe can come in. Figured the pool will hold the weight just fine, and this eliminates the risk of the PVC cracking from the wall's movements when we swim and play. All in all, almost done with all this and I think its turning out great.


Man I was so nervous when I pushed that first screw through the liner, lol. I twisted each screw back and forth while pushing on it with the screwdriver until they poked through the liner. Honestly makes me feel much better about the strength of my liner, because it was insanely hard to get the screws through.


The face plate with the screws in it, before I screwed them into the skimmer itself. If you do this, make sure you think to remove the tape before you screw all the screws into the skimmer, its no fun having to loosen a bunch of screws just to have to tighten them back up again, lol.


The skimmer secured to the pool with the ball valve attached to it. I'd highly recommend these ball valves from Hayward, they're very easy to turn, unlike normal PVC ball valves I've used, and have built in unions.


I'll post more pictures tomorrow of the complete setup and everything. Having to do everything each day in just 2 or 3 hours I have before work. :cry:
 
Last edited:
Nice water

What size is the next one going to be? Lol

Next pool? Lol, gonna stick with this pool for a couple years while I work on rebuilding my credit so I can buy a house in a few years. Gonna save up the money during that time to build a gunite pool whenever we do buy a house. Not 100% sure of the size yet, but probably around 40'x20' with a 10' deep end, so in the neighborhood of 40-45k gallons.
 
What is this I hear?????????? Someone planning for the future??? LOVE IT! There is not better feeling then to be able to play the mortgage companies against each other as they fight for your business due to your good credit score!

I an see you now...............standing by the side of the pool with the screwdriver in one hand, the screw in the other just standing there looking at the place you are about to poke a hole in :shock: Good job!

Kim:kim:

You've got access to a spy sat?! :shock::pale:

Still got to actually cut the liner tomorrow, so those screws will be nothing compared to that, lol.

I'll be happy to pass the minimum credit requirement to get one period lol. Been working for 3 years now rebuilding it.
 
So, think I'm pretty much done with the plumbing and electrical for my pool. Got the skimmer fully installed, the return and DIY fountain installed, all the plumbing done and don't see any leaks or air bubbles, and finally buried my conduit for the motor's outlet. Gonna buy a decent vacuum in the next few weeks, but that just connects to an adapter piece and connects to the skimmer. Also thinking about extending my table the motor is on to include some walls and a roof, since a black motor gets pretty hot just sitting in the sun, even without being turned on. Gonna get a salt system too, but gonna wait until spring for that.


Got my plumbing finished and don't see any leaks.


Drilled 3/16th inch holes spread 1 inch apart for the fountain.


Fountain's working great. Also, its not shown in these pictures, but I took some string and tied the fountain to the return to provide some extra support so the fountain would stand up straight, instead of leaning over. Click for video


Dug the trench and connected the PVC conduit. Got it all hooked up and working just before the rain started, and went out today to throw the dirt back into the trench. Digging that trench by hand was probably the worst part of all of this, lol.
 
Last edited:
BY HAND? I bet that was hot, sweaty work!! At least you had the pool to jump in to as needed!

Love the fountain! I bet the kids do!

Kim:kim:

Yea, by hand. And I never want to do that again. A foot deep and 40 feet long is a lot more dirt than I was expecting. Good thing I dug it by hand tho, as there is an unknown wire in the middle of my yard that no one knew was there.
That fountain turned out better than I was expecting. It can shoot water all the way across the pool into the yard if turned up too high. And the arms of it stay in without glue, so you can swivel it down and it makes a great back massagers. Also seems to cool the pool down a little too. Air temp steadily rising, but pool temp dropped 2 degrees yesterday.
 

Enjoying this content?

Support TFP with a donation.

Give Support
Thread Status
Hello , This thread has been inactive for over 60 days. New postings here are unlikely to be seen or responded to by other members. For better visibility, consider Starting A New Thread.