Yep, been building homes over 20 yrs and love to watch projects like thisI've worked in the construction industry for most of my adult life, and am interested in how you do it "down under".

Lautner Edge Pool, Australia - Finally complete!
- Thread starter Andrew69
- Start date
You are using an out of date browser. It may not display this or other websites correctly.
You should upgrade or use an alternative browser.
You should upgrade or use an alternative browser.
- Jan 21, 2013
- 112
A bit of an update, but no photos as yet Im afraid. I will try to get hold of the camera and download some pictures tomorrow!
Had a meeting with the guy I plan to use for my pool interior (pebblesheen type finish)
He says there is no way he could finish the edge with the kind of precision Im looking for, at least not over the length of my pool. And in any case, he thinks the finish will crack over time due to the sharp angles involved.
After throwing around several ideas, we've decided to go with a 1/2 bullnosed granite tile edge that the interior finish will then end up butting against.
Found a similar colour (called Venice) which is a blue/grey granite, in a 1/2" tile , 2ft long.
Bullnose is currently getting cut by a cnc machine and expect to pick them up end of next week.
Certainly not my ideal solution as I really wanted a totally uniform look, but we dont have a choice and think it will still blend well with both the interior finish of the pool as well as the polished concrete surround.
Will be fun installing these.....as well as protecting them while the concrete is poured, finished and polished around them.
Quick update.
Granite waterline tile installed. Accuracy was +/- 0.5mm (+/- 0.02 "). Took four guys four days to lay about 65 lineal meters (214 feet). Tiles had to be bedded to a string line for a line, checked, adjusted for level, re-checked, adjusted if necesary, etc, for each 600mm (24 inch) tile.
First four tiles took us 5 hours to lay! By the third day we had a system sorted and layed about 30 meters (100 feet) in one day. There is one tile that is about a millimeter low as it has a slight bow in it which we didnt notice until well after it was grouted. I was tempted to rip it out, by in reality, it will never be noticed, so I left it as is.
I will skip some other steps until I post photos, but will say this.... main floor slab is now also poured and we stripped out the formwork for the hidden drain this morning.
To say it looks awesome is a serious understatement!
I had many, many sleepless nights(and hence the lack of updates!) thinking about constructing this Launtner edge, but its been worth every lost hour.
Will post up photos later today once Ive downloaded them from the camera and further explain how we constructed the edge.
Ive seen photos of it being done with pool deck that is removable, but never with the pool deck being poured insitu.
Rather proud right now
teknic88
0
OK, here we go with some pics
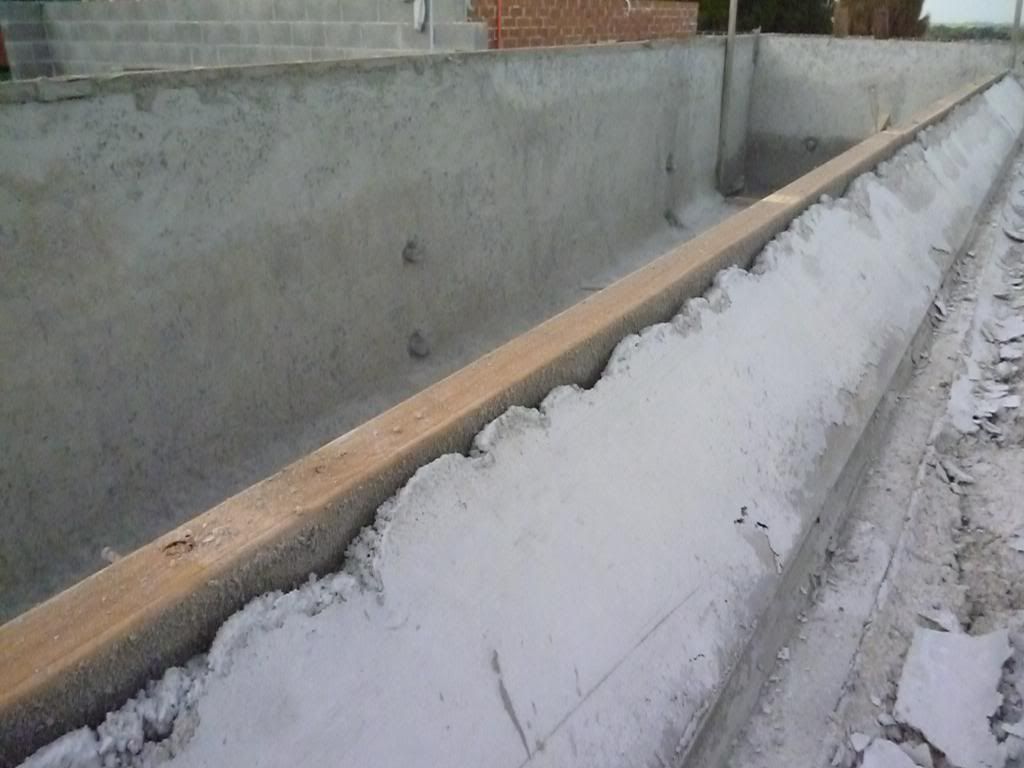

These couple show the poor finish of the shotcrete we found after we stripped the formwork. Was not happy at the time, but it wasnt the biggest deal in the world.
Patched using several products (Sika 352 and 620 top coat). Wasnt hard to do just took time and ended up being rather expensive.
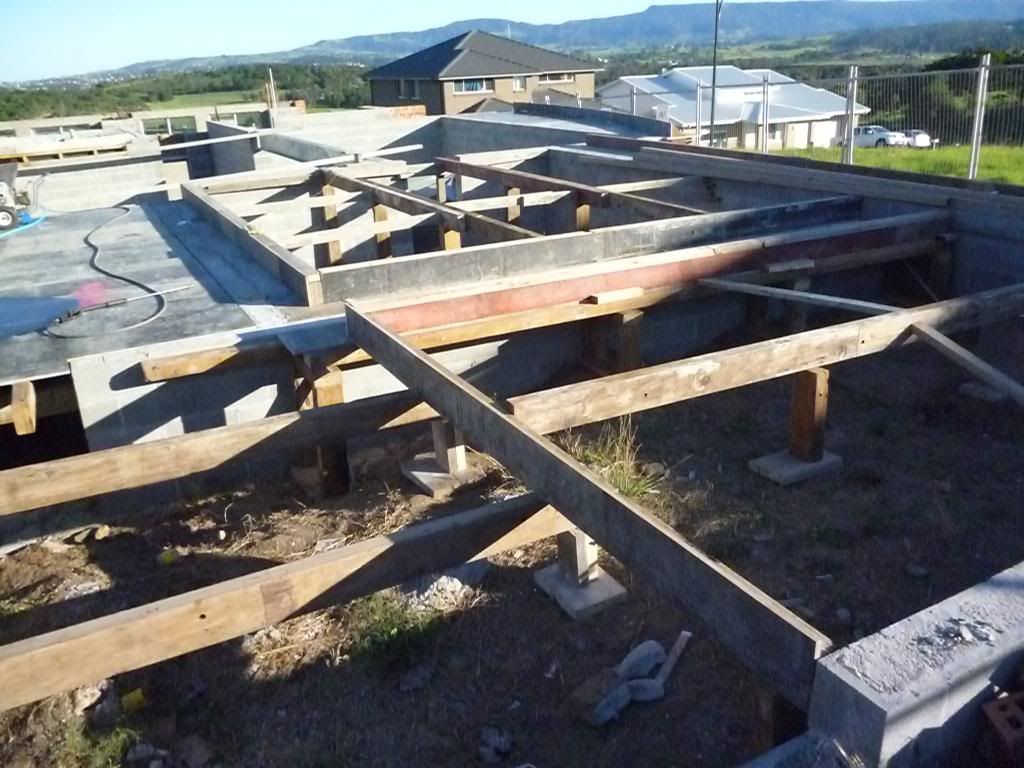
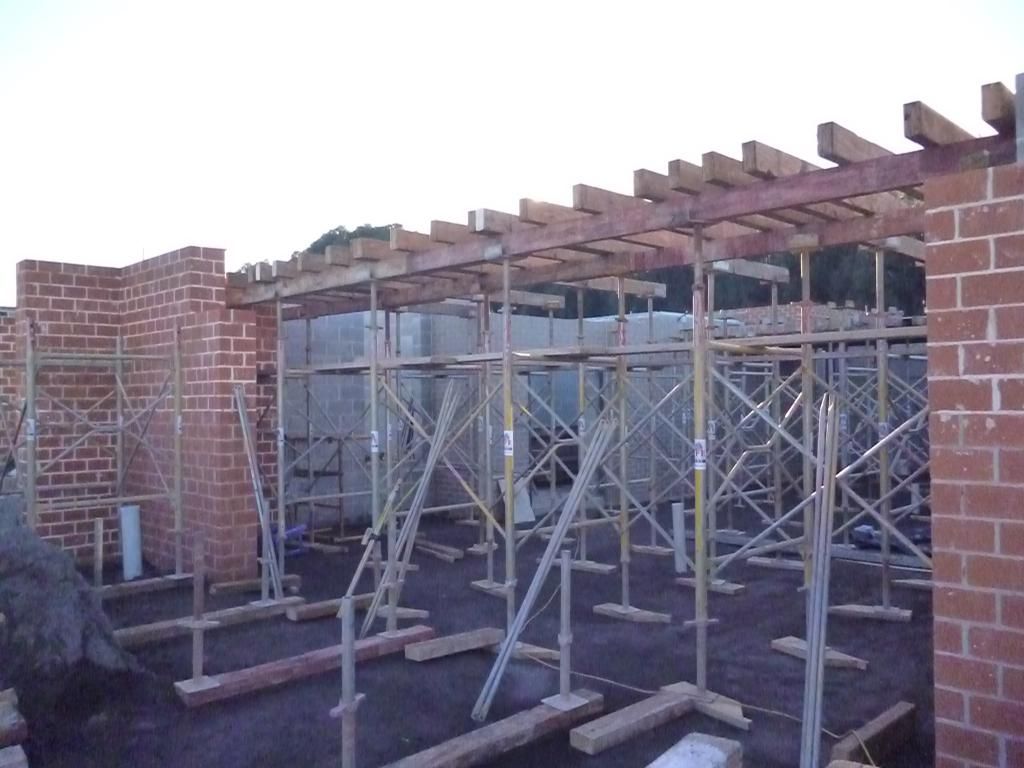
Some photos showing the formwork of the main slab. Kinda off topic, but some members have shown their interest in the way the rest of the house is going together so thought I would post them up.
I can post more if there is interest is them.
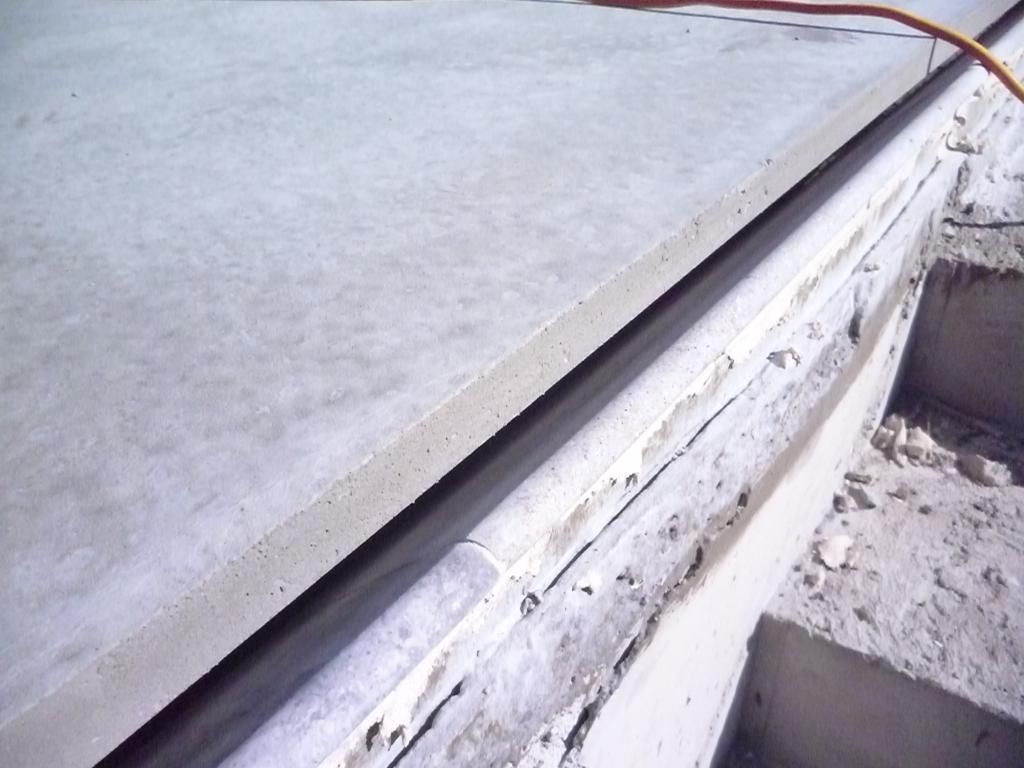
On to the granite tiles. As you can see, the tiles are glued onto the 45 degree surface that we formed up earlier and that was shot. The half bullnose edge of the each tile is the part that defines the actual water level of the pool and the edge that we took so much time in getting right. As I mentioned in my previous post, each tile was set to a very close tolerance.
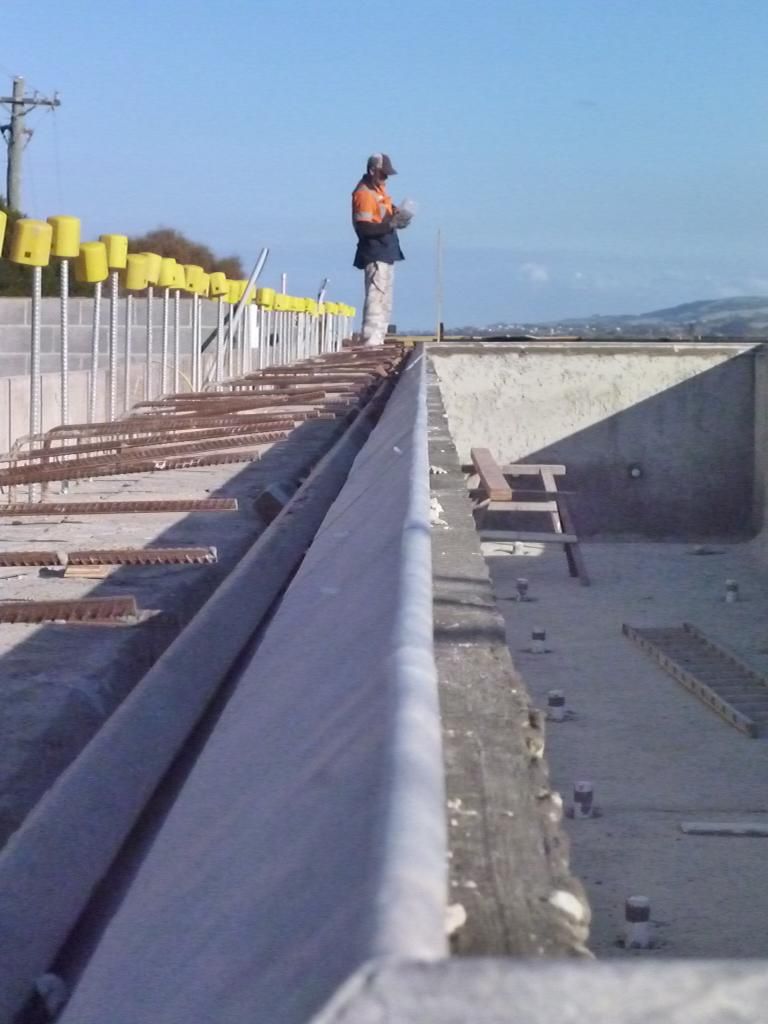
Here you can see along the whole length of the pool how straight it is. Any variation that can be seen in a bow or cup along the length of each tile. Thats something I simply could not control and I dont feel will make any marked difference to the finished product.

Unfortunetly, because I was so busy actually building, I ran short of time and would have loved to have taken a few more photos at this stage, but it wasnt to be.
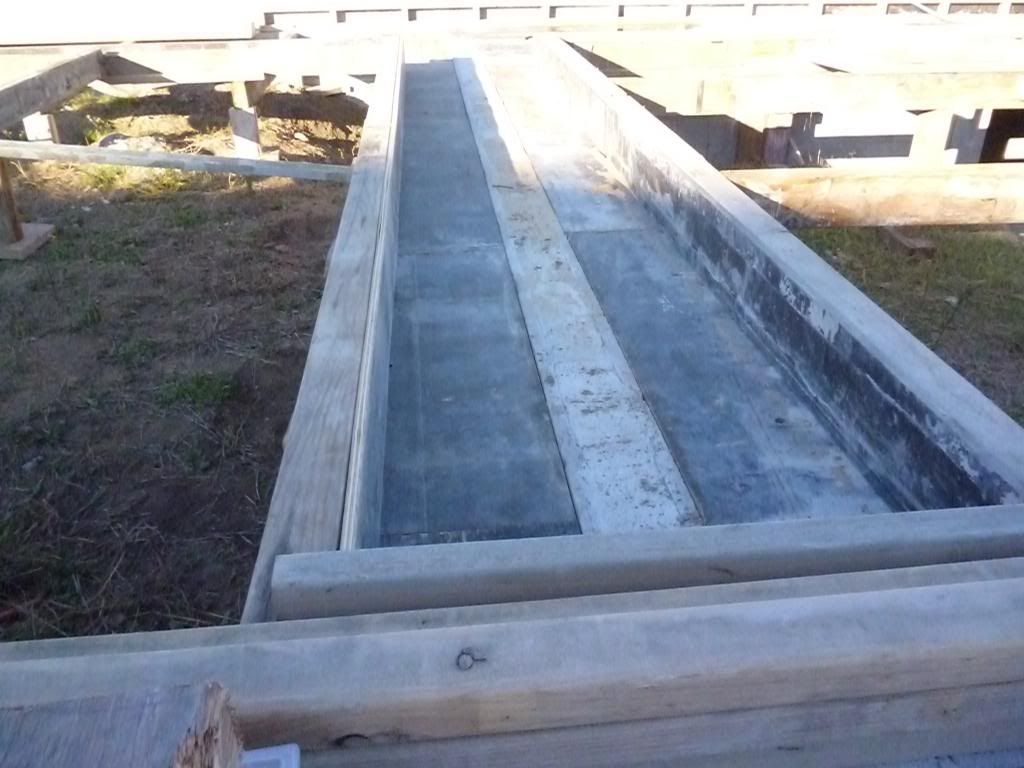
In this photo, you can see the two most critical aspects of this whole build.
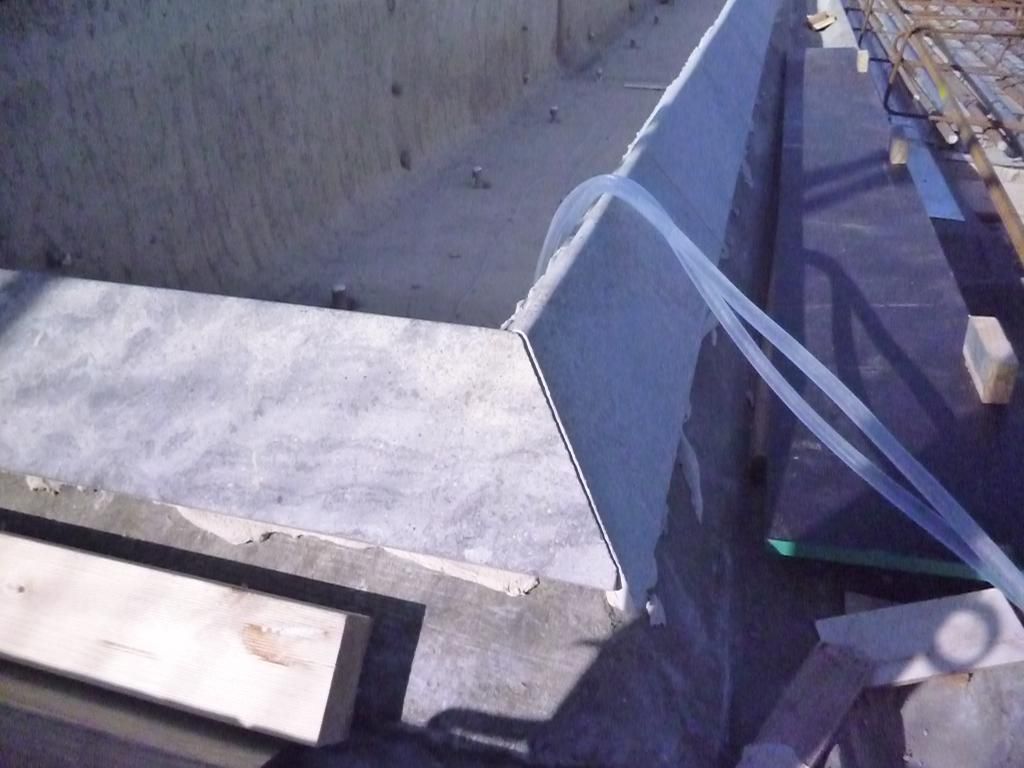
The dark board with the fillet attached is 1/2 inch formply which is sitting directly on top of the granite. This is what forms the actual drain around the edge of the pool. The fillet was something we had to mill ourselves as the size I needed (3/4") wasnt available. The placement of fillet on the formply was crucial as that defined the edge of the floor slab (pool surround) outside the drain. 98% ended up very close to perfect and Im delighted with the result. There are a couple of small sections that I will need to grind slightly to ensure the edge is perfectly straight.
The grey section is heat formed PVC sheet. The PVC sheet covers the dish drains we formed (and repaired) earlier that were cast when the pool was shot. This cover sits on top of the formply so that we maintained a 1/2 gap (drain).
I was rather concerned that in time the PVC sheet may delaminated from the concrete so I used a special primer on the PVC as well as nylon screws with a very course thread that pass through the PVC and allowed me to mechanically fix the PVC to the concrete. The course thread will give a good bite on the concrete and because they arent metallic, I wont have to worry about them corroding over time and later failing.
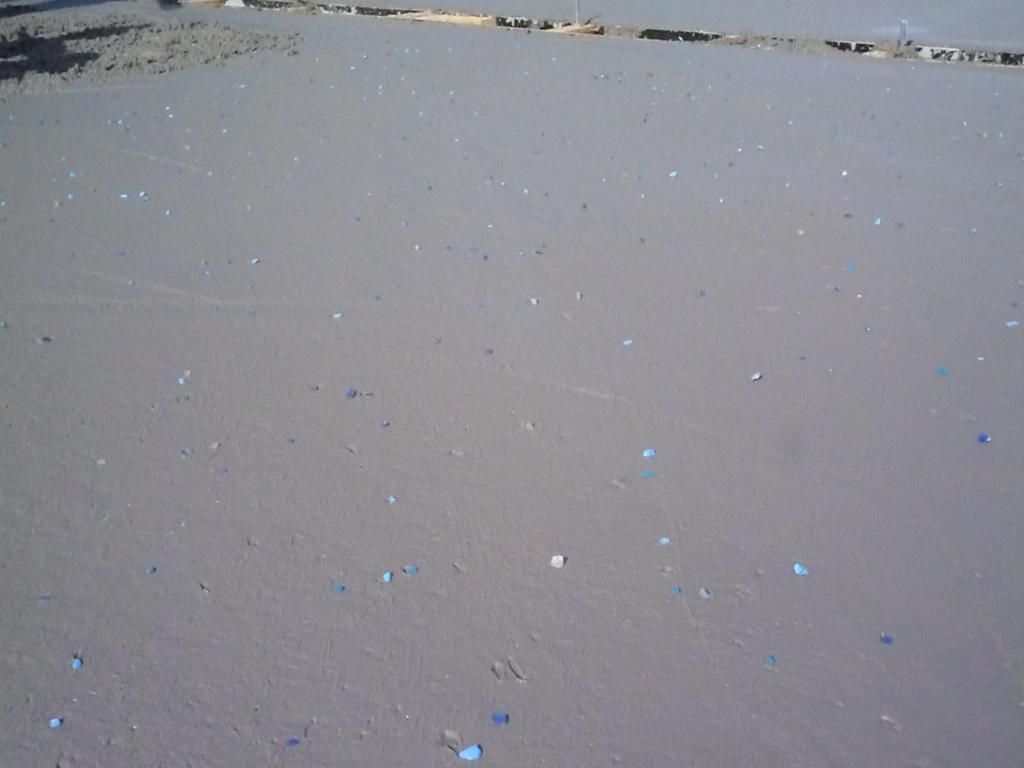
The slab is a 50/50 mix of white pebble and basalt, 10mm in size (3/8") and we "broadcast" a mix of recycled glass (4 different colours, 3 shades of blue as well as a clear glass) which was then trowelled into the wet concrete. Later , when the slab has fully cured, the surface will be ground and polished. We wanted to include the glass mix to tie the slab to the pool colorwise and give the main slab a bit of interest as well as its a pretty big area (400m2, 4300sqft)
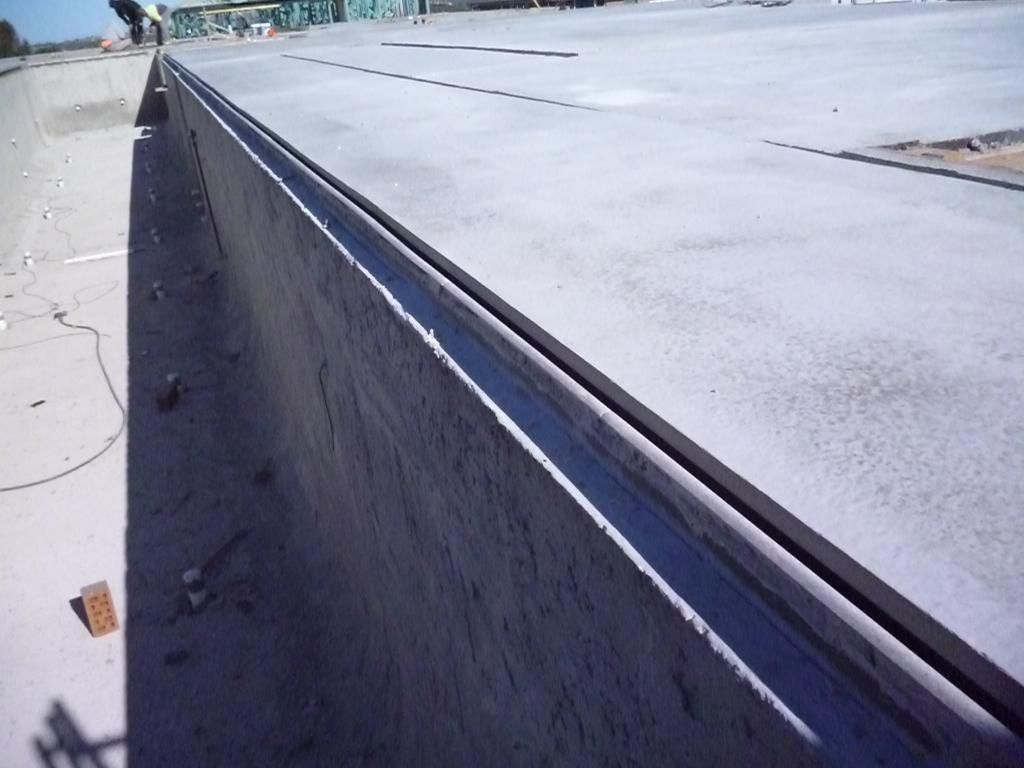
And here is the result.
A 1/2 " gap right around the pool, with all hidden drainage and the water level less than 1/2" below the pool surround.
We also cast in a slight fall right around the pool for the first 1.2m (4 ft) so that any water that is splashed out runs back into the pool/drain. Its only slight as I didnt want it to be obvious, but as the surround will be polished, it should be more than enough.
The slight waveness you can see along the edge is some variation in the thickness of the pool surround. That will disappear when the pool surround is polished.
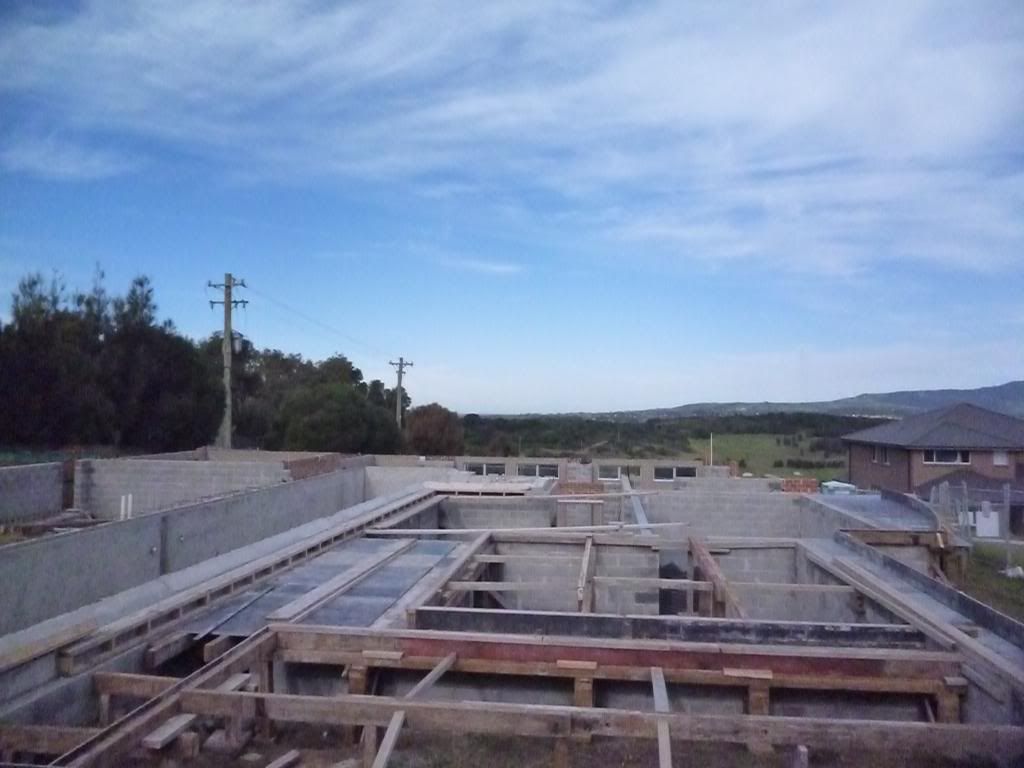
Still have the bedroom slab to form and pour (left of the pool) and then the house will have to wait while I start a new, larger project. Need to make some more money to pay for this dream home of ours!


These couple show the poor finish of the shotcrete we found after we stripped the formwork. Was not happy at the time, but it wasnt the biggest deal in the world.
Patched using several products (Sika 352 and 620 top coat). Wasnt hard to do just took time and ended up being rather expensive.


Some photos showing the formwork of the main slab. Kinda off topic, but some members have shown their interest in the way the rest of the house is going together so thought I would post them up.
I can post more if there is interest is them.

On to the granite tiles. As you can see, the tiles are glued onto the 45 degree surface that we formed up earlier and that was shot. The half bullnose edge of the each tile is the part that defines the actual water level of the pool and the edge that we took so much time in getting right. As I mentioned in my previous post, each tile was set to a very close tolerance.

Here you can see along the whole length of the pool how straight it is. Any variation that can be seen in a bow or cup along the length of each tile. Thats something I simply could not control and I dont feel will make any marked difference to the finished product.

Unfortunetly, because I was so busy actually building, I ran short of time and would have loved to have taken a few more photos at this stage, but it wasnt to be.
In this photo, you can see the two most critical aspects of this whole build.
The dark board with the fillet attached is 1/2 inch formply which is sitting directly on top of the granite. This is what forms the actual drain around the edge of the pool. The fillet was something we had to mill ourselves as the size I needed (3/4") wasnt available. The placement of fillet on the formply was crucial as that defined the edge of the floor slab (pool surround) outside the drain. 98% ended up very close to perfect and Im delighted with the result. There are a couple of small sections that I will need to grind slightly to ensure the edge is perfectly straight.
The grey section is heat formed PVC sheet. The PVC sheet covers the dish drains we formed (and repaired) earlier that were cast when the pool was shot. This cover sits on top of the formply so that we maintained a 1/2 gap (drain).
I was rather concerned that in time the PVC sheet may delaminated from the concrete so I used a special primer on the PVC as well as nylon screws with a very course thread that pass through the PVC and allowed me to mechanically fix the PVC to the concrete. The course thread will give a good bite on the concrete and because they arent metallic, I wont have to worry about them corroding over time and later failing.

The slab is a 50/50 mix of white pebble and basalt, 10mm in size (3/8") and we "broadcast" a mix of recycled glass (4 different colours, 3 shades of blue as well as a clear glass) which was then trowelled into the wet concrete. Later , when the slab has fully cured, the surface will be ground and polished. We wanted to include the glass mix to tie the slab to the pool colorwise and give the main slab a bit of interest as well as its a pretty big area (400m2, 4300sqft)


And here is the result.
A 1/2 " gap right around the pool, with all hidden drainage and the water level less than 1/2" below the pool surround.
We also cast in a slight fall right around the pool for the first 1.2m (4 ft) so that any water that is splashed out runs back into the pool/drain. Its only slight as I didnt want it to be obvious, but as the surround will be polished, it should be more than enough.
The slight waveness you can see along the edge is some variation in the thickness of the pool surround. That will disappear when the pool surround is polished.
Still have the bedroom slab to form and pour (left of the pool) and then the house will have to wait while I start a new, larger project. Need to make some more money to pay for this dream home of ours!
Love the look of what you've done so far!
Yes, keep the pics of the total build coming. I like the way you have it all designed, and the extra little personal touches you are building in to everything.
That granite waterline will look so good once you have the pool filled, and I too don't think a millimeter or two will make any difference on your waterline.
Now go make some $$ so you can send us more pics of the progress!
- Feb 28, 2011
- 1
Wow. Just amazing! Keep the pics coming along with the money of course! :lol:
Seconded.
I just found this thread. WOW! This is nice!
Too bad you have to go make money instead of building YOUR pool LOL
Please do keep us in the loop of the house build as well.
Thanks for sharing!
Kim
Too bad you have to go make money instead of building YOUR pool LOL
Please do keep us in the loop of the house build as well.
Thanks for sharing!
Kim
Yeah, always a bummer when reality kicks in!
The house is still progressing slowly, so will keep people updated on its progress.
Thanks for all the kind words everyone!
The house is still progressing slowly, so will keep people updated on its progress.
Thanks for all the kind words everyone!
Less than 2 weeks from spring here in Oz, yet we just had a huge rain event hit in southern NSW.
Many areas getting 8+ inches of rain in a couple of days along with gale force winds.
Had 6 inches plus of water sitting in my garage!
Not unexpected though as all water that hits the pool and the surrounds drains to under the house (where the overflow/ catch tank will be located) and the overflow plumbing from there to the street/sewer isnt yet connected.
Once the garage is poured and the overflows connected this will be a thing of the past.
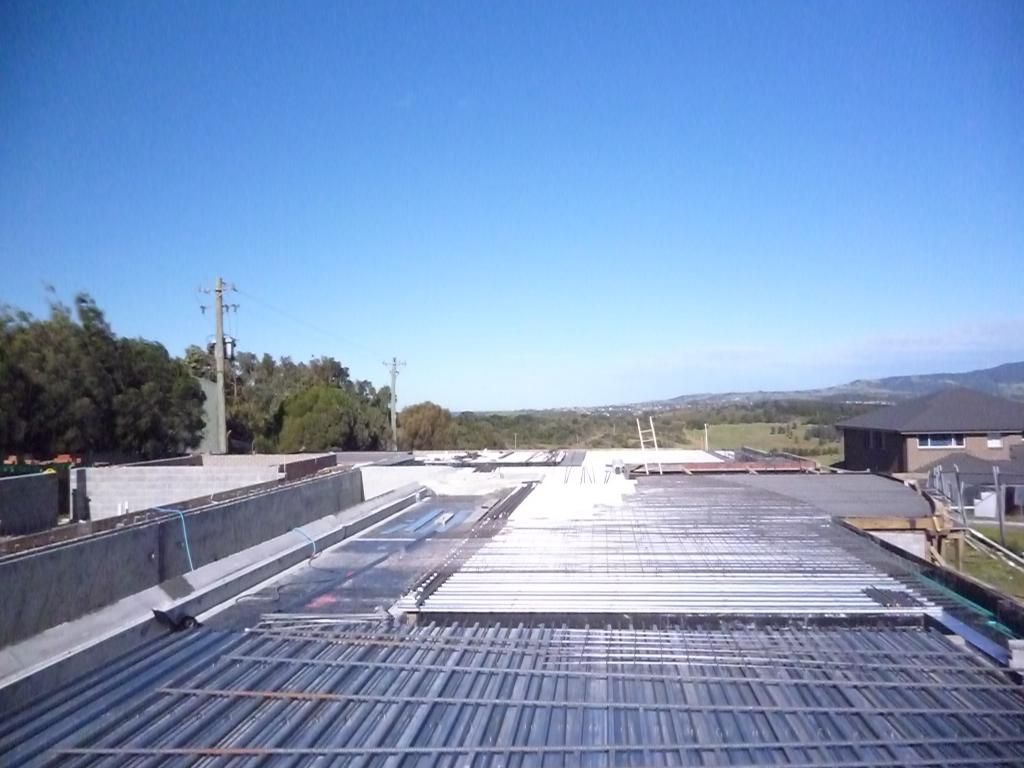
Preparing the suspended slab for the bedrooms at the moment. Will post pictures when we get back on the job.
Many areas getting 8+ inches of rain in a couple of days along with gale force winds.
Had 6 inches plus of water sitting in my garage!
Not unexpected though as all water that hits the pool and the surrounds drains to under the house (where the overflow/ catch tank will be located) and the overflow plumbing from there to the street/sewer isnt yet connected.
Once the garage is poured and the overflows connected this will be a thing of the past.
Preparing the suspended slab for the bedrooms at the moment. Will post pictures when we get back on the job.
Hi Andrew Thanks for checking in on my thread.. I'm always lurking on yours... I will agree the weather has been ****e... :-( I'm looking forward to getting back into it...
I'm loving how yours is looking so far.... Cant wait to see more..
Thanks for checking in on my thread.. I'm always lurking on yours... I will agree the weather has been ****e... :-( I'm looking forward to getting back into it... I'm loving how yours is looking so far....
Cant wait to see more..Hey Lacey,
Firstly, happy new year!
And no, no real developments apart from pouring of the suspended bedroom slabs (to the left in the above photos)
Unfortunetly, being in the trade means my house has to taken a back seat to paying customers. Wife and kids are NOT happy, but, thats life.
Gotta eat and pay the bills!
Expect to be back on the house by about the end of March. Hoping to get the floor slabs polished before this. Time will tell!
Laying in bed this morning thinking about pools and this thread came to mind.
Any new progress or are you still in limbo?
Any new progress or are you still in limbo?
teknic88
0
teknic88
0
Thread Status
Hello , This thread has been inactive for over 60 days. New postings here are unlikely to be seen or responded to by other members. For better visibility, consider Starting A New Thread.