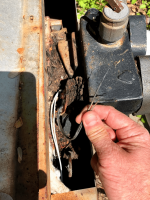
My 13yr old Lite 2 LJ400 heater was working fine, until it wasn't... After chasing several things, it ended up being a bad temp sensor.
A few general troubleshooting tips that might help others...
Getting to the sensor on the Lite 2 requires removing the top cover of the heater. It's not hard, but 13yrs of outdoors is not kind on sheet metal so it's a pain- and even more of a pain to put back on and line everything up. Also, the temp sensor sits at the top of the heater. With everything turned off, if your sensor seal is good (I hope, otherwise = leak), you'll get suction that will make the sensor seem like it's seized into the well. I opened the valve on the back of my filter gauge to release system pressure, sprayed a little PB Blaster around the grommet holding in the sensor, did a couple taps with a screwdriver and it eventually worked its way out using a screwdriver and pliers to work it out. Patience is a virtue on this as you don't want to break off the sensor in the well, lest you have an even bigger problem. When you go to install the new one, first clean any crud out of the well to ensure a good seal, then insert the temp into the well and get the grommet as tight fitting as you can without damaging the sensor or wires, finally screw in the bracket taking care to not pinch the wire. Tightening the bracket will provide the extra oomf to ensure it all seals up.
What took a few hours of troubleshooting and days of waiting on various parts I could now do again in about 30mins. Hope this helps someone!
-e

A few general troubleshooting tips that might help others...
- Make sure your heater's controller/LCD display is working so you can see any error codes. In my case, the screen was dead so like any engineer I just dove inside with a multimeter. Don't do what I did... spend the $250 and replace the display first.
- Refer to the Jandy troubleshooting guide. I believe if you test voltage to the SAFETY pin while the system is calling for heat, that should be a shortcut to quickly verify if all flow, fireman and other sensors upstream are operating normally. If no voltage, then follow the various tests for each area as noted in the guide.
- In my case the safety pin, all sensors and ignitor all checked out OK / in spec, but yet it still wouldn't fire. I even replaced the main power board and power conversion board for good measure (also because I was flying blind without a display and couldn't find any info like what I'm sharing here).
- What I didn't know, and wasn't clear in the guide above, was that if you have a faulty temp sensor the heater will not fire. Seems obvious now, but again I didn't see that called out in the guide. Refer to point #1 above. If I had swapped the display first I would have seen the FL1 error that indicates a bad temp sensor. When I finally tested the sensor it was open = bad. And when I say bad, I mean the wire was melted/corroded in half (see photo). Yep, that's definitely a problem!
- Swapped out sensor and voila. Back in business. Jandy P/N R0367000, ~$75 on eBay. Mine came with new insulation and bracket.
Getting to the sensor on the Lite 2 requires removing the top cover of the heater. It's not hard, but 13yrs of outdoors is not kind on sheet metal so it's a pain- and even more of a pain to put back on and line everything up. Also, the temp sensor sits at the top of the heater. With everything turned off, if your sensor seal is good (I hope, otherwise = leak), you'll get suction that will make the sensor seem like it's seized into the well. I opened the valve on the back of my filter gauge to release system pressure, sprayed a little PB Blaster around the grommet holding in the sensor, did a couple taps with a screwdriver and it eventually worked its way out using a screwdriver and pliers to work it out. Patience is a virtue on this as you don't want to break off the sensor in the well, lest you have an even bigger problem. When you go to install the new one, first clean any crud out of the well to ensure a good seal, then insert the temp into the well and get the grommet as tight fitting as you can without damaging the sensor or wires, finally screw in the bracket taking care to not pinch the wire. Tightening the bracket will provide the extra oomf to ensure it all seals up.
What took a few hours of troubleshooting and days of waiting on various parts I could now do again in about 30mins. Hope this helps someone!
-e


