The CircuPool RJ+ units come with a power cord that is about 48 inches long. In my case that was far too short, and installing a junction box was far more complicated than changing out the power cord. This post is just for reference in case somebody else faces a similar situation.
The stock power cord is a fairly standard 18-3 (18 gauge, 3 conductor) cord.

16-3 will fit, but you'll have to fight it through the strain relief at the bottom of the RJ+ control module. I used 16-3 just to add a little extra safety margin for the longer length. I used 10 feet of this cord, available by the foot from Home Depot, to replace it.
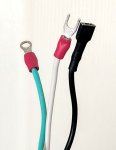
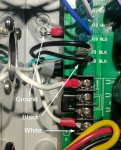
Each conductor is terminated with a different connector inside the RJ+ unit: black is terminated with a 1/4-inch female disconnect, white is terminated with a spade terminal, and ground is terminated with a ring terminal.

All connectors are standard crimp connectors in 22-16 size. I used these:

With a little creativity I was able to feed in the replacement cord without removing the PCB, being careful not to just shove it any old way and potentially damage any solder joints on the PCB. After crimping the connectors and feeding it through the strain relief, wiring it up was a relatively simple process.
Hope that helps somebody who faces a similar situation as I did.
The stock power cord is a fairly standard 18-3 (18 gauge, 3 conductor) cord.

16-3 will fit, but you'll have to fight it through the strain relief at the bottom of the RJ+ control module. I used 16-3 just to add a little extra safety margin for the longer length. I used 10 feet of this cord, available by the foot from Home Depot, to replace it.
Each conductor is terminated with a different connector inside the RJ+ unit: black is terminated with a 1/4-inch female disconnect, white is terminated with a spade terminal, and ground is terminated with a ring terminal.

All connectors are standard crimp connectors in 22-16 size. I used these:
- Ring terminal
- Spade terminal
- Female disconnect <-- the web site has a typo, they are really 22-16

With a little creativity I was able to feed in the replacement cord without removing the PCB, being careful not to just shove it any old way and potentially damage any solder joints on the PCB. After crimping the connectors and feeding it through the strain relief, wiring it up was a relatively simple process.
Hope that helps somebody who faces a similar situation as I did.

