Installing a longer power cord in a CircuPool RJ+

sbcpool

Well-known member
Mar 10, 2015
728
Upland, CA
The CircuPool RJ+ units come with a power cord that is about 48 inches long. In my case that was far too short, and installing a junction box was far more complicated than changing out the power cord. This post is just for reference in case somebody else faces a similar situation.

The stock power cord is a fairly standard 18-3 (18 gauge, 3 conductor) cord.

2020-07-18 10_12_26-Photos.jpg

16-3 will fit, but you'll have to fight it through the strain relief at the bottom of the RJ+ control module. I used 16-3 just to add a little extra safety margin for the longer length. I used 10 feet of this cord, available by the foot from Home Depot, to replace it.

Each conductor is terminated with a different connector inside the RJ+ unit: black is terminated with a 1/4-inch female disconnect, white is terminated with a spade terminal, and ground is terminated with a ring terminal.
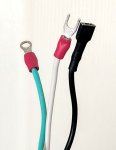
2020-07-18 10_08_30.jpg

All connectors are standard crimp connectors in 22-16 size. I used these:
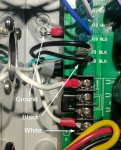
The cord enters the RJ60+ through a strain relief connector at the bottom of the controller and runs under the PCB and is wired like as seen below.

2020-07-18 09_49_20-Photos.jpg

With a little creativity I was able to feed in the replacement cord without removing the PCB, being careful not to just shove it any old way and potentially damage any solder joints on the PCB. After crimping the connectors and feeding it through the strain relief, wiring it up was a relatively simple process.

Hope that helps somebody who faces a similar situation as I did.
 
The CircuPool RJ+ units come with a power cord that is about 48 inches long. In my case that was far too short, and installing a junction box was far more complicated than changing out the power cord. This post is just for reference in case somebody else faces a similar situation.

The stock power cord is a fairly standard 18-3 (18 gauge, 3 conductor) cord.

View attachment 153525

16-3 will fit, but you'll have to fight it through the strain relief at the bottom of the RJ+ control module. I used 16-3 just to add a little extra safety margin for the longer length. I used 10 feet of this cord, available by the foot from Home Depot, to replace it.

Each conductor is terminated with a different connector inside the RJ+ unit: black is terminated with a 1/4-inch female disconnect, white is terminated with a spade terminal, and ground is terminated with a ring terminal.

View attachment 153524

All connectors are standard crimp connectors in 22-16 size. I used these:
The cord enters the RJ60+ through a strain relief connector at the bottom of the controller and runs under the PCB and is wired like as seen below.

View attachment 153523

With a little creativity I was able to feed in the replacement cord without removing the PCB, being careful not to just shove it any old way and potentially damage any solder joints on the PCB. After crimping the connectors and feeding it through the strain relief, wiring it up was a relatively simple process.

Hope that helps somebody who faces a similar situation as I did.
Check the local code ,around here any pump lead with a plug must be 3 feet or less, also we always use number 10 wire on pumps. it is just better
 
It's never a bad idea to go down in gauge (thicker wire) and it's great you made it work, but the actually power consumption of them on at 100% is less than 300W (depending on model--size).. so it probably wasn't necessary to up size the cord.

The way I took care of the same problem was to use a piece of flexible plastic conduit (okay to 6' by code, that plus the 4' cord gives 10' which I hope would be plenty for most cases and if not I wouldn't run a line cord outside any longer!) and a waterproof outlet box-- that was wired into the panel and I used 120V to run it (I have a VSP pump so there is a digital outlet timer in my panel instead of the clunky mechanical Intermatic). Easy, elegant and a half hour job. I wanted to mention this as a possibility for others who have too short of a cord as well like both of us did in our setup. Even a combination of the two is do able in some cases.
 
The way I took care of the same problem was to use a piece of flexible plastic conduit (okay to 6' by code, that plus the 4' cord gives 10' which I hope would be plenty for most cases and if not I wouldn't run a line cord outside any longer!) and a waterproof outlet box-- that was wired into the panel and I used 120V to run it (I have a VSP pump so there is a digital outlet timer in my panel instead of the clunky mechanical Intermatic). Easy, elegant and a half hour job. I wanted to mention this as a possibility for others who have too short of a cord as well like both of us did in our setup. Even a combination of the two is do able in some cases.
That sounds like the best way. My case was a bit weird in that the only way to run power to an electrical box was the same way I had to run it to the unit (basically laying on the ground or hanging in the air) so it didn't make sense to have two boxes with the same result. My pad is against the house and solid concrete in all directions. The power is in a box about 6 feet out from the house embedded in concrete. There's nowhere to run power to a junction box on the exterior wall from my panel unless I run about 50 feet of conduit on an outside wall and around two doorways (which would look really trashy) or disassemble the whole pad and jackhammer concrete to place a trench.
 
I was able to screw the junction box to the little enclosure "shed" I built for my equipment pad. It's also where I put the control unit for the SWCG. As long as a critter doesn't chew up your cord you will be fine. It's not dangerous if they do assuming it does right into a breaker.

As far as a trench goes, for future use, places with reasonable soil, and a small run, you can use a water directional trencher -- they are available from Home Depot.. I figure in AZ that would take all day and cost $100 in water though... so I never bit on one...
 
What I described is a small device to directional drill under a pad. They make small consumer ones now. But what else I was saying is that I bet that would have worked great in the Midwest but here (and depending where you are at in California) it probably wouldn't due to concrete-like soil. For code though you still have to go 18" deep with rigid metallic so.. it still would be work to do. What you did is fine and safe.
 

Enjoying this content?

Support TFP with a donation.

Give Support
This is a great post...thanks so much for all the info! I hope someone will still be reading this thread and chime in.

I am getting ready to install rj+45 and have a clarification question on wiring. Ideally i would mount the swg control box next to the switch and i do have room, but i need at least 10ft of cable from the location of cell install to connect to the control box if mounted there. From my rough measurement the cable and line from the flow switch are 12ft each. How much extra cable do I need to be able to clean the cell? Would it be better to mount the control box closer to the cell and use a junction box and 18-3 wire to connect to the timer?
 
ok - one more question if you don’t mind - with this set up the cable and wire from the cell and flow switch will be laying on the ground inside the pump house. cell will be mounted outside the pump house because the heater is outside, in order to install swg after heater. The cable and wire will come into the pump house through the same hole in the building as the plumbing pipes. Should I enclose the cable and wire in a pipe or something to protect them? Or is it fine for them to be on the floor?
 
Thread Status
Hello , This thread has been inactive for over 60 days. New postings here are unlikely to be seen or responded to by other members. For better visibility, consider Starting A New Thread.