Infinity Edge Pool & Spa Renovation

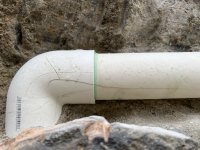
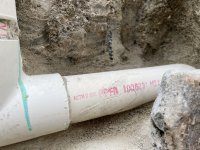
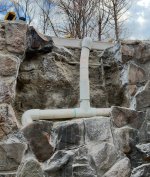
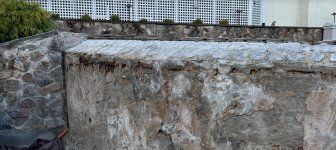
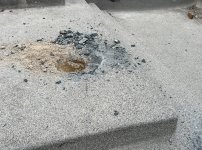
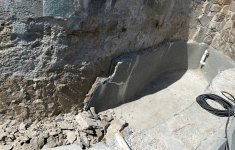
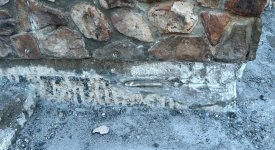
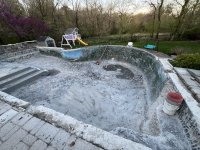
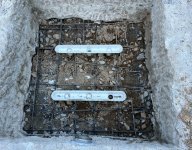
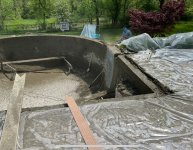
While waiting for my contractor to get started, I decided to find the cause of a leak in my sheer descents. The back of the raised wall gets wet when I run the sheer descents. I started digging and found a small hairline crack between the top of the sheer descent and the body. That was only a minor drip so I kept digging. Turns out the PVC pipe has multiple cracks that are gushing water. This is turning into a more major issue than I anticipated.

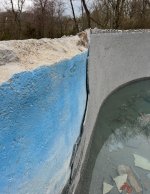
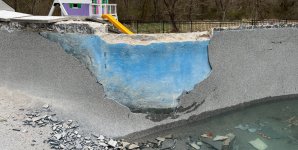
I have 4 total sheer descents that are plumbed with a balancing loop. I thought possibly the bottom of the balancing loop could crack due to improper winterization, but the crack is in the top half so shouldn’t be due to freezing pipes. It also has a slight slope at the location of the crack so any water would drain into the bottom half of the loop.

Any ideas how this portion of pipe cracked? I’m stumped.
 

Attachments

  • IMG_5026.jpeg
    IMG_5026.jpeg
    477.1 KB · Views: 20
  • IMG_5025.jpeg
    IMG_5025.jpeg
    514.3 KB · Views: 20
  • IMG_5028.jpeg
    IMG_5028.jpeg
    724.8 KB · Views: 20
The professionals arrived this morning and made significant progress with the demo. All the coping, tile, and weir wall stone was removed. Damaged portions of pebble were removed. A few interesting findings… 1) Professionals are so quick, such incredible progress in just one day, my back hurts just thinking about lugging all that material out in 5 gallon buckets

2) There is a random piece of wood behind the tile line at the step, probably why those tiles kept falling off, seriously???

3) Only moderate damage to the weir wall where it appears the rebar was too close to the surface of the gunnite

4) There are ~3” diameter holes in the gunnite around the anchors for the loop loc cover, those should have been sealed with waterproofing

5) Should I be concerned the pool is only 1/3 filled? I’m in Maryland so the water table is generally pretty far down, but horror stories of pools popping stress me out. There is enough water so the plugs have not been pulled yet.
 

Attachments

  • IMG_5039.jpeg
    IMG_5039.jpeg
    796.7 KB · Views: 26
  • IMG_5041.jpeg
    IMG_5041.jpeg
    400.6 KB · Views: 26
  • IMG_5040.jpeg
    IMG_5040.jpeg
    748.8 KB · Views: 26
Day 2 of the pool renovations and things continue to stay interesting.

1) In the catch basin, there were several large cracks in the pebble at the base of the weir wall that always concerned me. I was slightly worried my pool had structural issues that would be very expensive to fix. Fortunately the cracks were the result of a mortar bed delaminating from the gunnite. The pool builder used 2” thick mortar to bring the pebble even with the stones on the upper part of the weir wall. The mortar failed causing failure of the pebble finish. Overall, this is good news because no structural issues and now the new tiles on the upper weir wall will align nicely with the new pebble to be installed with only a standard thickness mortar bed needed.

2) Most of the pebble in the main pool is completely delaminated! The original pool builder appears to have used a waterproofing coating (blue in the picture) that was not compatible with plaster/pebble. The pebble is coming off in sheets. Looks like I’m getting a full chip out which is probably better in the end. The good news is this explains the various cracks in the pebble that always were concerning.

3) The steps and sun shelf are mostly sand and completely falling apart. Sadly, they will need be completely re-built. Ugh. The good news is I plan to change the shape slightly to remove the sharp corner that everyone hits their shins on and possibly make it smaller. We never use the sun shelf so it really just wastes space in the pool. For anyone building a pool, don’t put a sun shelf in the middle of the steps because the chairs are always in the way of people getting into and out of the pool.

Wow, so no major structural issues is a relief, but so many issues with the pool finishes is discouraging. My pool contractor has been on top of everything so I’m feeling more confident in his skills every day.
 

Attachments

  • IMG_5051.jpeg
    IMG_5051.jpeg
    913.3 KB · Views: 23
  • IMG_5050.jpeg
    IMG_5050.jpeg
    595.1 KB · Views: 22
  • IMG_5049.jpeg
    IMG_5049.jpeg
    578.8 KB · Views: 23
  • IMG_5048.jpeg
    IMG_5048.jpeg
    588.2 KB · Views: 22
Last edited:
The demo resumed this week and the full chipout is nearly complete. Still some work on the bottom and need to fully remove the old waterproofing.

Other interesting updates: my spa always seemed very shallow and the jets were pretty worthless just an inch off the seat. The pool builder has to bring in a gunite crew to repair the weir wall so they are going to lower the spa seat and floor and will add gunite after they dig down. The current spa is 16” from the waterline to the seat and 12” from the seat to the floor. The goal is to go to 19” for the waterline to the seat and at least 13” from the seat to the floor. Should be much more enjoyable when all done.

Also, when chipping out the pebble in the pool, spa or possibly sheer decent piping was exposed. Should I be concerned this piping will only be covered by pebble? Not sure there is an easy way to address this.
 

Attachments

  • IMG_5067.jpeg
    IMG_5067.jpeg
    721.1 KB · Views: 14
  • IMG_5066.jpeg
    IMG_5066.jpeg
    686.1 KB · Views: 15
  • IMG_5065.jpeg
    IMG_5065.jpeg
    689 KB · Views: 14
  • IMG_5063.jpeg
    IMG_5063.jpeg
    917.1 KB · Views: 14
As part of the spa height adjustment, the pool builder recommends removing the existing main drains and just having a pipe with a cover embedded in the pebble finish. Removing without replacing the drain housing reduces the amount of digging needed to finish the job. They say this is normal now to not have the plastic basin portion of the drain. Does this sound correct? What is the purpose of the plastic drain basin?
 
As part of the spa height adjustment, the pool builder recommends removing the existing main drains and just having a pipe with a cover embedded in the pebble finish. Removing without replacing the drain housing reduces the amount of digging needed to finish the job. They say this is normal now to not have the plastic basin portion of the drain. Does this sound correct? What is the purpose of the plastic drain basin?
It is doubtful the pipe without a sump will meet VGBA Safety Standards.

Anti-entrapment safety is especially important in a spa.


1745338941606.png

 
  • Like
Reactions: birdman579
Thank you for the detailed reply. My contractor does not build new pools, but does sub work for new pools and has witnessed this approach which is why he suggested as an option. He will use a full drain sump basin if I request which I’m inclined to do.

On a related note, my spa filter pump only uses a single drain for the 3/4 hp pump. Is this compliant? There are 2 drains for the 2 hp jets pump. Always seemed weird to have 3 drains in my spa when everywhere else they are installed in pairs. The drains covers are the anti-vortex raised covers.
 
Thank you for the detailed reply. My contractor does not build new pools, but does sub work for new pools and has witnessed this approach which is why he suggested as an option. He will use a full drain sump basin if I request which I’m inclined to do.

Contractors who do this work should be familiar with all safety requirements they are required to meet.

On a related note, my spa filter pump only uses a single drain for the 3/4 hp pump. Is this compliant? There are 2 drains for the 2 hp jets pump. Always seemed weird to have 3 drains in my spa when everywhere else they are installed in pairs. The drains covers are the anti-vortex raised covers.
Depends on the size of the drains. Compliant drains are required to have appropriate markings. CMP explains it on their website.

Look at the CMP drains. The VGBA compliant single drains are large enough that no persons wide rear can cover the entire drain and become entrapped.

If a drain can be covered by a persons body then two are required spaced far enough that the suction cannot entrap a person.
 
Last edited:
  • Like
Reactions: birdman579
One more drain question, my current pool had the drain covers attached to rings embedded in the pebble finish. I have to plug some of my drains in the winter so the covers are removed and installed a couple times per year. When I bought the house, several drain covers were loose because the embedded ring was cracked.

Is the correct approach to use the drain cover ring embedded in the pebble. Why not attach directly to the drain basin screw holes? Seems like directly attaching would be more durable and less likely to break.
 

Enjoying this content?

Support TFP with a donation.

Give Support
One more drain question, my current pool had the drain covers attached to rings embedded in the pebble finish. I have to plug some of my drains in the winter so the covers are removed and installed a couple times per year. When I bought the house, several drain covers were loose because the embedded ring was cracked.

Is the correct approach to use the drain cover ring embedded in the pebble. Why not attach directly to the drain basin screw holes? Seems like directly attaching would be more durable and less likely to break.
I would need to see the details but if the screws line up connecting the cover to the sump should be fine.
 
Is installing the ring in the pebble finish acceptable? That seems to be most common, but has been problematic for my pool. Most drains are installed once and never touched again for years. My catch basin and spa need to be plugged for the winter so have more wear and tear. I want to defer to the contractor, but I have had so many bad contractors involved with my pool that I like to double check :)
 
Is installing the ring in the pebble finish acceptable?

Acceptable to whom?

For VGBA certified drains follow the manufacturers installation directions.

For non-VGBA drains it is the wild west and they are required to be replaced although many contractors don't follow the regulations.

That seems to be most common, but has been problematic for my pool. Most drains are installed once and never touched again for years. My catch basin and spa need to be plugged for the winter so have more wear and tear. I want to defer to the contractor, but I have had so many bad contractors involved with my pool that I like to double check :)
Start with the Installation Instructions for the sump and drain cover being installed. The Contractor should not be freelancing his own process because he has seen others do it.
 
I talked to the pool builder and asked to use linear drains in the spa. I’m excited to have the flush drains in the spa and won’t be tripping over the raised ones any more. Don’t worry about the plugs in the picture, they were fixed and protective covers installed before gunite.
 

Attachments

  • IMG_5274.jpeg
    IMG_5274.jpeg
    803.9 KB · Views: 6
Last edited:
Last week was gunite day. Wow, so much activity, but everything turned out really well. The major changes were fixing the steps to be smaller, rounding the corner, and getting the height correct so the drop off into the pool is even. There was a huge difference along the step before that caused visitors to fall into the pool. I just told them how I wanted it when they arrived and it looks awesome. Lots of subtle things had to align just right and everything looks great. The infinity edge height also stressed me out to get that perfectly level. They basically did it by hand with a 4 foot level. I thought that would never turn out right so I checked with my laser level. Across the 30’ length, it doesn’t vary by more than 1/8”. Incredible. Easy to get perfect with the tile install. This gunite crew was amazing. They laughed when I looked worried and said they got it. I shouldn’t have doubted them. Haha.

The only minor issue so far is one of the skimmers is about 1” low. My water level never changes with the infinity edge so it won’t be a problem, just a minor cosmetic issue that only I will notice when all done. I’m fine if that’s the worst issue discovered.

Now the wait for the gunite to cure before tiling and pebble. While waiting, I get to stress about picking the plaster color. The front runner is Stonescapes Tropics Blue Mini. I want an intense color, but not extremely dark. Looks like the best compromise.
 

Attachments

  • IMG_5243.jpeg
    IMG_5243.jpeg
    763.7 KB · Views: 9
  • IMG_5275.jpeg
    IMG_5275.jpeg
    693.3 KB · Views: 9