IceShadow - SWCG Thread

Also, I had to use a 3/4” to 1/2” reducer bushing out of my switch box to get the 1/2” conduit I bought to connect, and I’m pretty sure it’s not meant to be used that way. Is there a better product for that in this application?
That’s it 👍🏻 you’re good 😊
 
I don’t think there’s jumpers, just wire settings in this box. Fuse was removed and visually inspected, looks whole. If there’s more fuses I’m unaware of where they would be.

Hopefully not. We will see!

The exterior box just has 3/4” threaded. I removed a plug but otherwise there was no 1/2” option. I’m getting a zinc reducer to replace the iron one I got from the hardware store. And a whole new box honestly, as some of the screw connections are stripped out.
They make boxes with 1/2 inch holes. Just gotta check when @ the store. Maybe get a 2gang box instead so you have more room.
20F8C839-6578-4B21-A509-5E3523B335F1.png
Or for instance This plastic one comes with reducing bushings & has more holes
4AAD44CE-3DC0-4DCE-AFFC-2A196E1577B4.png
 
Last edited:
They make boxes with 1/2 inch holes. Just gotta check when @ the store. Maybe get a 2gang box instead so you have more room.
View attachment 484342
Or for instance This plastic one comes with reducing bushings & has more holes
View attachment 484343
I’m limited by the second box next to it which has a switch for my heater. It has two conduit going to it as well. I also have 3/4” conduit lines going to both of those boxes. Probably best to just replace the box with a new like one and use the reducer bushing but this time use zinc and Teflon tape.
 
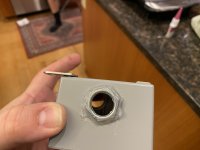
See pic below. The box for my switch has a 3/4” threaded knockout. The power supply box for the SWCG has a 1/2” hole. So I used 1/2” flex conduit with 1/2” ends and then a 3/4” to 1/2” reduction bushing from the plumbing aisle to make it all fit together. Seems like that might not be a good solution in an outdoor setting.
There should be a 3/4" x 1/2" conduit reducing bushing in the electrical aisle. What you have will work, but it could get flagged if it were ever inspected since it isn't the 'correct' reducer.

Edit - or you may be able to find a 1/2" liquidtight x 3/4" male connector so no bushing is required. Might have to hit an electrical supply house for that.

--Jeff
 
  • Like
Reactions: Mdragger88
There should be a 3/4" x 1/2" conduit reducing bushing in the electrical aisle. What you have will work, but it could get flagged if it were ever inspected since it isn't the 'correct' reducer.

Edit - or you may be able to find a 1/2" liquidtight x 3/4" male connector so no bushing is required. Might have to hit an electrical supply house for that.

--Jeff
I couldn't find anything local but the black iron one in the plumbing aisle. I am buying a zinc one online and plan to install that in a new box using teflon tape.


I can't find any 1/2" liquidtight x 3/4" male connectors online. I don't know that they exist. That would certainly be ideal.
 
I can't find any 1/2" liquidtight x 3/4" male connectors online. I don't know that they exist. That would certainly be ideal.
I think you're correct. I don't mess around with liquid tight much but I'll bet they just expect you to use a bushing if necessary.

--Jeff
 
  • Like
Reactions: IceShadow
I mean, ideal would be a box with two 3/4" connectors on the bottom and one 1/2" connector on the top, but I doubt they have such specific layouts available. :)
 
I couldn't find anything local but the black iron one in the plumbing aisle. I am buying a zinc one online and plan to install that in a new box using teflon tape.


I can't find any 1/2" liquidtight x 3/4" male connectors online. I don't know that they exist. That would certainly be ideal.
I have the appropriate reducer in my tool bag right now - I could mail it to you but it may stall your project a bit.
 

Enjoying this content?

Support TFP with a donation.

Give Support
And now the 1/2” conduit doesn’t fit into the reducer bushing. The one I did find at Home Depot worked fine. Back to Home Depot I go
 
And now the 1/2” conduit doesn’t fit into the reducer bushing. The one I did find at Home Depot worked fine. Back to Home Depot I go
I’m an idiot. The bushing was just upside down. Why would they make the hex side where you can’t reach it once it’s in the box…
 
Ok, so:

- Engineer at work recommends lever wire connectors when I have this much stuff in a box, to ensure nothing comes out of a wire nut as I’m shoving it all back in

- Get the new gang box from Amazon that I’m swapping in and the bushing (realizing Home Depot carries it after all)

- Decide I need some silicone, the lever wire connectors, and some Teflon tape. Go to Home Depot and get them

- Turn off breaker and start disconnecting everything in the box. Take off the top conduit for later use. Bottom conduit to the pump has a seal so old it falls apart as I remove the connector. We have extra conduit, but not enough 1/2” connectors, and this is also a 1/2” conduit with a really old reducer bushing that I don’t want to reuse. Also the conduit is really old and should be replaced

- Go to Home Depot for trip #2 to pick up a reducer bushing and a new end connector

- Remove old box by twisting it off the conduit connector going into the house. Remove old nail-things holding it to the wall with a vice grips. Open hole in wall a bit more and drill a new one for mounting tabs for new box, silicone the hole not used so water/ice doesn’t get in the brick

- Mount new box in new anchors after screwing it onto conduit coming from house (silicone applied to that connector as it doesn’t seem to have a rubber washer at the bottom)

- Panic as the conduit connector doesn’t fit into the reducing bushing from Amazon. Make trip #3 to Home Depot. Get bushing from there along with some 5-port connector lever connectors for the ground wires in the switch box

- Realize when I get back (working by work light at this point as sun is long set) that the bushing was just in upside down. Use vice grips to remove and clear off silicone, flip over, put back in and silicone applied after. Run new ground wire through to the power supply for SWCG box and connect that in that box

- Realize ground wire is outside the threaded bushing inside the power supply box. Disconnect, work through bushing, reconnect. Connect conduit to switch box and to SWCG power box

- Connect conduit from pump to bottom of switch box

- Connect all wires using the lever connectors

- Test the breaker - pump on, light in SWCG power box again (yay!)

- Breaker off. Have trouble fitting wire into box. Ask wife for packing skills help. Wife makes everything fit easily

- Breaker back on with switch put in box, everything has lights. Turn off switch, connect SWCG cell to power box. SUCCESS.

IMG_9029.jpeg
 
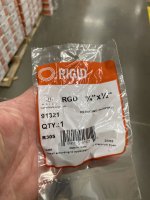
The hex side of the reducer bushing I got at Amazon. It must be intended to go on the 1/2” thing first, tighten with the hex connector, then go into the 3/4” side. I put it in the box upside down. >.<

View attachment 484590
I thought u meant the one in the bag - lol 😂
All water under the bridge now!
 
  • Like
Reactions: IceShadow
Also my pool looks pretty clear under the cover. My flow switches for heater and the SWCG both seem to trip on as I go over 1500 RPM so I set it to 1700 RPM for 24 hours.

Now I need to investigate that Current Sensing Relay. I wonder if there’s a way to set my heater up too. Probably need a second 120v one for that….

IMG_9030.jpeg
 
Last edited:

Enjoying this content?

Support TFP with a donation.

Give Support
Thread Status
Hello , This thread has been inactive for over 60 days. New postings here are unlikely to be seen or responded to by other members. For better visibility, consider Starting A New Thread.