That looks similar to the one I ended up ordering. the Fanimation Covert.

Hurry up and wait! (Katy, TX)
- Thread starter renesme
- Start date
You are using an out of date browser. It may not display this or other websites correctly.
You should upgrade or use an alternative browser.
You should upgrade or use an alternative browser.
21-Oct-21
Not much to update. The porch extension has been roofed in and painted. Just waitin on the tile & coping crew to show up. Any day now!

Not much to update. The porch extension has been roofed in and painted. Just waitin on the tile & coping crew to show up. Any day now!
And the journey continues...
22-Oct
I noticed one of our lights is busted. PB agreed to replace it.
26-Oct
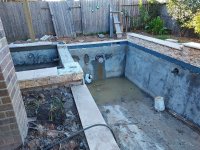
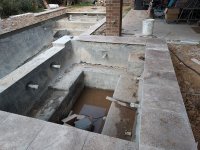
Ledger stone and coping started! On this day they also realized the plumbers forgot to put in the overflow drain, so that had to get notched in on the short corner where the spa is.
27-Oct
Waterline tile started going in. No one seems to know where the handhold tiles are. The tile guys said they will cut out spots for them once they show up. Instead of tiling the bottom of the skimmer opening, they went with some cut travertine coping material. That was a surprise, was not expecting it, but I kinda like like the look. One of the corners ended up being a bit wonky, so I asked the PB if we could get that straightened out a bit more, which they did the next day.
22-Oct
I noticed one of our lights is busted. PB agreed to replace it.
26-Oct
Ledger stone and coping started! On this day they also realized the plumbers forgot to put in the overflow drain, so that had to get notched in on the short corner where the spa is.
27-Oct
Waterline tile started going in. No one seems to know where the handhold tiles are. The tile guys said they will cut out spots for them once they show up. Instead of tiling the bottom of the skimmer opening, they went with some cut travertine coping material. That was a surprise, was not expecting it, but I kinda like like the look. One of the corners ended up being a bit wonky, so I asked the PB if we could get that straightened out a bit more, which they did the next day.
Attachments
-
 20211027_172214.jpg777.3 KB · Views: 78
 -
 20211027_172104.jpg754.1 KB · Views: 77
 -
 20211027_171953.jpg594.9 KB · Views: 76
 -
 20211027_171857.jpg747.9 KB · Views: 74
 -
 20211027_171850.jpg840.5 KB · Views: 73
 -
 20211026_181024.jpg560.9 KB · Views: 72
 -
 20211026_181005.jpg599.4 KB · Views: 72
 -
 20211026_180952.jpg620.9 KB · Views: 70
 -
 20211026_180927.jpg678.1 KB · Views: 73
 -
 20211022_160507.jpg468.2 KB · Views: 77
Turbo1Ton
Gold Supporter
- Dec 26, 2019
- 1,995
- Pool Size
- 14500
- Surface
- Plaster
- Chlorine
- Salt Water Generator
- SWG Type
- Pentair Intellichlor IC-40
Glad they fixed that corner. Tile guy should be strung up by his thumbs for even doing that to the corner in the first place.
--Jeff
--Jeff
Poolnerdgrandma
Gold Supporter
- Sep 15, 2018
- 955
- Pool Size
- 17000
- Surface
- Plaster
- Chlorine
- Salt Water Generator
- SWG Type
- Hayward Aqua Rite Pro (T-15)
This is the first I've ever heard of handhold tiles. Where do you put them, how are they used?And the journey continues...
22-Oct
I noticed one of our lights is busted. PB agreed to replace it.
26-Oct
Ledger stone and coping started! On this day they also realized the plumbers forgot to put in the overflow drain, so that had to get notched in on the short corner where the spa is.
27-Oct
Waterline tile started going in. No one seems to know where the handhold tiles are. The tile guys said they will cut out spots for them once they show up. Instead of tiling the bottom of the skimmer opening, they went with some cut travertine coping material. That was a surprise, was not expecting it, but I kinda like like the look. One of the corners ended up being a bit wonky, so I asked the PB if we could get that straightened out a bit more, which they did the next day.
Question for the experts here. There are a couple spots around the tile where the thin set has blurbled into the grout area. Is this an issue that I need to tell them to remedy so that the grout has a place to be or is this common and is already assumed that this will be fixed before grouting?
Attachments

They are kinda like rock wall grip thingies. Great for those with raised walls where you can’t just hold onto the side of the pool in the deep end. I forget the other term at the moment. Finger something or others. Lol.This is the first I've ever heard of handhold tiles. Where do you put them, how are they used?
They are a 3D tile that has a piece that sticks out a bit to allow someone to grab onto them. Here is an example (not the one we are getting though).This is the first I've ever heard of handhold tiles. Where do you put them, how are they used?
It is a safety issue for me because of the raised back wall. I want the kids to have a spot they can grab onto while swimming in the area if they feel they need to. (The coping is too high to reach comfortably). We are getting 3 that will be spaced along the back wall.
Poolnerdgrandma
Gold Supporter
- Sep 15, 2018
- 955
- Pool Size
- 17000
- Surface
- Plaster
- Chlorine
- Salt Water Generator
- SWG Type
- Hayward Aqua Rite Pro (T-15)
That makes sense. I wasn't thinking of the raisedThey are a 3D tile that has a piece that sticks out a bit to allow someone to grab onto them. Here is an example (not the one we are getting though).
It is a safety issue for me because of the raised back wall. I want the kids to have a spot they can grab onto while swimming in the area if they feel they need to. (The coping is too high to reach comfortably). We are getting 3 that will be spaced along the back wall.
back wall. We have a raised wall spa, but there's a seating ledge that runs along it so the kids are never without a reachable "get out or sit" spot.
I imagine too, that approximately 9 seconds into a swim day they will be declared a ‘base’ where kids can’t be tagged. 2 totally different uses for being ‘safe’. 
29-Oct
Look what showed up today!
For any future users of the board that want to see what these actually look like in a non-magazined photo I present the following 3 pictures, because I, for one, had one heck of a time finding many pictures to use for inspiration.
Very happy with how these turned out. Nicely contrasting with the waterline tile and ledger stone but without clashing. They all compliment each other well. Hard to tell sometimes looking at a picture in a brochure what exactly you might end up with.
Attachments


Yeesh, I blinked three times and November is gone. Since last time, the deck was finished and the equipment 80% installed. Still missing a booster pump, Intellicenter, and the salt system, which are all on back order. The PB gave us a temporary control panel to run the main pump and filter since plaster is scheduled for tomorrow, 12/3. Assuming acid wash and fill on Saturday, 12/4, that brings us to exactly 2 months dig to water. Not too shabby! Just a few finishing items such as final electric and the brick veneer on the column. We'll have the gutters added to the extension, and the water softener re-installed after water is in.
Nov 02
Most of the equipment installed.
Nov 09
Deck rebar went in.
Nov 10
Deck concrete poured.
Nov 11
Backyard graded and trash cleaned up.
Nov 17
Spray deck texture applied.
Nov 18
Spray deck color applied.
Nov 30
Sod installed. Pool cleaned in prep for plaster
Nov 02
Most of the equipment installed.
Nov 09
Deck rebar went in.
Nov 10
Deck concrete poured.
Nov 11
Backyard graded and trash cleaned up.
Nov 17
Spray deck texture applied.
Nov 18
Spray deck color applied.
Nov 30
Sod installed. Pool cleaned in prep for plaster
Attachments


BigPapaSmurf
Well-known member
I would not use zip ties, they can scratch up your fresh plaster, also tie on an empty water bottle to float the hose. I can’t wait to see it full of water!Dec 03
Plaster is done!
Wet Edge Signature Matrix Carribean.
Dec 04
Up for today, acid wash and start of fill. The sock and zip tie are ready to be deployed.

BigPapaSmurf
Well-known member
I used nylon string, but a rubber band should also workah ok....is a rubber band better?


As it is filling, take the time at certain levels such as touching bottom step, bottom step covered, seat covered, etc.
All of this info if helpful when you have may have to do a partial drain so you can calculate times and volume.
If you took a picture of your water meter at the start then also take a picture when you hit those defined milestones on levels.
All of this info if helpful when you have may have to do a partial drain so you can calculate times and volume.
If you took a picture of your water meter at the start then also take a picture when you hit those defined milestones on levels.
Thread Status
Hello , This thread has been inactive for over 60 days. New postings here are unlikely to be seen or responded to by other members. For better visibility, consider Starting A New Thread.