How to remove this square plug

You can’t turn a plug clockwise and counterclockwise at the same time.
Your thought is the same reason I spent 10 minutes trying to figure it out!

The assumption being that the plug only comes out one side. So to remove it from the top, loosening it from the bottom, it turns clockwise.

--Jeff
 
  • Haha
Reactions: JamesW
I have an identical plug and I held it over a mirror so that I could see the top and bottom at the same time.

Your perspective was the same. You have to physically move yourself to the other side of the plug. Raise it above your head and turn it counterclockwise (from the top) and see which way the bottom rotates.

--Jeff
 
  • Like
Reactions: JamesW
Ok, I tried it and it does go the opposite way.

:goodjob:
The perspective check helps when working on car engines as you can never seem to look at a bolt from the direction needed. Similar to why “lefty-loosy, righty-tighty” isn’t reliable. If the wrench is pointing downward, or you’re looking at it from the opposite end, then rotating the wrench left will tighten the bolt.
 
  • Like
Reactions: JamesW
The perspective check helps when working on car engines as you can never seem to look at a bolt from the direction needed.
Literally have done this probably 1000 times or more. Has not been as difficult as getting the perspective on this one, because I'm not trying to remove the bolt by unscrewing it from the opposite end.

--Jeff
 
Wow … this was one loooooong thread about how to turn a wrench 🤔🤷‍♂️🤦‍♂️

200.gif
 

Enjoying this content?

Support TFP with a donation.

Give Support
If the plug is screwed into the bottom of the hole, which way does it unscrew?
It always unscrews counter-clockwise if both of the following are true:
1. The removal direction is parallel to your viewing direction.
2. The plug moves closer to your eyes as it unscrews.

Unless it has left handed threads, but that’s a whole ‘nother can of worms. 😁
 
  • Like
Reactions: riny and JamesW
Oh wow this got outta hand 😆. Just drill a hole in the plug and proceed as you would have (had you removed it) using the slip fitting on the bottom for the drain plumbing.
Edit: oh shoot, i see Joyfullnoise already proposed this before the shenanigans started
 
Last edited:
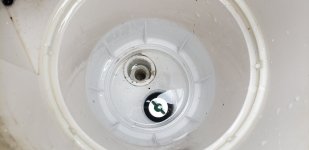
Ok, final update... the "righty tighty, lefty loosey" redux was fun but ultimately moot. It was hard to see at first but the plug is definitely glued. So I went with plan B and decided to drill it out.

This was easier said than done because it's hard to reach, and I was really nervous about damaging the rest of the skimmer. I couldn't really get to it from the bottom so I had to drill from the top, and the skimmer is so deep that I couldn't use my hole drilling bits. So I used the biggest bit I had which would reach (a long spade bit, not ideal for plastic bit it did the job) and drilled a hole in the center of the square part. Then I used my mini saw to carefully cut radius lines out from the center, and a long chisel to knock out as much of the plug as I could. Finally I finished with my 1.5" socket saver bit to round out the opening as much as possible.

Then I glued in a 2" to 1" reducer and tied the 1" into my existing overflow line. I plugged the other hole (the one that goes to the pad) with a rubber plug and tested for watertightness. Finally I removed the block on the skimmer opening and let it drain down into the woods. It took more than an hour to come down but now my water level is right at the bottom of the skimmer opening. We're due for the first big snowstorm of the season this week, and I'm happy that the cover isn't already submerged... and as the snow melts through the mesh, it has somewhere to drain off.

For next summer: I thought about putting in a valve, but instead I decided that I'll just plug the 1" opening from inside with a smaller rubber plug when the time comes. I can always add a ball valve into the 1" line if it's ever needed.
 

Attachments

  • 20211206_132044.jpg
    20211206_132044.jpg
    150.5 KB · Views: 11
Thread Status
Hello , This thread has been inactive for over 60 days. New postings here are unlikely to be seen or responded to by other members. For better visibility, consider Starting A New Thread.