Day 8
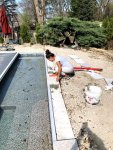
Something finally went well! I've gone around and around for a few days trying to figure out the best way to raise the pool bottom due to it having been dug too deep. I got great input from the TFP folks and the Pool Warehouse tech line. Ultimately I drove to the gravel yard and spent time talking to the owner Jerry Wysong (Wysong Gravel in West Alexandria). He was fantastic at helping me understand the different type of gravels and their uses. I ended up going with what they call small course crush. It's "mostly" clean crushed 3/4 and down gravel. It ended up being $1.25 cheaper per ton than the other stuff!
And then! The driver was able to drop 12 tons in the hole for my leveling project! Woohoo!!! I'd been trying to find a cheap skid steer solution to move the gravel from point A to point B.
PERMITS - I also drove to the permit office downtown for my electric and gas permits. The ladies there were fantastic as well. The gas permit for connecting the furnace was $125 and the electric inspections were $75 x 2. (One inspection for the "lower bond" which is the connection to the light niche to bond the water and one inspection for the "upper bond" which happens after backfill and covers everything else that's bonded. The new 100amp subpanel will also be included in one of the inspections.)
CONCRETE - I went ahead and ordered concrete for 8AM Saturday. I went for 3,000 PSI with 5" slump (per the installation guide) and added the fibermesh after recommendations from TFP. Total will be $127/yd + $6/yd for the mesh + $20 fuel charge.
So! It's 2:28 PM EDT and I have until 8AM EDT to be ready for the concrete collar pour! Here's my to do list:
Be back later!!!
- Spread & level the gravel to get the pool grade right
- Get my walls in the hole
- Get my 200+ lb cozy cove / swim up spa in the hole...
- Set / level the walls
- Figure out how to do the cozy cove and get it right (I think I might need a hardware store trip for wood on this)
- Set braces
- Put the tanning ledge together
- Shape the walls of the hopper
- Decide if I should go buy some 2x4's to brace the walls from the inside
- Temporarily relocate 6 very large Hastas so the concrete truck doesn't destroy them...
Drawl nice build. What is the fiber mesh for?Day 8
Something finally went well! I've gone around and around for a few days trying to figure out the best way to raise the pool bottom due to it having been dug too deep. I got great input from the TFP folks and the Pool Warehouse tech line. Ultimately I drove to the gravel yard and spent time talking to the owner Jerry Wysong (Wysong Gravel in West Alexandria). He was fantastic at helping me understand the different type of gravels and their uses. I ended up going with what they call small course crush. It's "mostly" clean crushed 3/4 and down gravel. It ended up being $1.25 cheaper per ton than the other stuff!
And then! The driver was able to drop 12 tons in the hole for my leveling project! Woohoo!!! I'd been trying to find a cheap skid steer solution to move the gravel from point A to point B.
PERMITS - I also drove to the permit office downtown for my electric and gas permits. The ladies there were fantastic as well. The gas permit for connecting the furnace was $125 and the electric inspections were $75 x 2. (One inspection for the "lower bond" which is the connection to the light niche to bond the water and one inspection for the "upper bond" which happens after backfill and covers everything else that's bonded. The new 100amp subpanel will also be included in one of the inspections.)
CONCRETE - I went ahead and ordered concrete for 8AM Saturday. I went for 3,000 PSI with 5" slump (per the installation guide) and added the fibermesh after recommendations from TFP. Total will be $127/yd + $6/yd for the mesh + $20 fuel charge.
So! It's 2:28 PM EDT and I have until 8AM EDT to be ready for the concrete collar pour! Here's my to do list:
Be back later!!!
- Spread & level the gravel to get the pool grade right
- Get my walls in the hole
- Get my 200+ lb cozy cove / swim up spa in the hole...
- Set / level the walls
- Figure out how to do the cozy cove and get it right (I think I might need a hardware store trip for wood on this)
- Set braces
- Put the tanning ledge together
- Shape the walls of the hopper
- Decide if I should go buy some 2x4's to brace the walls from the inside
- Temporarily relocate 6 very large Hastas so the concrete truck doesn't destroy them...


