Cracked Vanishing Edge Tile & Stone

birdman579

Active member
Dec 18, 2020
29
Maryland
Pool Size
30000
Surface
Plaster
Chlorine
Liquid Chlorine
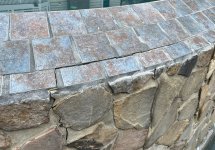
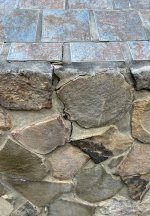
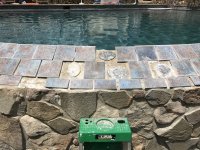
I had a pool party yesterday and had the pool running all afternoon and evening. At the end of the party, I noticed a large crack along several of the tiles at the bottom of my vanishing edge tiles and extends down the face stone. This appeared relatively suddenly. There was no evidence of leaking or other issues in this area before the crack appeared. I regrouted this tile 2 years ago and it doesn’t seem to be leaking. The area is dry if I let the pool level drop about a half inch so no water flows over the edge. I also don’t see any significant efflorescence below this area indicating a leak. Thoughts on what happened? How do I confirm this is only cosmetic?

My thoughts are there is a small leak at the peak of the tiles that lets in water when the full edge effect is running. This water builds up behind the grouted tile until it gave way. I don’t know how to look for a leak since it only happens when the water is flowing rapidly over the edge so dye testing is not feasible.

When I regrouted 2 years ago, I checked all the tiles and they were solidly attached the wall. They are obviously loose now.

Thoughts?
 

Attachments

  • IMG_3940.jpeg
    IMG_3940.jpeg
    867.3 KB · Views: 22
  • IMG_3941.jpeg
    IMG_3941.jpeg
    895.4 KB · Views: 22
Plan on doing maintenance to that area every year or two. That design will always develop small cracks in the grout or mortar or stone that water will find and over time open up.

Regrout around the tiles and the stone uses Type S mortar between them.
 
  • Like
Reactions: birdman579
What specifically about the design leads to the tile failures? I’ve considered regrouting the inside tile with epoxy grout. The large grout joints on the angled tile also seems problematic that could be resolved by replacing with smaller tiles, cutting tiles, and/or not trying to align the lower courses of tile to the upper courses of tile.
 
I don’t see tile failures.

The thinset, grout, or mortar is cracking from thermal expansion and contraction and ground movement.
 
Correct, I didn’t mean the tiles were failing, the bond from the tiles to the wall is failing.

Why do you recommend type S mortar? Since the failure is most likely caused by expansion and contraction, wouldn’t a more flexible type n or o mortar be better?

For the tiles, I previously used Pool Patch tile setting repair kit (not on these tiles specifically, a few other tiles cracked when I was grinding out the old mortar) and that has worked well. I plan to use that for the tiles again. Can I use the same for the stones on the vertical surface? A few are now loose. Or should I stick with mortar for attaching them and use the same mortar between the stones? Also, do I need to grind away the old mortar behind the stones?
 
Let's be clear - use thinset for tiles and Type S mortar to set stones.

You want a good surface for the thinset or mortar to adhere to. I use an osciallating tool to clean out old thinset and mortar.
 
Yes, got it for the tiles, thanks! My oscillating tool worked wonders to remove old grout. I’ll have to try it for the old mortar too.

Why do you recommend type S mortar for the stones? Why not a more flexible type N mortar to prevent future cracking?
 
Why do you recommend type S mortar for the stones? Why not a more flexible type N mortar to prevent future cracking?

Either will work.

I think getting a good mix and proper preparation of the base is more important then the type. Type S has a higher compressive strength.

Depends if the stones are decorative or structural.
 
  • Like
Reactions: birdman579
Adding some background to this issue… when I regrouted the infinity edge tiles 2 years ago, I noticed the tiles were all installed using a blob of mortar that left many of the edges and corners of tiles unsupported. See the pictures from the regrouting project. I thought the original pool builder knew what they were doing so this is normal. Research since then indicated this is probably not correct and contributing to my tile issues. I assume all my tile was installed using this blob method instead of a solid layer of Thinset. Also notice the top row of tiles is not fully supported by anything! The top quarter of the top row is cantilevered to meet the vertical tile on the inside of the pool. This seems bad.

Question - am I fighting an unending tile battle because of how the tiles were installed? Should I consider replacing all the tile in my pool and bond them properly? And possibly upgrade to epoxy grout?

Note: the Pebbletec finish still looks nice after 17 years. All my issues are tile/grout related.
 

Attachments

  • IMG_2568.jpeg
    IMG_2568.jpeg
    792.5 KB · Views: 6
Blobs is a lazy way to lay tile.

Both the surface and the tile should be buttered with thinset using a notched trowel and the tile laid on the thinset.

full
 

Enjoying this content?

Support TFP with a donation.

Give Support
Thread Status
Hello , This thread has been inactive for over 60 days. New postings here are unlikely to be seen or responded to by other members. For better visibility, consider Starting A New Thread.