Cracked Jandy Check Valve

Feb 15, 2021
9
Austin, TX
Pool Size
16000
SWG Type
Hayward Aqua Rite (T-15)
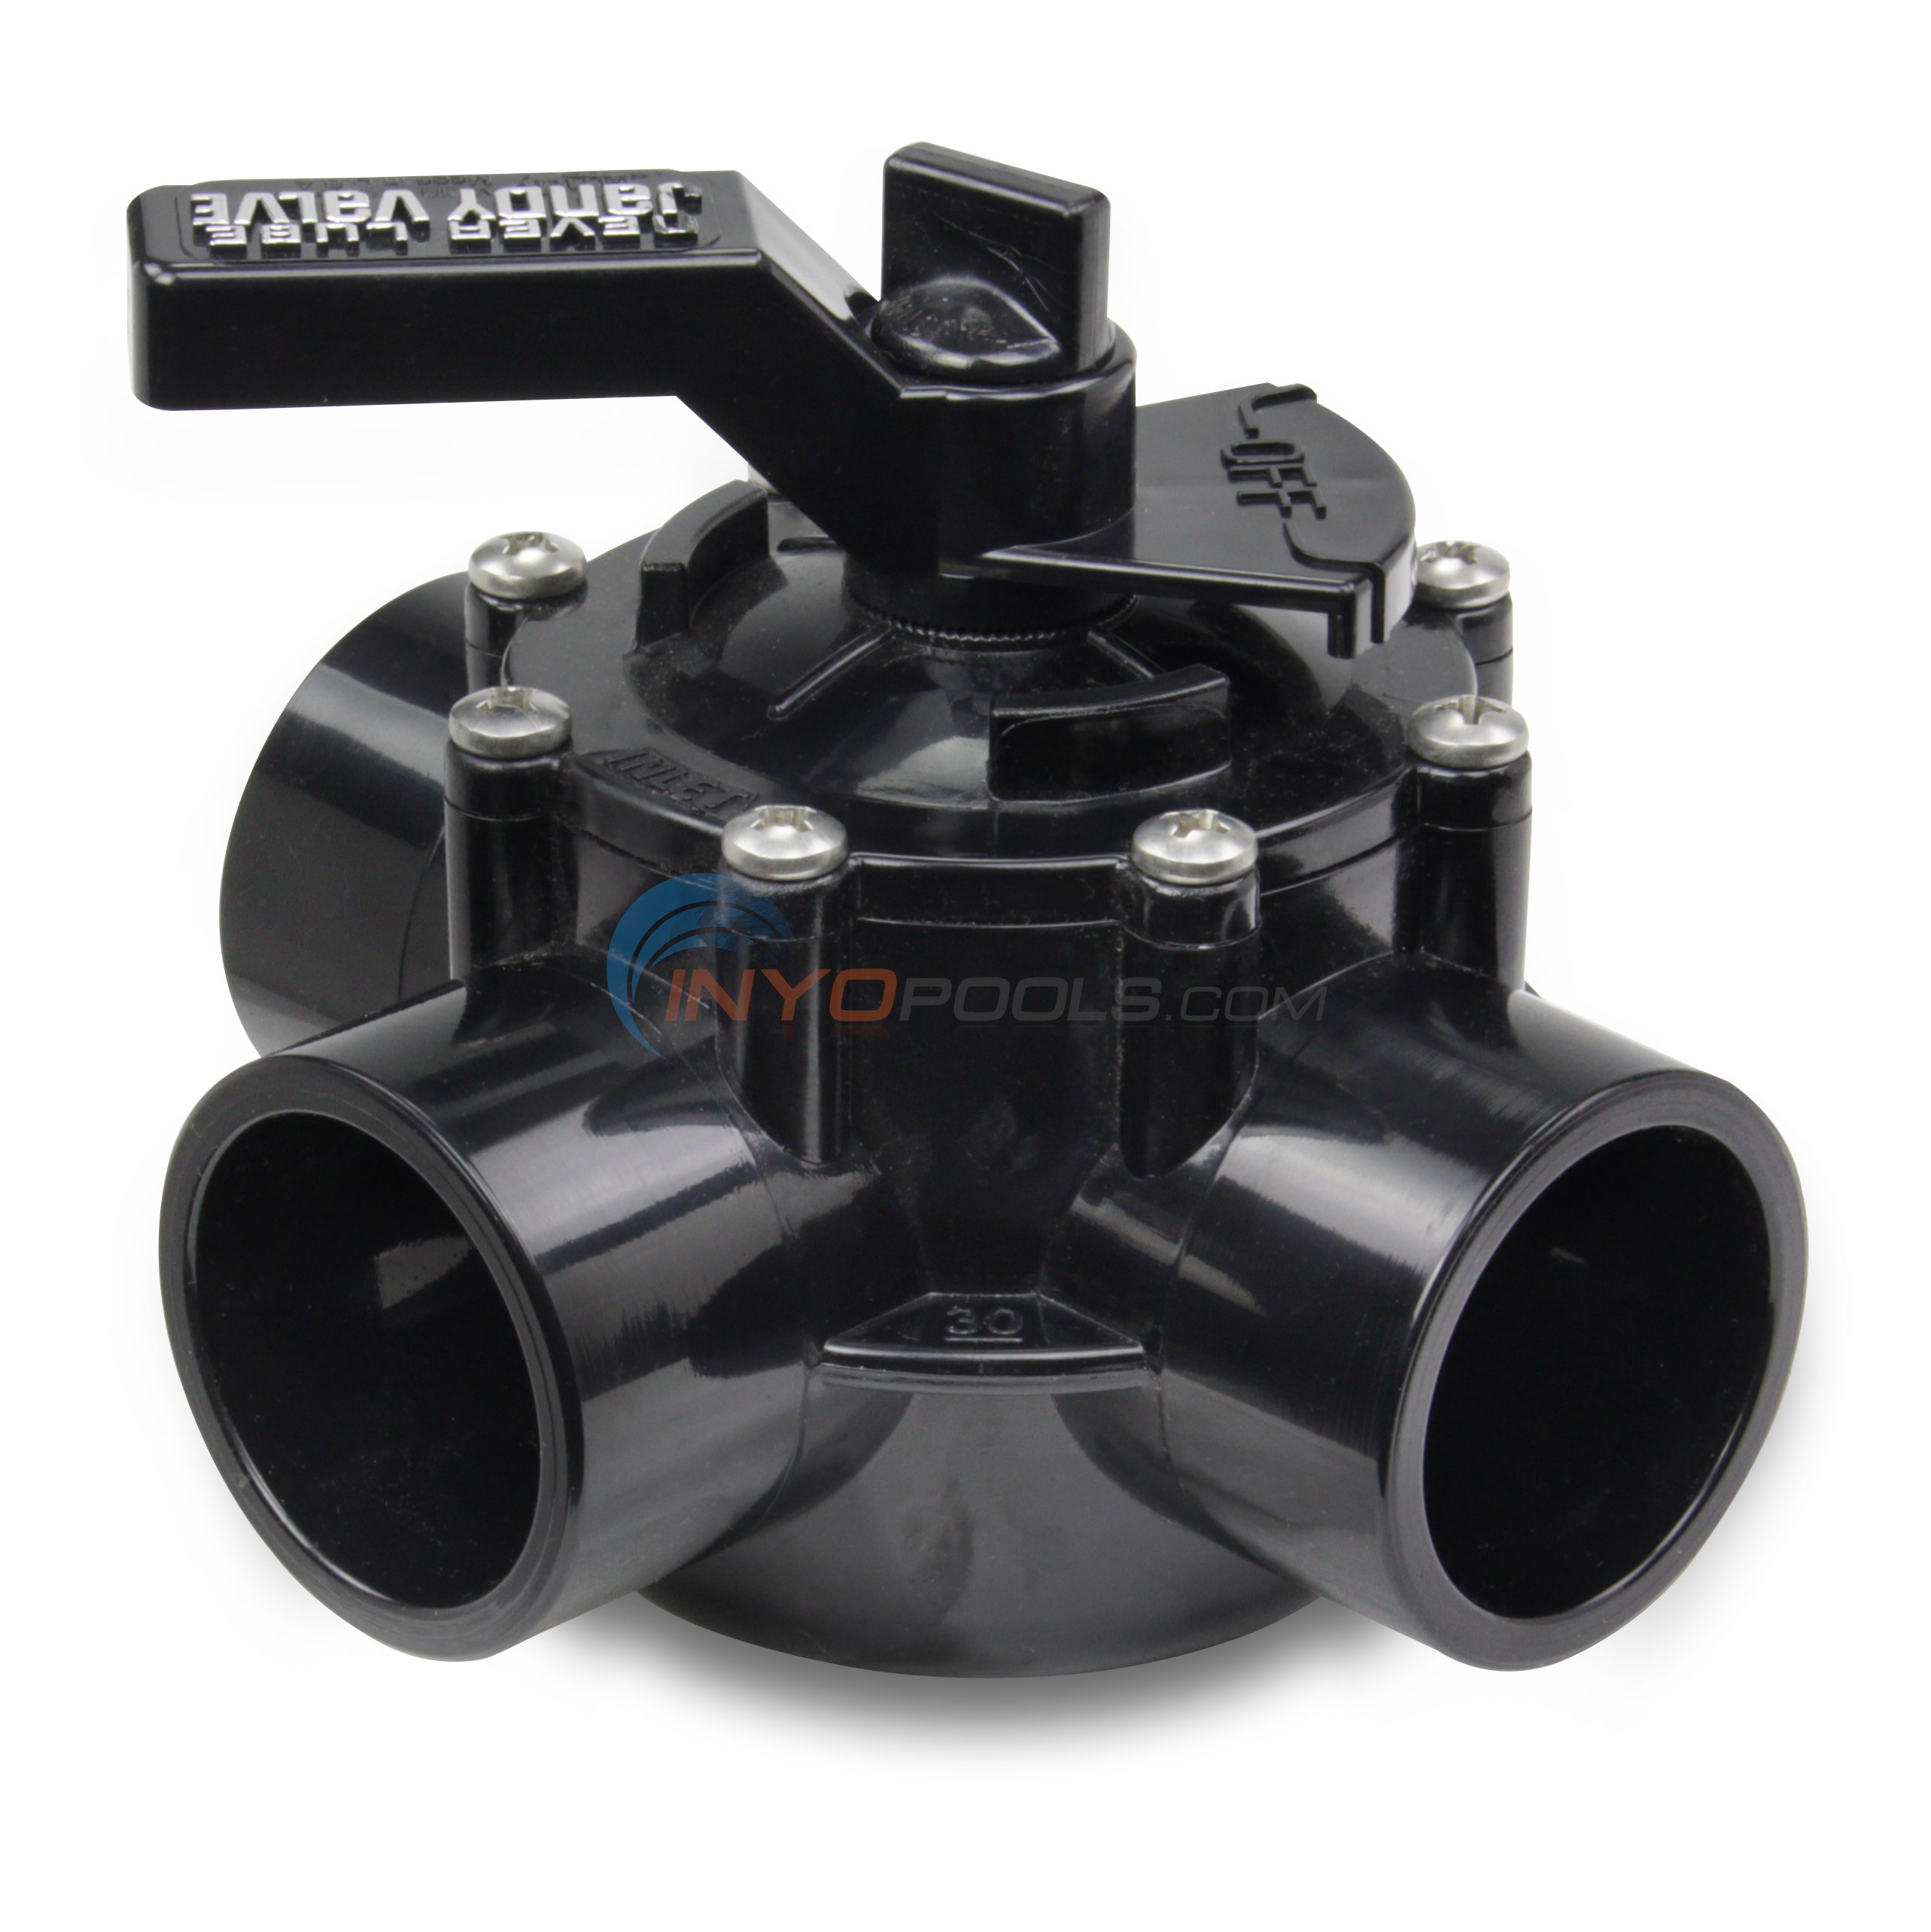
Hello all. Thank you guys for the storm advice. I’m sure there may be more damage to find once under pressure but the main visual damage i see here is this cracked valve.
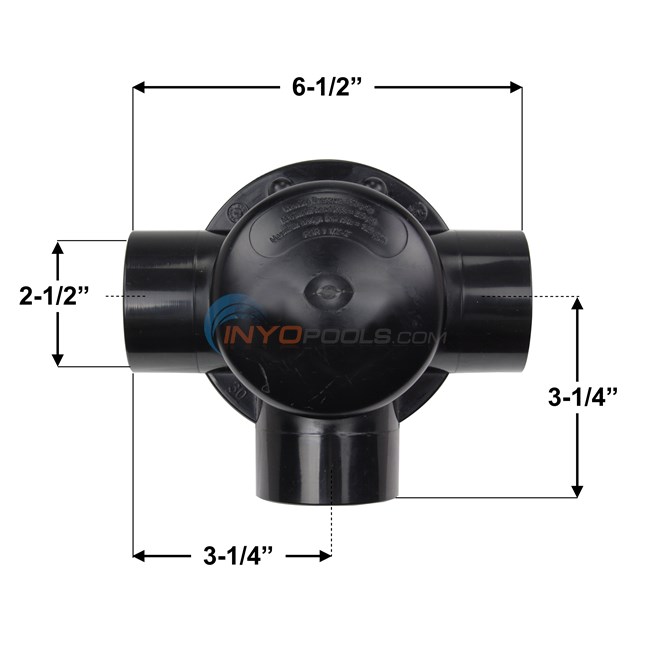
Hoping I might be able to DIY but the proximity to the next valve has me concerned. Would love a recommendation about where to cut (or not if the valve could separated another way). Thank you!B08223E3-5172-4206-BD76-8961C1AD2E66.jpegEFA910A5-8589-428B-AACD-8D060A3F0C63.jpegB08223E3-5172-4206-BD76-8961C1AD2E66.jpegEFA910A5-8589-428B-AACD-8D060A3F0C63.jpeg
 
The check valve is designed accept two pipe sizes. If your valve is a Jandy 7235, it will accept 2" on the outside (as installed)) and 1 1/2" on the inside.

I'm not saying this is the best solution, but I don't think there's an easier solution. You could cut the valve off flush at the elbows and replace with a 1 1/2" section of pipe. You can mount your check valve vertically between the ground and the elbow.

Check Valve.JPG
 
The three-way valve can take 1.5” pvc pipe on the inside or a 2” fitting on the outside.

Assuming that the valve inside is clear, you can cut through the 2” fitting where the valve would end and then replumb with 1.5” pvc pipe.


4715-02.jpg


4715-dimn.jpg
 
Inkedcracked jandy valve_LI.jpg

I would cut where I marked the blue lines. Since the elbow is so tight against the valve actuator you will need to cut through the elbow. You will probably need to very carefully apply heat to soften the pvc to be able to remove it from the actuator. Mounting the new check valve vertically will give you more room to work with in the future.
 
You can try this....

 
It appears you have automation. You could eliminate the check valve all together and use the Spillover function in your automation. You would have to adjust the cam on your actuator to close the spa return completely when in Pool mode.

Unless this is on the suction side. Which would not need a check valve.
 
Allen's link that describes melting the elbow off of the valve might be worth a shot, but that could backfire, too, if you get the valve port too hot and deform it. If you look at the three-way valve under the actuator, what looks to be the inlet port has its PVC pipe glued to the inside. Which means gluing the new pipe to the inside of the outlet port (the one you need to get at), as @JamesW suggests, is not going to reduce flow at all. That's the easier, safer fix...

The pipe coming out of the valve, after a couple elbows, can be glued to the inside of the inlet port of the new check valve, and then mate up with the pipe going into the ground with a coupler glued to the outside of the check valve's exit port. 15 minutes, Bob's-yer-uncle.

I would cut the elbow between the three-way valve and the cracked check as zea3 suggests. That way, you can inspect the port on the three-way to make sure the inside was not previously used. If there's a piece of pipe already glued in there, then you can try melting off the elbow.
 
Last edited:
  • Like
Reactions: JamesW

Enjoying this content?

Support TFP with a donation.

Give Support
The check valve is designed accept two pipe sizes. If your valve is a Jandy 7235, it will accept 2" on the outside (as installed)) and 1 1/2" on the inside.

I'm not saying this is the best solution, but I don't think there's an easier solution. You could cut the valve off flush at the elbows and replace with a 1 1/2" section of pipe. You can mount your check valve vertically between the ground and the elbow.

View attachment 176480
so I understand are you saying after making the cut there would be a new length of pipe where the old valve is and then relocate the valve to be vertical after the second elbow? Thank you for your help.
 
  • Like
Reactions: Rancho Cost-a-Lotta
View attachment 176481

I would cut where I marked the blue lines. Since the elbow is so tight against the valve actuator you will need to cut through the elbow. You will probably need to very carefully apply heat to soften the pvc to be able to remove it from the actuator. Mounting the new check valve vertically will give you more room to work with in the future.
Thank you. This idea is gaining popularity:). Your cut suggested near the actuator...is that at 45* and then try heat to get the rest of the elbow off?
 
Allen's link that describes melting the elbow off of the valve might be worth a shot, but that could backfire, too, if you get the valve port too hot and deform it. If you look at the three-way valve under the actuator, what looks to be the inlet port has its PVC pipe glued to the inside. Which means gluing the new pipe to the inside of the outlet port (the one you need to get at), as @JamesW suggests, is not going to reduce flow at all. That's the easier, safer fix...

The pipe coming out of the valve, after a couple elbows, can be glued to the inside of the inlet port of the new check valve, and then mate up with the pipe going into the ground with a coupler glued to the outside of the check valve's exit port. 15 minutes, Bob's-yer-uncle.

I would cut the elbow between the three-way valve and the cracked check as zea3 suggests. That way, you can inspect the port on the three-way to make sure the inside was not previously used. If there's a piece of pipe already glued in there, then you can try melting off the elbow.
Thank you. I think I’m with you. Question on the first cut after the three way valve. Is that straight or more 45*. Not sure how much clearance there is to the three way valve. Assuming I’ll need a replacement elbow (x2) and then I think I follow you what you suggest after that. Amazing help. Thank you!
 
Cut through the 2" 90 degree elbow flush with the existing valve edge.

You will leave approximately 1.3" of the 2" 90 on the outside of the valve and then plumb to the inside like what was done on the other two fittings.

There is no need to remove the 2" fitting that will be left on the outside of the valve.
 
Measure 1.3" from the 2" 90 fitting edge and then mark it straight and cut straight so that the cut is flush with the outside edge of the valve which extends about 1.3" inside the fitting.
 
Not sure if warranty matters too much to you. But you're in luck if it does and you want to DIY the repair. Valves and valve parts are the only items Jandy sell and give full warranty for DIY... pretty sure they exclude damage from freezing though. :laughblue:
 
Thank you. I think I’m with you. Question on the first cut after the three way valve. Is that straight or more 45*. Not sure how much clearance there is to the three way valve. Assuming I’ll need a replacement elbow (x2) and then I think I follow you what you suggest after that. Amazing help. Thank you!
@JamesW is giving you good instructions about where to cut. But you can also cut twice if you're unsure. Give yourself some wiggle room. Cut through the elbow well away from the three-way valve's port. Then you can peek inside and see exactly where the three-way's port stops. Transfer that to the outside of the elbow with a marker, and then cut a second time with confidence that you won't slice off any of the three-way.
 
  • Like
Reactions: JamesW
@JamesW is giving you good instructions about where to cut. But you can also cut twice if you're unsure. Give yourself some wiggle room. Cut through the elbow well away from the three-way valve's port. Then you can peek inside and see exactly where the three-way's port stops. Transfer that to the outside of the elbow with a marker, and then cut a second time with confidence that you won't slice off any of the three-way.
Got it. Seems like there’s a chance I could cut on the left side of the broken valve flush and keep the elbow. Straight piece next then 2nd elbow then check valve vertical. seems like having the check valve vertical is a good idea...agree?
 

Enjoying this content?

Support TFP with a donation.

Give Support
Thread Status
Hello , This thread has been inactive for over 60 days. New postings here are unlikely to be seen or responded to by other members. For better visibility, consider Starting A New Thread.