Concrete pool up north

Henry Porter said:
I must admit that I'm little surprised that you finds my insignificant little project interesting despite all the overwhelming projects that are posted in here. I hesitated more that once if I should put up a log of my own in here. But I'm very glad I did.

You call this project little? If building your own pool and kitchen and tiling everything and all the other things you've had to do to complete this project is little, and all by yourself... I'd like to know what a big project is. :lol:

Anyway, I continue to be amazed by your progress and I must say WOW at your tiling job!! I would never have the patience, or skill to lay every one of those tiles individually.

Best of luck,
Adam
 
no-mas said:
[quote="Henry Porter":3duaxh9r]I must admit that I'm little surprised that you finds my insignificant little project interesting despite all the overwhelming projects that are posted in here. I hesitated more that once if I should put up a log of my own in here. But I'm very glad I did.

Hey Mats -
You posted this almost a year ago. I likely speak for many when, after 11 pages and counting; and after >5300 page views; I say that we are all delighted that you posted and continue to do so. Keep up the good work. You'll be swimming, cooking and entertaining in your new oasis before you know it :goodjob:[/quote:3duaxh9r]


Without a doubt! This is my favoroite thread. I was so disappointed in July when you took some time off and I am sure winter is going to be too long to wait for updates as well (c:
 
I'm speachless.. What more can I say than thank you everybody for making this logging so worth while.
no-mas! I have my own explanation regarding all the views. Half of them is probably my own :cool: and the other half has a lot to with that I'm not from the US. But either way I'm very proud of all the cheerful replies. So once again thank you :bowdown: :bowdown:

Cobra! I have looked at the green egg and a few other ceramic cookers including the komodo kamado(too expensive though).
But we have set final gear that will be mounted in the kitchen. This setup let us both cook and grill beacuse of the big gas driven "steak plate" I have bought, something I'm satisfied with. I'm a charcoal type of person so that will be the only gasdriven cooker out there. I have bought a bullet smoker aswell but that will be stored under the bench. The Oklahoma smoker!! hopefully a item I can afford next summer, but that is only a matter of money and not something I have to prepare for at this stage at the build.

Adam Don't belive for a moment that my tileing job is something that demands any great skills to accomplish beacuse it's not. If you're able to take meassures and can draw a few lines there is not much more to it than reapeat your doing to the extent that you risk to eventually puke. Little exaggerating, but patience is more important than skills to undertake a job like that.
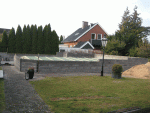
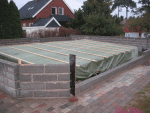
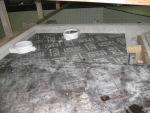
If I should try to describe my own current tileing situation! I'm so tired of everything associated with tiles so I have bought a new tarp that I will replace on saturday(if the weather allows me to do so). That way can I make sure that there will be no water in the pool that can freeze during the winter. When I'm sure everything is water tight will I clean out the pool and than wait with the grout to the spring. I feel I can't do a good job with that at the moment, so it's better to wait.

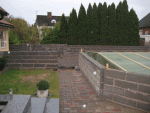
On the positive side. I have started to brick up the wall next to the kitchen. I have to do that before the forming for the draining board( is that right word for the bench where the sink is placed in ?) since that will go out on the top of the wall 300mm wide all the way to the shower. I thought that could be convenient to place the grogg on when it's party time :party: And it's so fun to brick it up can't wait for the weekend so I can put my hands on it again.

As usuall new pics on sunday!
Once again thank you and good night :-D

All the best Mats
 
Mats,
I have just recently made a new friend that also lives here in Cancun. His name is Ray and he is from Austin, Texas. He is a master barbecuer and smokes all his meats. He makes the most wonderful smoked baby back pork ribs, brisket, and angus beef ribs as well as his own BBQ sauce which he smokes in his smoker grill. It's not fancy as he has to set up his smoker on the rooftop of the apartment building he lives in with his family. He is a real Texan and really knows what and why he is doing with his smoker. Here are a few pictures I've taken of his set up.

Ray's smoked BBQ ribs

Ray's smoker set up

Two briskets gettin' smoked along with a bowl of BBQ sauce getting the smoke stirred in

1 kilo of brisket (cold, because we weren't going to eat it until the next day)


This kind of grub is very hard to get here in Mexico, so we are very lucky to have our friend Ray from Texas making this for us. He picks up his meat at the Cancun airport every Thursday, it's from Hormel in the USA and he cooks up a batch on Fridays and Saturdays every weekend. So don't let that smoker slip out of reach, you'll put it to good use. :goodjob:
 
Oh! Tom what a great set of pictures. I will show them to Eva see if they change her mind about the 400 pound beast I want to buy :) I guess they will!

Those ribs really look fantastic Tom. I guess it take some practise before you can flourish with an result like that. I have tried to achive it with a round charcoal grill but with poor results. I bought a "secret" rub recipe for ribs over the net on a smoking forum and tried to apply that on the ribs I was making in my weber, but they just burned due to the temperature, so that was a failure. But I have found out a way to use it. I mix it with some regular grill sauce and it works really well actually. Doesen't look as good as the one you posted but better than what I have achived before.

Always great to her from you Tom, you little slider. :wave: :cheers:

EDIT: I know how interested you are in good food :) Talking about good food :cool: Belive it or not but I'm pretty good in grilling salmon. A speciallity in our family and our kids favourite. See if I can buy one this weekend, I can put up some pics if I do so.

//Mats
 
Mats,
The secret is "low and slow". With the smoker the fire is not directly under the meat, it's off to one side, so the meat cooks over many hours at only about 82ºC, it will develop a nice char on the outside and a smoke ring just under the surface. Then when you bite into it you get that wonderful smokey flavor. That's info from the barbecue master Ray himself.
:party:
 
Sunday morning and I have run out of rebars :shock:
I will do a calculation to see how many meters I need to finish the remaning job that's left. So I can finish the bricking next week!
I said in my last post that the kitchen bench was next in line. I had to change that beacuse of the weather and started to brick up the walls instead(less tools that I have to protect from the weather) :)
At the moment I'm forming the ceiling to the machine room, see if I can come back later today and put up some pics on that aswell.

//Mats
[attachment=1:2uqtdcyw]brickingIMG_0134.gif[/attachment:2uqtdcyw][attachment=0:2uqtdcyw]brickingIMG_0135.gif[/attachment:2uqtdcyw]
 

Attachments

  • brickingIMG_0134.gif
    brickingIMG_0134.gif
    344.3 KB · Views: 171
  • brickingIMG_0135.gif
    brickingIMG_0135.gif
    335.1 KB · Views: 170
Any suggestions how I should proceed if I want the plastic lid to the skimmers in the finished stamped concrete? Are you pouring the concrete with the lids mounted on the skimmers, adjusted to the right height and then before the concrete has settled compleately have them removed, so they not stick?

Thanks!
//Mats
[attachment=1:ezc3afol]ceilingIMG_0136.gif[/attachment:ezc3afol][attachment=0:ezc3afol]ceilingIMG_0137.gif[/attachment:ezc3afol]
 

Attachments

  • ceilingIMG_0136.gif
    ceilingIMG_0136.gif
    221.5 KB · Views: 167
  • ceilingIMG_0137.gif
    ceilingIMG_0137.gif
    96.1 KB · Views: 810
Hi, Mats,

I may not be understanding your question very well but I will tell you what I did. I set the body of the skimmer at a level appriximately 1/2" below the finished level of the decking. I then made a metal "collar" (by forming a piece of sheet metal into a ring) that fit around the skimmer lid insert portion of the skimmer and stuck up about 2-3 inches.

When I poured the concrete, the metal collar kept the concrete from going down into the skimmer and I finished the concrete right up to it.

Because I made the ring with sheet metal screws on the inside to hold it together, it quickly came apart when I took the screws out and was easily removed. I then had a nice round hole in the concrete that my skimmer lid insert fit down into almost perfectly. I had to use some concrete filler to smooth the walls of the hole a little bit but that was easily done with a putty knife. I then placed the skimmer lid inserts into the hole.....they fit well enough I needed no further adjustments and the lids snap in place very conveniently.

It looks like your skimmers are a little different than mine but, if you are asking what I think, you should be able to make some sort of ring to keep the concret out of the skimmer body while you pour and that will hold you skimmer lid when you remove the ring.
 

Enjoying this content?

Support TFP with a donation.

Give Support
Thank you Dave!
I will copy your idea with the sheet metal.
Did you leave a gap between the skimmer and the concrete on the outside of the skimmer body when you poured your deck?
I figured that there might be a risk that movement in the earth could crack the platic if you do it without a joint? Or am I over concerned about that!

//Mats
 
No, I don't think you are overly concerned at all.....I think it is a point that should be considered very carefully. I understand that it is a very common cause of a leak.

I poured the skimmer encased in concrete before I poured the deck[attachment=1:u6vql5k5]024skimmer.jpg[/attachment:u6vql5k5][attachment=0:u6vql5k5]026skimmer.jpg[/attachment:u6vql5k5]The decking was poured on top of the encapsulated skimmer body then so I ended up with a cold joint (no bonding) between the skimmer body and the decking (Before pouring the decking, I put a layer of roofing felt (tar paper) between the decking and the top of the skimmer so that the decking could "slide" across the top of the skimmer). I was a little worried that I should have allowed more room for movement but it's about five years old now and it still looks like it has not moved.

It looks like your pour is going to be a little different but I completely agree with you that you should make some provsion for the deck to move independently of the skimmer.
 

Attachments

  • 024skimmer.jpg
    024skimmer.jpg
    49.8 KB · Views: 764
  • 026skimmer.jpg
    026skimmer.jpg
    45.1 KB · Views: 762
Really appreciate that you take your time Dave!
I will take a few days and see if I can come up with something for my situation, that are as you noticed a little different from yours. I will pour my deck at the same level as the poolwalls. But I will not tie it to the wall but instead pour it with a 1/2" wide controlling joint there.
Thanks again Dave :wave:
 
It hit me when I was driving that I can pre-pour concrete around my skimmers the way Dave did it.
And when I pour the deck I simply add a 1/2" expansion joint around the pre poured skimmers. Most be the easiest way to do it, so why complicate it more than necessary. Dave you're the king :goodjob:

I'm no longer out of rebars :cool: I went crazy the other day and orderd 1500m of 10mm single bars. I can guarantee that my pooldeck wont crack with that arrangement! Everything well so far. The hardest thing now is to find a way to hide the invoice for Eva :shock: But remeber that I do love rebars :sun: :sun: so why not exaggarate a little!
Winter have hitted us this week so the rebars will sit still for a while, feels good to have them home though.
//Mats
[attachment=0:154yixsm]rebarsIMG_6272.gif[/attachment:154yixsm]
 

Attachments

  • rebarsIMG_6272.gif
    rebarsIMG_6272.gif
    263.8 KB · Views: 171
WoW!!! :shock: :shock: :shock:

Up until you posted the picture above, I liked to brag to my friends that I had used 1200 lineal feet of rebar in my pool walls.....well, those bragging days are over.

Mats, I'm not sure if you know what an "understatement" is, but this is the King of Understatements.....

I'm no longer out of rebars :cool:

If Sweden comes under nuclear attack, all the government officials will want to hide under your pool deck.......they will be perfectly safe!! :lol: :lol:
 
Mats, your build is still the most popular thread on this site :cool:

You have done every part of it to the highest quality :goodjob:

I just want to tell/ remind you of some things about concrete. :

1) Only add water to the mix when it first comes to achieve the proper 'slump' (adding water midway through the pour weakens the crete you subsequently pour :evil:

2) Don't pour the crete if you anticipate freezing temperatures in the next month :hammer: (crete takes 27 days, I don't know what that is in metric :lol: , to fully cure and you don't want it freezing before it fully cures :!:

It's always a pleasure to see your posts and watch your pool build :party:
 
Ted Thanks for the heads up, priceless information! Keep them coming please..
I can assure you that I appreciate your post just as much as you seems to appreciate mine :)

btw I saw that you had your birthday yesterday and I can't see that you have posted anything today :cool: Takes a while to recover, right?? :party: If you're weren't so darned far away I would set up a party of my own to celebrate the delightful person who spends a lot of time helping me(and many others) by sharing his knowledge here on TFP :wave:


I will finish the bricking of the wall today(have a few hours after work before it get's pitch black). After that it's time for the plaster on the outside of the wall. I can't do the inside beacuse I have to mount all the electrical cables for outlets, speakers and lamps before I can do so. I would prefer to wait to spring with it to be honest, but since my wife wanted to get rid of the pile of sand that we have in our jard, that stands next in line. And as long the weather allows me to work with cement I can just as well do that.
I can't decide though if I should apply the plaster very smoothly or try to get a slightly more roughly appearance on it. What do you guys think looks best on a wall that I build? I'm good with plaster(stucko) I have done my own house so I'm pretty comfortable that I'm able to get a 100% smoth surface if I(we :-D )decide that looks the best.


Best regards Mats
 
What about making it match the house? Then neither of younz could give each other the stink eye over it. :mrgreen:

Ahhh.. Happy Birthday waste!
 
Hi Casey!
I applied the topcoat on the house with a machine and used a product made of limestone not something I plan to do with this job, here will I just use handtools. And we(wife) have decided to do the wall white with a black top, not yellowish like the house.

Here is a pic of the finish bricking job, I'm satisfied by the way it turned out, if I may say it myself. It may look yo you like the poolarea is a lil to small but you should remember that the machineroom take a lot of space under the tarp. So I think when we uncover the pool it will be alright. It's size was a comprimise between me and Eva and I must admitt the she was right that a bigger poolarea would look weird compared to our small house. [attachment=0:2pd7pxmm]finished pool wallIMG_0371.gif[/attachment:2pd7pxmm]

//Matsingen :)
 

Attachments

  • finished pool wallIMG_0371.gif
    finished pool wallIMG_0371.gif
    178.1 KB · Views: 173

Enjoying this content?

Support TFP with a donation.

Give Support
Thread Status
Hello , This thread has been inactive for over 60 days. New postings here are unlikely to be seen or responded to by other members. For better visibility, consider Starting A New Thread.