- Oct 29, 2021
- 18
- Pool Size
- 22400
- Surface
- Fiberglass
- Chlorine
- Salt Water Generator
- SWG Type
- Jandy Truclear / Ei
Concrete poured in early Oct. Tarp cover with water bags installed a couple weeks later. PB unexpectedly came out last week (day before Thanksgiving) to replace with a mesh cover (I was fine waiting until next year).
The week before holes were drilled, the day time high temperatures were mid-30s, and nighttime lows were in the 20s. The day of anchor drilling, the high was mid-40s, and part of the deck is in shade. Water bags (when removed before drilling) were frozen solid.
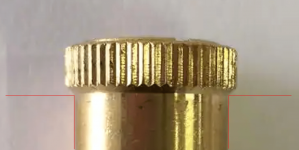
A small sample of the resulting chipped concrete shown in attached images, on over 80% of the anchors. In the second image, you can even see aggregate exposed. Our mason said he was frustrated to see these pictures and he can fix the concrete with a day of labor. PB instead says not to worry; they aren't done with the job and will be installing brass collars in the Spring.
I want the best end result. If it were you, would you have the PB install collars or have the mason repair and have the PB pay? Or a better option?
Thanks!


The week before holes were drilled, the day time high temperatures were mid-30s, and nighttime lows were in the 20s. The day of anchor drilling, the high was mid-40s, and part of the deck is in shade. Water bags (when removed before drilling) were frozen solid.
A small sample of the resulting chipped concrete shown in attached images, on over 80% of the anchors. In the second image, you can even see aggregate exposed. Our mason said he was frustrated to see these pictures and he can fix the concrete with a day of labor. PB instead says not to worry; they aren't done with the job and will be installing brass collars in the Spring.
I want the best end result. If it were you, would you have the PB install collars or have the mason repair and have the PB pay? Or a better option?
Thanks!