Austin Owner Build (Raised Pool with Infinity Edge)

I wish I had come across your post sooner as our previous pool was very similar to yours and I have some advice.

Background on pool:
We were second owners of house and did not build the pool. Pool was built with the house as an integral part. House built on a steep hill with the hill grading down away from the front. Back part of house has “floating” concrete deck with solid concrete surrounding walls. Majority of house and all of pool and deck are all on concrete piers to bedrock. All built in 1996. Structurally everything extremely solid and very well engineered.

The problem with the pool was/is that, over time, the fill used around the shell settled. This wouldn’t be a problem since everything major was supported by concrete walls & piers except that the plumbing (especially for the returns) was supported by the fill. So with time, vibrations, and the lack of any activity on the soil to keep it compacted (it’s underneath a floating deck so nothing’s putting pressure on the fill) the plumbing began to sag. With more time and more sag, the plumbing would crack at connection to the wall returns (moreso around the hot tub, probably due to the jet plumbing having more horizontal run and more vibration from activating he bubble blower, etc). And then, to compound things further, once that fill gets wet from a leak, the fill starts shifting more.

So, my advice, is think about what’s going to happen with your plumbing 10 years down the road, how you’ll repair it (we were constantly having to jack-hammer the deck - thankfully with a “Cool Deck” finish it was easy to repair and blend the finish and color back in). If I were doing from scratch myself, I’d be looking for a way to support the plumbing from any means other than the fill.


The longevity of the plumbing is a major concern. If your post/advice was earlier in my build, I probably would have have changed a few things--particularly on my looped returns.

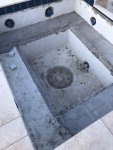
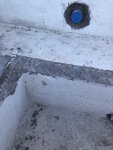
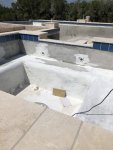
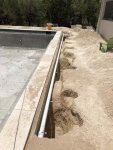
Most, but not all, of my plumbing comes through the pool shell and straight down to solid ground/rock. I hope that having most of the plumbing going down to solid rock will eliminate the issues that you experienced.

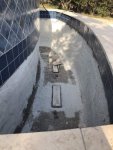
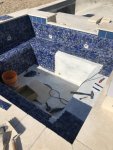
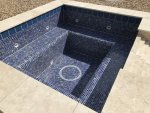
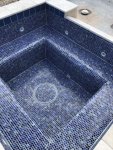
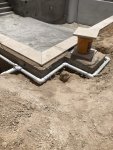
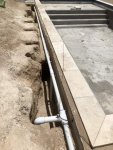
The looped return pipe on my pool is very close to the shell, less than 4 inches but it does have long horizontal runs between the actual return inlets (I hope that shifting fill does not crack/break the looped return pipe.) For about 1/2 of my pool, I used washed rock which should not have a shifting issue (Once compacted, rock normally stays put.) It is only on the portion of the pool that I used screened fill that I am currently concerned about.

I am installing Travertine on a sand bed for pool decking; so, I will not have the jack hammering issues you faced. But, much of my plumbing is 6' to 8' under screened fill or washed gravel. The looped returns are 4' to 6' under washed gravel or fill. Having to dig that far down for a plumbing issue would be a PIA.

My house is on a slope, but it is relatively a small slope. Yes, the back foundation is 9' off of the ground but this is over a more than 100' distance from the front of the house to the back--the house is a large one story. So, sliding/shifting is not something I am concerned about from either the house or the pool. The house foundation was engineered, and I had the pool engineered (structural and soil engineer).

I did have to dig up some electrical pipes that pushed down when the fill settled--I supported the electrical pipes the second time with galvanized wire attached to the pool shell and retaining walls. So, I unfortunately have experienced the settling that you are referring to (my electrical pipes bent but did not crack/break). If I could go back in time, I probably would have done something similar to support the looped returns. Alternatively, I would have used washed rock instead of screened fill for the entire area around the pool shell. My fill has experienced a lot of rain/time to settle, so I hope that additional settling/shifting will no longer be an issue.

Did you have a lot of fill below/above your pipes? How deep were your pipes?

Only time will tell if I experience the same issues you faced.

One of my goals with posting this build is to help other people that might take on a build like this. Thanks for posting your experience and advice!

I will take all of the advice that people can give me.
 
:shock: You rock!

So how did you get the sand bags up to the top steps or even harder the middle ones??

Kim:kim:

The sand bags are laid/placed before the wood is installed for the step risers (i.e., the board that are horizontal where the steps are). But the sand bags have to be carried up to the middle/top. Essentially, you have to climb up the previously placed sand bags to go higher and higher. Think of it like building a pyramid from the bottom up.
 
An update on my plumbing. After jragan’s post ( thanks again for posting your experience), I decided to dig down to inspect my looped returns, and my returns in the screened fill were experiencing the same issues jragan experienced (bending and cracking at the pool wall). So I redesigned my looped return system. Unfortunately, this required a LOT of digging—at least I am getting good as something.

I decided to raise the looped pipe to within 8” of the surface. This will make life easier if the pipe leaks in the future. However instead of relying on the fill to support the pipes, I drilled 1/2” holes into the pool shell for 1/2” rebar to be hammered in. This will provide support for the looped returns (the pipe is resting on the support pegs/rebar). To protect the rebar and the looped returns from rubbing on the rebar, I cut 1/2” pvc pipe, filled it with silicone, and slid the pvc over the rebar. I hope this permanently fixes the problem.

In the pictures you can see some of my bonding wire.
 

Attachments

  • 83919A76-4544-4108-A738-E9D5273D8DD7.jpg
    83919A76-4544-4108-A738-E9D5273D8DD7.jpg
    71.7 KB · Views: 507
  • AB28B780-1704-4C28-B4C4-434948B1DFE3.jpg
    AB28B780-1704-4C28-B4C4-434948B1DFE3.jpg
    87.6 KB · Views: 506
  • 553EF3ED-DD8D-47A6-BEF0-9CB0B95A30BF.jpg
    553EF3ED-DD8D-47A6-BEF0-9CB0B95A30BF.jpg
    78.9 KB · Views: 499

Enjoying this content?

Support TFP with a donation.

Give Support
I have been working on multiple parts of the pool project that I have not posted. At this stage, I am tired of this project. I officially started on July 24, 2017–so it has now been a little over a year.

One of the bigger issues was discovered by my tile guy. The infinity wall was out of level by 3” ( i.e. the infinity wall vertically was not straight). The tile guy fixed the top half of the infinity wall where he tiled, but I had to float out the bottom portion of the wall. It takes a lot of material to float out a wall 4’ tall and 21’ in length.

I have also started to waterproof the catch basin but need to finish ( the waterproofing is the white stuff).

We originally were going to plaster the spa but decided to tile the spa. I felt the tile guy wanted too much to tile it; so, I decided to tile the spa myself. Tiling the spa unfortunately requires me to cut and hammer out some concrete on the spa seats so that the 1” tile has a more gradual round over. I am also leveling out the spa as it has variances in seat height that would be noticeable with tile. To do the round over on the seat I snapped chalk lines and used a circular saw to make straight cuts then I hammered out the concrete I needed to remove. Once I finish floating out the spa seats and walls, I will waterproof the spa again and then begin tiling. It is a little hard to see in the pictures what I have done so far.

I also had the masons out to complete the stone on my steps. At least some items are getting wrapped up.
 

Attachments

  • 058F5451-51AD-49ED-AD65-6D3547ED2310.jpg
    058F5451-51AD-49ED-AD65-6D3547ED2310.jpg
    59 KB · Views: 408
  • 35FDBD7D-DBD7-4942-A16F-D985F92E67BD.jpg
    35FDBD7D-DBD7-4942-A16F-D985F92E67BD.jpg
    56.1 KB · Views: 401
  • 5C109E95-32FE-47BC-9A49-C0D9867037B2.jpg
    5C109E95-32FE-47BC-9A49-C0D9867037B2.jpg
    59.9 KB · Views: 408
  • 8038E6B2-3B60-4E43-9E5D-219F42FFD72E.jpg
    8038E6B2-3B60-4E43-9E5D-219F42FFD72E.jpg
    65.2 KB · Views: 404
I bet you ARE tired of it all.........but man what you have done so far is unreal! I love the idea of the tile in the spa but yeah that does=more work for you :(

Your stone guy did a great job with the steps! Will you put a rail or anything on the open side?

Here is hoping you have found and fixed all of the oppies!

Kim:kim:

Yes, I will put up railing (ie cable railing) on the steps and around the pool as soon as I finished with the travertine.
 
Instead of chipping try an angle grinder with concrete cup:
https://www.amazon.com/OCR-Concrete-Diamond-Grinding-Grinder/dp/B01CQQR3DW/ref=sr_1_3?ie=UTF8&qid=1533248606&sr=8-3&keywords=concrete+grinding+cup&dpID=5105M-VqmWL&preST=_SY300_QL70_&dpSrc=srch

Much faster and you can bullnose or chamfer very easily. General rule for tile: much easier to add thinset and float it smooth than to grind it down.

- - - Updated - - -

If you grind concrete make sure to protect lungs and eyes.

p.s. pool looks great.

I did not think about grinding the edge. I wish I would have tried that. The tile guy I spoke with said that he would have chipped off the edge; so that is what I did.

I already had a diamond cup from epoxing my garage floors. But I am not sure I would have been able to grind that much off of the corners—I think my cup would have died before I finished .
 
Any updates, I've been following this build for a while and noticed you haven't posted for a few months

This poor guy is either in traction or the looney bin by now. Most owner builds consist of a diy vinyl kit or a walmart intex blowup job. This is the most ambitious owner builds I have ever seen. Hat's off to anyone with big enough stones to attempt this. I bet we will see him once he finishes tiling the spa. Can't wait to see it!
 
This poor guy is either in traction or the looney bin by now. Most owner builds consist of a diy vinyl kit or a walmart intex blowup job. This is the most ambitious owner builds I have ever seen. Hat's off to anyone with big enough stones to attempt this. I bet we will see him once he finishes tiling the spa. Can't wait to see it!

LOL--a few folks have accused me of being crazy. My running joke is "if I am crazy it is not my problem--it is everyone else problem."

All kidding aside, I have been working on the pool (just not posting as many updates). The weather has been extremely uncooperative--lots of rain.

I finished tiling the spa some time back (about a month ago). I now know from experience that tiling a spa is a major PITA. My spa has internal dimensions of 9' x 8', which resulted in 140 sq ft to tile. The biggest pain was floating out the spa to level things out (the shotcrete guys did not get remotely close to level enough to tile a spa).

The top row of 6" x 6" tiles were installed by my tile guy. The remaining tile was installed by me. I did not get everything leveled out perfectly but I do not think anyone will notice once water is in the spa.

If I had more spare time, this project would go much faster.
 

Attachments

  • IMG_0157.jpg
    IMG_0157.jpg
    48.3 KB · Views: 241
  • IMG_0160.jpg
    IMG_0160.jpg
    73.5 KB · Views: 245
  • IMG_0203.jpg
    IMG_0203.jpg
    98.3 KB · Views: 251
  • IMG_0204.jpg
    IMG_0204.jpg
    98.1 KB · Views: 249

Enjoying this content?

Support TFP with a donation.

Give Support
Thread Status
Hello , This thread has been inactive for over 60 days. New postings here are unlikely to be seen or responded to by other members. For better visibility, consider Starting A New Thread.