2020 Pool & Backyard Renovation - Advice Needed

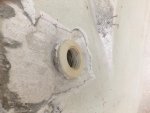
Was able to get a bit more demo done on the skimmer in between rain showers today.

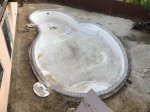
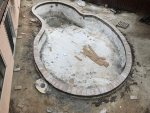
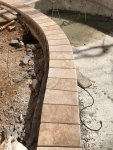
Coming up in May, the tile, coping and current pool finish will be removed and new Pebble Brilliance finish, new glass tile and new Travertine Coping installed.

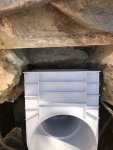
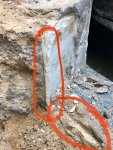
Looking at the skimmer throat and realizing the plaster company will be demoing the interior, how much material should I remove so that they don't disrupt my new skimmer set?

Circled in the attached pic and shown on the attached video, I think I see 3 different materials in the throat. Concrete, then White Plaster, then mortar bed for the tile.

How much of this should I take out now? What will make it easiest for the plaster company to do their work without messing up my new skimmer set?


Attachments

  • SkimmerThroat.jpg
    SkimmerThroat.jpg
    145.3 KB · Views: 17
Last edited:
All depends on the size of the replacement skimmer. I would just chip away the plaster right around skimmer so you have a guage w old plaster where to set it. The mortar for tiles can come off you either build up if you need it for new tile to skimmer or adhere over what's there. How much difference between old and new
 
I started demo on my second skimmer Sunday and went ahead a filmed the work. You can see how much I was able to get busted out in about an 1.5 hours.

I'm using a Rotary Hammer that is set to the Hammer ONLY setting. Probably got about 1/2 way done before running out of time. I'll film the rest of the job this coming weekend and post as well. Let me know if anyone finds this interesting or helpful, or if you'd like me to try and capture or answer anything specific. There a handful of videos on YouTube showing different aspects of a skimmer replacement, but not too many.. Hope seeing some of this work helps some of the TFP community!

 
  • Like
Reactions: kimkats
TFP - Put together a quick 2 minute time-lapse showing the removal of my concrete pool deck.. Realized I had all of this footage on my Ring Security camera!

Planning to get a lot of work done this weekend, finishing up the removal of both skimmers and then start rough grading the dirt around the pool so I can start digging for my new plumbing lines. My two new skimmers should be delivered today too! The plaster company is planning their work for the week of May 11th as of now, so gotta get all my prep work done.

I think we've decided on Pebble Brilliance Vivid Shores for the finish, still trying to figure out what tile we want.. Leaning towards a 1x2 glass tile, some sort of blue tint.

 
Last edited:
Was able to finish up the Skimmer demolition and removal on Saturday, captured the rest of this job which you can watch in the video below if interested.

I also got my new Hayward Skim-Master skimmers delivered, was pretty excited when the box showed up! Will probably be a week or two before I'm ready to install them, but will plan to film that process as well. I'll probably have a few more questions for the community here before taking on that job.

I also did my rough grading around the pool using the Dingo, posted a quick time lapse of this on the YouTube channel as well if you want to check it out.

Next I'm planning to start digging trenches and running the new suction and return plumbing lines. Upgrading from the 1.5" existing to 2" Schedule 40 PVC. I think I may home-run each line independently (2 suction, 3 return). Anyone have an opinion on this? This means each suction and return line will be independent of one another, dedicated lines all the way to the equipment pad. I figure this will give me maximum flexibility to control/tune my system, and also allow me to easily shut off a line should I encounter a leak at some point in the future. (Hopefully never run into this situation though!!).

Let me know what you think so far, and if you have questions or suggestions! Thks


Enjoying this content?

Support TFP with a donation.

Give Support
Getting ready to install the new skimmers in the next day or two. I've been filming more of the work along the way that I'll be posting later, but hoping to get some advice or reassurance that I'm going about this the right before pouring concrete.

The two pics show the new skimmer sitting in the hole, already have the rebar cage built and attached to pool wall.. Regarding the actual concrete though, my plan is to use a hydraulic cement first to pack as best I can around the front of the skimmer face and the side.. Then mixing up 5000psi cement to pour/entomb the full skimmer.

Questions:
1. Is it smart/necessary to use the hydraulic cement around the face first?
2. How "liuqidy" should the cement be mixed to allow it to flow fully around the skimmer?
3. Any thing I'm not thinking of or tips?

I'll be bonding the new rebar, ensuring height is set flush with pool opening and level all around, and making the plumbing connection prior to pouring as well..

Thanks!

@jimmythegreek - Appreciate any thoughts or advice you have.
 

Attachments

  • Skim_1.jpg
    Skim_1.jpg
    68.9 KB · Views: 25
  • Skim_2.jpg
    Skim_2.jpg
    95.1 KB · Views: 24
i just use thin plywood and foam to seal off the front and pour it. you dont need it that wet it loses strength. you can add a tiny bit of plasticizer if you need to get into nooks and crannies. make sure the old stuff is clean and use a bonding agent. the front can be built out using thinset when doing the tiling. make sure you use thinset thats approved for underwater use. I use laticrete 254 its expensive but is the strongest stuff Ive ever used or seen
 
Lots of progress on the project over the past couple of weekends, have more pics and videos to share soon.

But first, a quick question on Return Fittings.. The plaster company started their demo today and will be hydro-blasting tomorrow. Here is a quick pick of one of the return fittings. Can the visible part of the fitting be replaced with out fully replacing the return pipe?

I am contemplating if I should take the opportunity over the weekend to basically drill through the existing the returns and run new pipe through the wall or not. Thoughts? What would the anatomy/components of the return pipe and fitting consist of?

Appreciate any thoughts.
 

Attachments

  • Return.jpg
    Return.jpg
    68.9 KB · Views: 12
Usually on concrete pools the return like that is glued on. Pipes are left long and cut before plaster. Take a look inside fitting see if theres glue remnants or primer color visible.

Jimmy - you’re right, I can see the primer/glue residue indicating the fittings are glued on. Appears the fittings slip over the return pipe and is glued.

So, assume this means my only real option is to replace the pipe through the wall.. is there another approach I’m not thinking of?

If I core drill and replace, can I use a female threaded fitting flush with new plaster finish? What do you typically use here?
 
Depends how much room you got. If pipe is OK I would personally do surgery with a mini hacksaw or vibrating tool and a heat gun and get them off and replace that way. Its tedious amd time consuming but so is replacing the pipe. If back of pool wall is open you can just cut and bang them thru. Theres different ways to remove pvc fittings I've seen all sorts of things thru the years.
 
Would love to see an update pic!

Renovation still very much underway, but big progress coming up! I have a lot of videos showing much of the work I have been doing DIY, such as Skimmer replacements, Pressure Testing new plumbing, Replacing return piping through the wall, Finding and fixing a structural crack! I have to edit all of this before getting it posted, but will be sure to let this thread know when the videos are out there.

In the meantime, here are 4 pics that show the pool starting to transform.
Pic 1 = Pool state before draining​
Pic 2 = Pool after coping and tile removal​
Pic 3 = Pool after hydroblasting​
Pic 4,5,6 = Pool with new Travertine coping set. Hard to tell from the pic, but the cuts, gaps and overall layout really looks great!​
 

Attachments

  • Pool1.jpg
    Pool1.jpg
    117.6 KB · Views: 42
  • Pool2.jpg
    Pool2.jpg
    90 KB · Views: 41
  • Pool3.jpg
    Pool3.jpg
    89.1 KB · Views: 40
  • Pool4.jpg
    Pool4.jpg
    109.8 KB · Views: 41
  • Pool5.jpg
    Pool5.jpg
    109.6 KB · Views: 49
  • Pool6.jpg
    Pool6.jpg
    107 KB · Views: 45
  • Love
Reactions: Snoobug

Enjoying this content?

Support TFP with a donation.

Give Support
Thread Status
Hello , This thread has been inactive for over 60 days. New postings here are unlikely to be seen or responded to by other members. For better visibility, consider Starting A New Thread.