Pentair Clean And Clear 420 Cartridge Filter Exploded, Brand New Filter Leaking Help

May 21, 2018
45
Las Vegas, NV
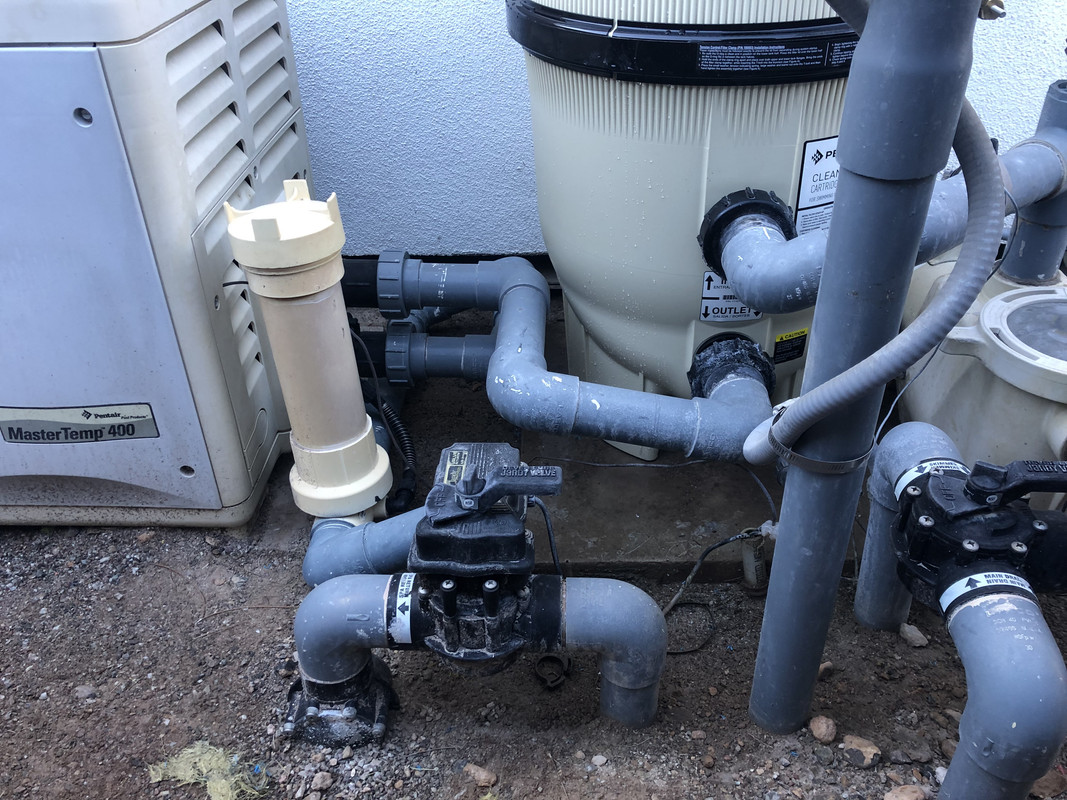
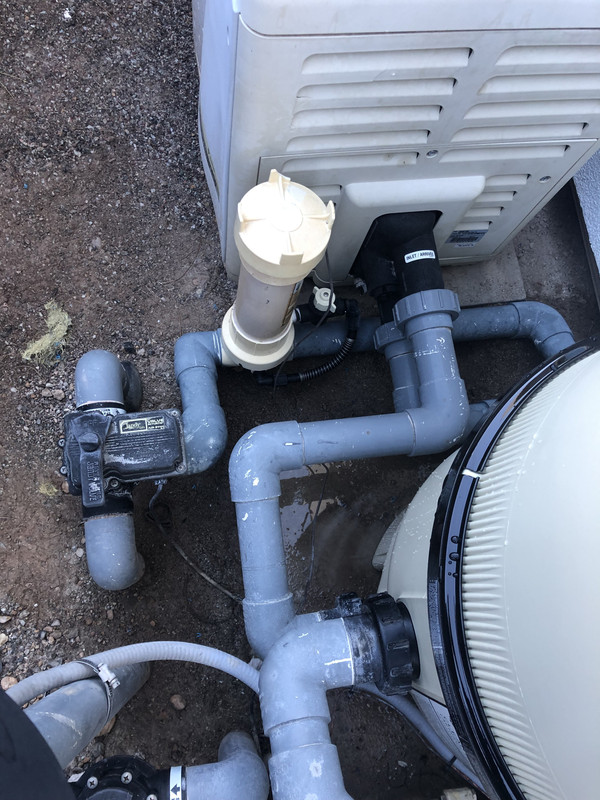
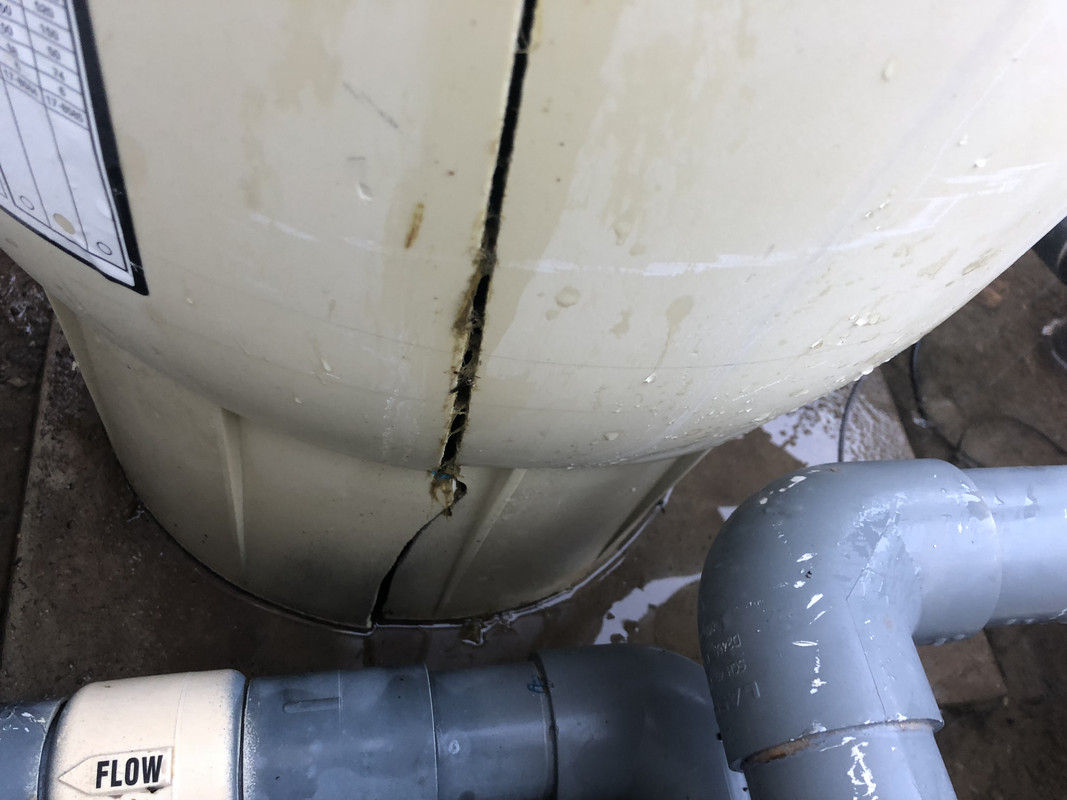
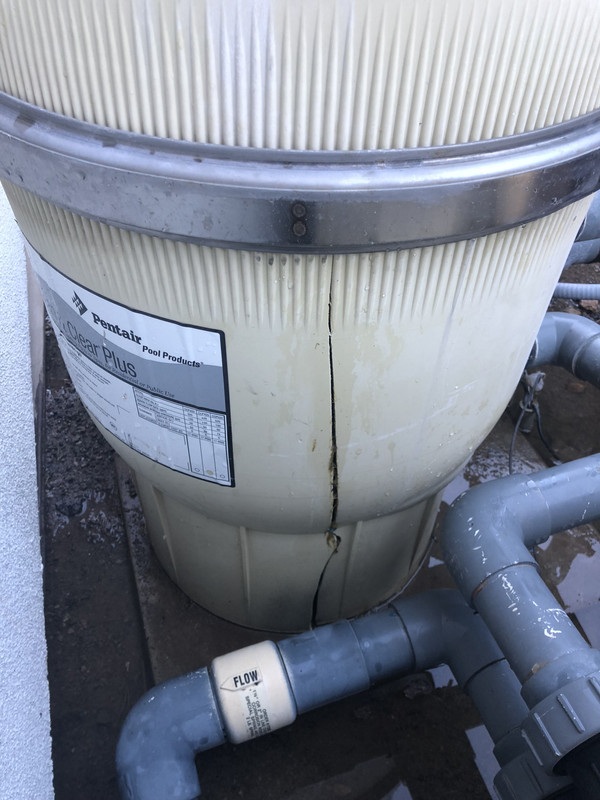
I recently had my Pentair Clean and Clear 420 cartridge filter catastrophically explode. It was about 8 years old.
I was checking on a leak in my pump.
Pumps had been operating that day.
I turned pump off.
I turned pump on.
No issues.
I went to turn pump on one last time and when I hit the button a loud boom!
I shut down and the filter bottom had split vertically from the band all the way underneath.
It almost split completely in two. Luckily, the top didn't separate and kill me.

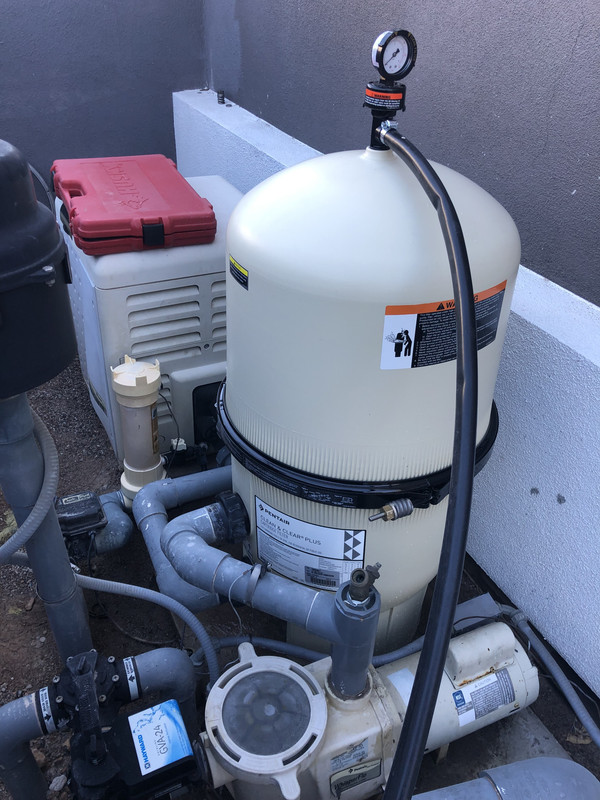
Anyway, I got my new Pentair C&C 420, brand new from the factory yesterday. I installed it in the exact same way as the old one that blew up. I went to fire it up with the air relief valve open. As soon as water came out the valve I noticed that the new filter was leaking water from the band. This is before shutting the valve. I immediately turned off the pump. I noticed that one of the springs was not touching so I tightened the band. I tried again and same thing. This time I watched the gauge on the valve. The pressure hit 30psi and vibrated there. This was with the valve open. I never shut the valve because the band was still leaking. 30 psi is about normal for my system but with the air valve shut not open. Now I am completely freaked out that the new filter is going to blow if I shut the valve. Some questions.
1. When purchasing a new filter like the Pentair clean and clear cartridge, do you need to open the filter and mess with anything inside or is it ready to go from the factory? The installation instructions have no warnings or instructions that indicate you need to open the filter on initial install. They only provide directions for cleaning the filters down the road.
2. Is it normal that the band would leak on a factory direct unit? Instructions indicate that if water leaks from where two halves come together turn off immediately and check and clean the pressure relief valve or call Pentair. Well its not a valve problem and Pentair is closed today...
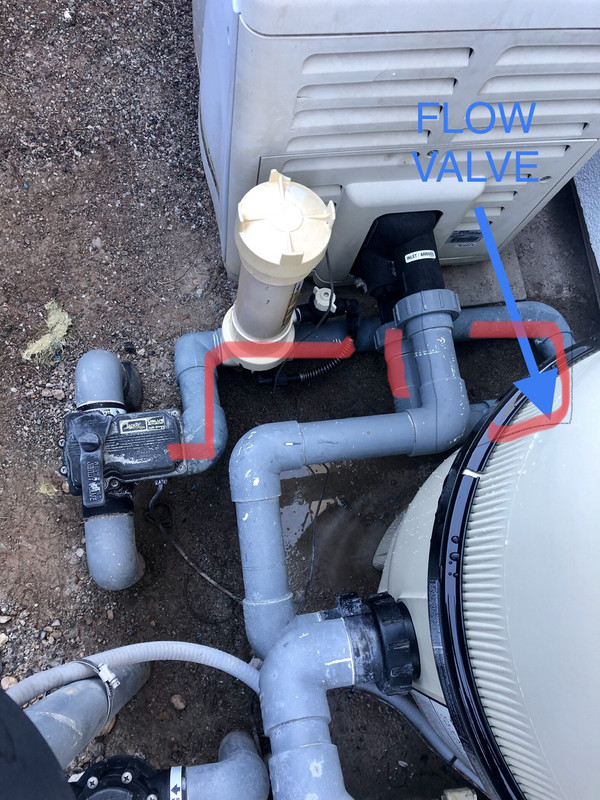
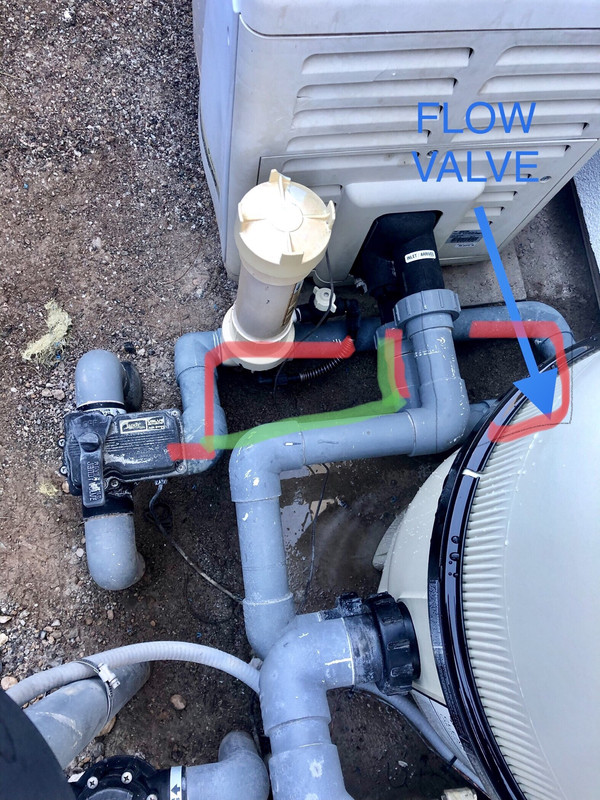
3. Is it possible that there is a blockage in my return lines big enough to cause the filter to over pressure and blow? Is there an easy safe way to check for this?

As always, any help is truly appreciated.

Thank you.
583296-B5-78-CC-47-F5-A508-82-EEAAC61-AAD.jpg

E829-C8-AD-AF83-4-F44-A701-1-AB852-B43-DC6.jpg

4-DBEFACC-22-FA-4786-BA6-A-01-B1-F6-EF60-CF.jpg


OLD FILTER THAT EXPLODED
5-D750077-FDE6-4-B71-965-A-A4629-FE7-C753.jpg

E528-CD27-12-A7-4077-AEE0-D505-C12-E79-AB.jpg
 
I suspect that you probably have some sort of blockage in the lines. Maybe at the heater or chlorinator.

A 3 hp WhisperFlo is a very strong pump. It's really too big.

I would suggest that you get a variable speed pump or a much smaller pump.

I would get rid of the chlorinator.
 
James, thanks for the input. The chlorinator has not been used in years, I just haven't removed it. I got on the TFP bandwagon long ago in terms of chemicals. Liquid Hypo for me. The 3hp has been in service for me with no issues for 8 years. My setup is a little different in that there is a long run from the equipment to the pool. The pool is in the middle of the house (courtyard) and the equipment is out back. I think thats why such a large pump was specified when we built. But, I am open to solutions.
The heater is an interesting idea. How would I check to see if there is a blockage in the heater?
Also, that chlorinator wouldnt have anything to do with blockage could it? I have it turned off and have not put pucks in there in years.

Thanks again.
 
The chlorinator has a venturi elbow inside the plumbing that might have something stuck on it.

I suspect that maybe something broke loose in the heater and is clogging the heater or chlorinator.

You're probably going to have to start taking things apart to figure out what's going on.

Once you get the clog figured out, I would change out the pump for a variable speed pump or a much smaller pump.

The pump generates way too much pressure and uses way too much power.

There's a check valve in the plumbing. Sometimes the flapper will break loose and block all flow.
 
It seems like a clog to me. I think that a part probably broke loose in the old filter, the heater or the check valve and is now blocking the flow of water.

You could turn on the pump and feel the return pressure, but you might cause more damage.

I would start taking things apart.

I would remove the white check valve and the chlorinator and then see if the problem is resolved.
 
Fad,

James has given you the advice you need.

What you might try doing is working backwards and bypass the Chlorinator first, then the heater.

If you know a good plumber, you want to see if they can help you w some re-plumbing using quick connects and/or flex pipe w of the same ID. You could bypass your filter altogether, but w the pressure relief valve open, this takes the stress off the system to a degree, but w a 3HP single speed pump, she cranks it up right out of the gate.

If this whole system has been working for yrs, then all of a sudden your filter explodes, that's when the return line/components clogged-up. It's much easier to bypass the chlorinator than the heater and obvious part complexity too. I'd open the throughput of the chlorinator to 100% first and see what happens- keep your PR-valve open and save the water to 5gal buckets. and toss back in pool. I'd start w the easy things first, then end it w the heater.

My Pressure Valve on my filter is never over 12 PSI even on max start-up, so you definitely should not be operating at 30PSI, even w significant head-loss.

good luck and keep us posted, tstex
 
The white check valve is what I think is the most likely problem.

With the excessive flow rate, the movable gate/flapper probably broke loose and is blocking the flow of water at the output of the check valve.
 
The white check valve is what I think is the most likely problem.

With the excessive flow rate, the movable gate/flapper probably broke loose and is blocking the flow of water at the output of the check valve.

Oop's yes. I didn't state the part(s) btw the filter/heater and chlorinator, which obviously is the ck valve...these are usually right btw the chlorinator and heater to prevent strong CL from backflowing into the heater...from the pic's I cannot see the ck-valve; is it at the back on the turn?
 

Enjoying this content?

Support TFP with a donation.

Give Support
The bottom union of the heater is the outlet. Coming out of the heater outlet, the line 90s back towards the wall and then does a 180 to head out towards the pool.

Standing where the heater is, facing the filter, the outlet turns left 90 degrees, then another 90 left and down then another 90 left to go towards the pool.

The check valve is just past the first 90 out of the heater.
 
I took off the top <filter outlet> to <heater inlet> pipe. Looked clear.
The pipe from the outlet of the heater to the valve is on the bottom. This is the line that has the chlorinator and the flow valve. If I am understanding you right, this flow valve is only needed if I use the chlorinator to protect the heater. So, I like the idea of removing both. The problem is that this line of pipe is all glued slip fit connections, except at the heater. It is also painted.
The way its connected there is not much pipe to work with. It would seem the most efficient to go from the heater outlet 90 to the right and straight into the valve.
Am I not seeing this right? I do have to cut and clean and re glue all the bypass components required to remove the chlorinator and flow valve?
How do I get the pipe inside the valve out (right now there is no clean straight pipe coming out of the valve body, its right up to a fitting)? Is there any way to repipe from the valve to the heater without all new valve body?

thanks
Pipe that needs to be replaced to remove chlorinator and flow valve. Under valve (left in picture) the 90 elbow sits almost flush with the valve body. It seems the absolute minimum straight pipe was used to get the elbow on. Can that be removed and new pipe put in the valve body or do I need to replace the entire valve body?
6-EE5-E37-C-07-E2-4463-82-D6-7-EFC5-EA59657.jpg


Proposed new route in green if I can get a new pipe into that valve body.
2684303-C-629-E-4-B6-E-956-D-A8-C9-F0-D9-DE4-A.jpg
 
The paint is not a problem, just sand it off or scratch it off with a knife and then use primer for a good cleaning.

You can come out of the heater and go to the pvc directly after the chlorinator or you can cut flush with the valve and install a coupling on the outside of the valve.

The valve takes 2" pvc pipe inside or a 2.5" coupling on the outside. If you use a 2.5" coupling, then you use a 2" bushing to reduce to 2" pvc.
 
Ok, I watched a few of the heat method videos. Either it comes out pretty as can be or they make a big mess of it. Im leaning toward the outer coupling method. I just cut at the edge of valve body, then use the bushing/coupler glued to OD of the valve body and then the 2" pipe on the other side? Sounds simplest.
Is this the kind of bushing part I would need?
Lasco Reducer Bushing Slip x Slip, PVC, 2-1/2 x 2 in., S by S (437-292) - Fittings - Plumbing - Construction - In-Ground Pools/Spas - Pool Plaza
or this
Amazon.com : Genova Products 30292 PVC Reducing Bushing, 2-1/2 by 2 Outdoor

Can I get schedule 40 parts like these at local box store or plumbing outlet? Is there something special about pool PVC Schedule 40?

Thanks
 
You would need a 2.5" slip by slip coupling and either of the reducer bushings that you show.

Glue the coupling over the valve body and then glue the reducer bushing into the other end of the coupling. Then, glue 2" pvc pipe into the bushing.

Local hardware stores generally don't have schedule 40 pvc larger than 2".

A specialty plumbing supply will have them or online.

There is enough pvc to try it without going directly on the valve if you want to do it that way.

It's a little bit tricky, but it's doable either way.

Note: I'm pretty sure that the valve is 2.5" x 2" but it might be 2" x 1.5". If it's 2 x 1.5, you would use a 2" coupling and then a 2 x 1.5" bushing. Verify the valve size before buying the parts.
 
Thanks James. Im going to take a look at it now and see what sizes. Without going over the valve I would have to cut after the elbow. So, basically just follow the same loop it is in now and replace straight pieces where I take out the chlorinator and flow valve right?
 
Thanks James. Im going to take a look at it now and see what sizes. Without going over the valve I would have to cut after the elbow. So, basically just follow the same loop it is in now and replace straight pieces where I take out the chlorinator and flow valve right?

Yes, that should work. You could probably go more directly by going 90 towards the front then 45 then another 45 then a 90 onto the pipe just past the 90 near the valve.
 
Cool. So I made a drawing. The parts are all from Lowes Schedule 40 bin. I also confirmed the existing pipes are 2". These parts will work then right? I mean schedule 40 is schedule 40 right?
Pipe
Shop Charlotte Pipe 2-in x 10-ft 280 Sch 40 Solidcore PVC DWV Pipe at Lowes.com
Coupling 2" slip slip sch 40
Shop LASCO 2-in x PVC Sch 40 Coupling at Lowes.com
90 Elbow 2" slip slip sch 40
Shop LASCO 2-in x 90-Degree PVC Sch 40 Slip Elbow at Lowes.com

Whats the best way to clean the paint off? Sandpaper? Acetone? Steel wool?

Red are cut lines. Parts are the above sch 40 pvc from Lowes.
pentair-clean-and-clear-420-filter-to-pentair-heater-plumbing.jpg


existing elbow
F6850-BB2-389-A-401-B-91-A0-245-E7-ED79576.jpg
 

Enjoying this content?

Support TFP with a donation.

Give Support
Thread Status
Hello , This thread has been inactive for over 60 days. New postings here are unlikely to be seen or responded to by other members. For better visibility, consider Starting A New Thread.