Signed the contract this morning, New build Orange County, CA

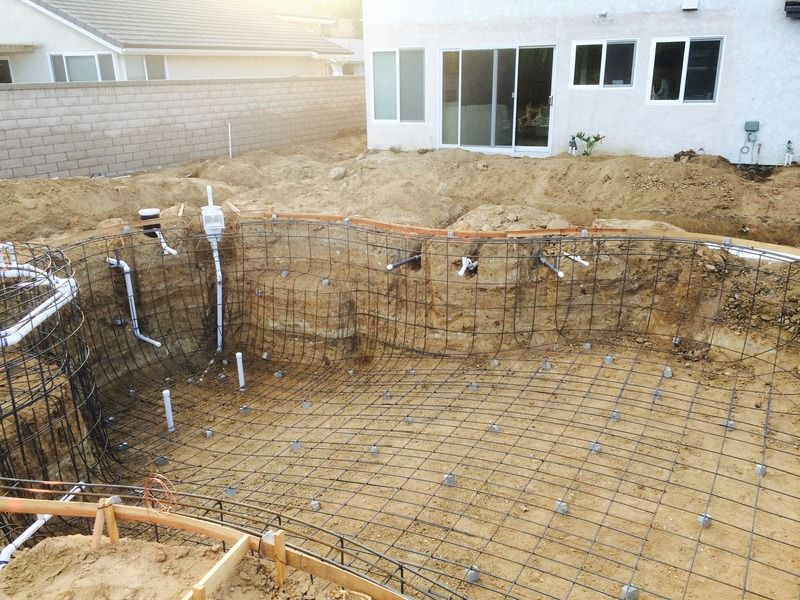
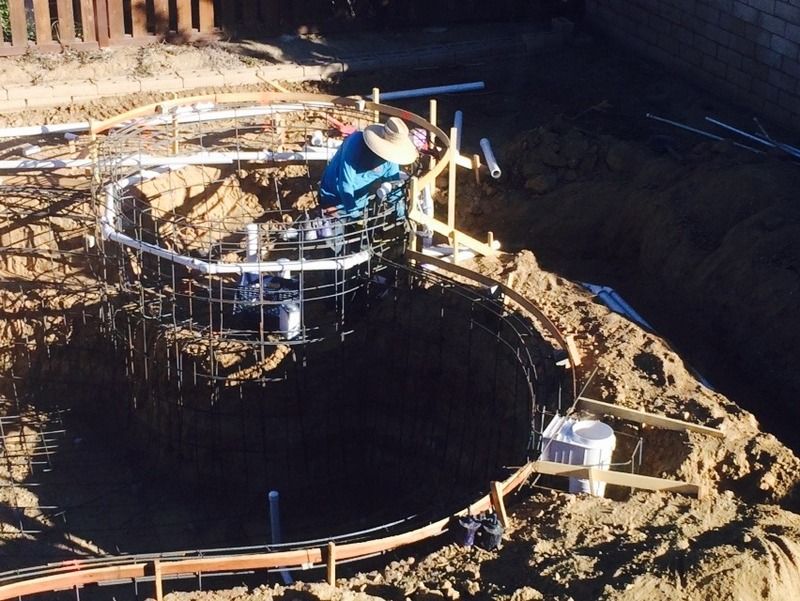
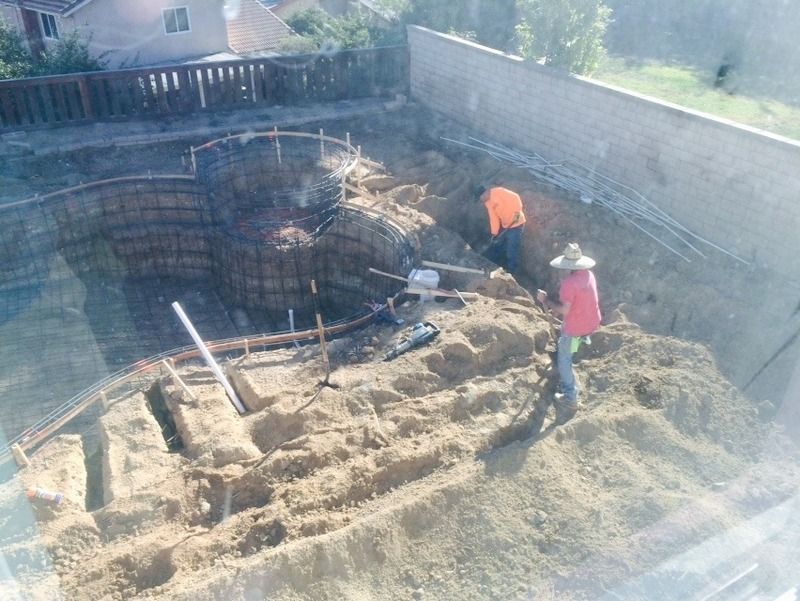
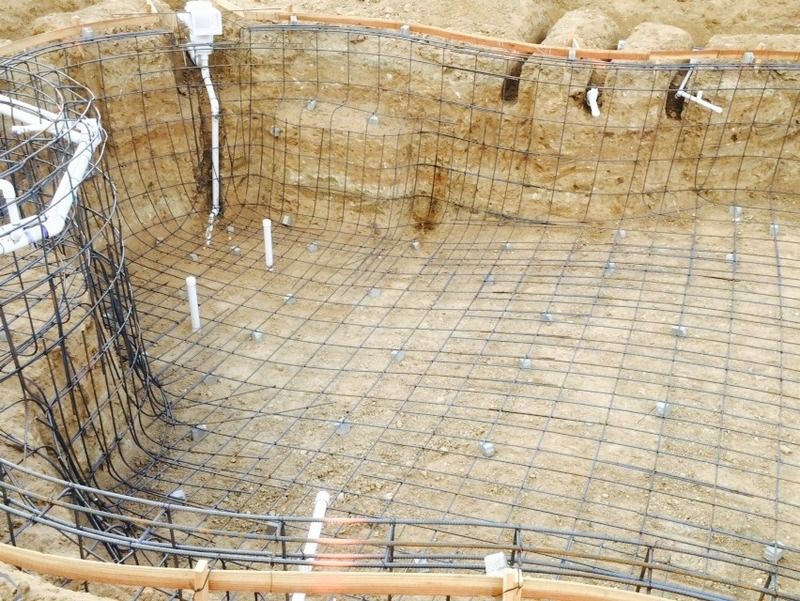
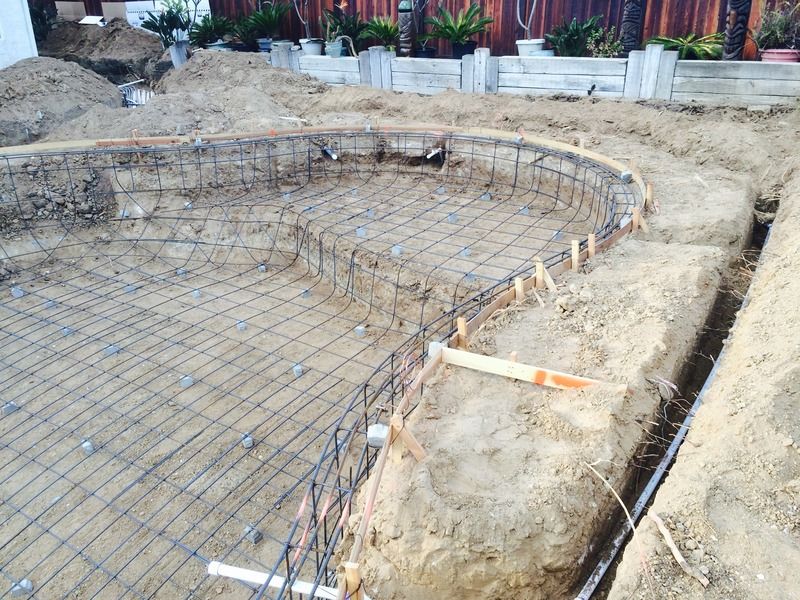
^ those concrete squares that hold the steel framing off of the dirt are called "dobies". Tell your steel guy you think you need more dobies, so he thinks you are in the know :D (I don't think you do, I'm just sayin')...

Hey, I might just keep that one in my back pocket for if I need some extra respect from my concrete guys! (But I looked it up, just in case, because I didn't want to look stupid in case you were playing a trick on us! ;-) )
 
On day two of plumbing trenching etc., there is a benefit to being here as much as possible, as the PB foreman only shows up after each stage. Yesterday the equipment was delivered, I of course checked it and found the supplier delivered the wrong filter, automation control panel, SWCG, and pluming kit. Of course the subs don't know what was ordered, had I not been here the wrong equip. would have been installed. They also placed the pad in the wrong location and had the main drain PVC touching the bottom side of the rebar, they did not trench deep enough. I spoke with the PB foreman who told me that I don't need to supervise as he checks everything at the end of each phase. Okay I get that but why not be here and ensure it correct the first time??? Perhaps I am nuts, I always go with an ounce of prevention is worth a pound of cure. things are going pretty quickly but my suggestion to others is make sure you are on-site for critical items (ie. layout, placement of EQ, drains, ETC, of and the EQ pad was out of level by 1/2" in two feet, that's a lot you could see it without a level, I had them re-level the pad.

I removed my old garden wall over the weekend before the plumbing crew started. Everyone said there would be plenty of room and we could remove them later once the new walls are installed. Again, me thinking that the plumbers would not have adquate space to place the EQ, trench, and run plumbing lines I decided to remove a 26ft section of the railroad ties on the side of the house, Well, had I not removed the old railroad ties on my own the plumbers would not have been able to work. Again, problem averted but a suggestion to others, think ahead of everyone else as there are so many things going on small details get overlooked and then you can have delays and problems. In the photo with the equip. there used to be 1ft wide railroad ties stacked 18" tall, all of the dirt near the redwood fence will be removed and the new stone wall will kick in towards the fence to open up this area. See the last photo, where the ceramic FROGS are sitting, the new wall will kick back to within 12" of the redwood fence and extend all the way back to the front redwood gate, it will be 18" tall and widen that entire area up from 4FT wide to 8 1/2 ft wide.

D3422D2B-A432-47B3-A912-188300A412DD_zpsbmi23p2a.jpg

4C0F5283-B6B9-45AB-A8D2-A4A5B590560C_zpsoxo2n8gq.jpg

5B1E4385-6DE2-4280-AECE-04729E115F20_zpsnmeylthq.jpg

10B5B7D2-B7A1-42EF-BCBA-68A29F644246_zpsykxncxxb.jpg

55340C20-06E6-414D-994B-DDDA02A857C4_zpsf7d4vhgg.jpg

BB584146-3B14-4DCB-98E5-A0F7193AEDD7_zpsvs52wfrt.jpg
 
I spoke with the PB foreman who told me that I don't need to supervise as he checks everything at the end of each phase.

Sort of audacious for the foremen to express it like that after what sounds like a complete and total snafu that would have cost the PB a lot of time and $$ having to redo major components of your build.

It's natural for some to feel disinclined to be looking over the shoulder of a contractor during the build out. But it pays to resist this. In my case, I felt that way during my recent pool remodel. Decided not to stick around to verify the right tile and grout color. Came home to find the PB tile sub went with the wrong grout color. Some step trim was also not installed where it should have been. Two tile guys then spent a day and half hand removing all of the semi-cured grout from what was quite a lot of water line and step tile.

You better believe I was there for the new grout install; as well as the application of the pebble finish, acid wash and pool fill. I even believe my recommendation during the application that hand casting of the abalone was starting a little too early in the final or finish troweling stages helped to keep a lot of it from being buried and hidden following the acid wash. This from my having observed the PB's other similar pool finishes and wondering why those pools had the abalone showing up in a very uneven manner (i.e. "glitter" only showing up in separated patches/spots -large areas with no abalone "glitter"). I actually pleaded for the PB to be there during this critical stage - which he was nice enough to obliged me - and without an attitude which was nice. All in all, pool turned out great.

In sum, spot on admonition about doing some looking over the shoulder of the PB or his foreman. Also, many helpful prior posts about this from PBs gracious enough to share their technical knowledge about the pool build process and what to look out for; particularly that last and most visually significant plaster application step. So kudos out to those guys.
 
[QUOTE =Also, many helpful prior posts about this from PBs gracious enough to share their technical knowledge about the pool build process and what to look out for; particularly that last and most visually significant plaster application step. [/QUOTE]

Can you point me to those posts, I want to get up to speed on this.
 
I have worked for a very large developer/builder. Its your job as the owner to go look at the project every day. You should talk to the crew when the arrive in the morning and drop by at least once while they are working. Be polite, don't order people around but get in your understanding of what the plans mean. You should also inspect at the end of every phase. Don't rely on city inspectors or PB or his supervisor. Owners must be involved. If they don't do it right tell them -- be polite but tell them.
 
Things looked better, they re-did the skimmer/main drain plumbing. The only other question I had was with one on the returns, looks like the put it in the wrong spot off by a couple feet, rather than trench in the correct spot they added elbows and extensions to get it in the right position. Is this a real world issue, potential issue, or am I being OCD about a non-issue I will never see after shotcrete?

Fixed

1CBCF601-8C97-4AAF-877D-40DBCDD8BD6D_zps4urwynbz.jpg


**** EDIT **** Okay, it's fixed, spoke with the lead plumber this morning, he thought one of the lights was going in that spot so they moved the return to the left. I showed him the drawings and explained where the lights are and so they replaced the return line so it shoots straight off the main line rather than having all the sweeps.

Again these guys are doing a great job but there is just so many opportunites for something to get put in the wrong place with (5-6) trades and no foreman on site, it's really a comminucation issue. Note to all, your PB will not have an on-site foreman, if you want to have any input "WHEN" the judgement calls come you better have somebody at the house. So far in the past 2 weeks I have avoided at least 10 small issues. Not bad construction, but choice of where things are located, ie sprinker valves, lights, power and gas stub outs, etc, etc. It's a lot easier to handle now than change it later.
 

Enjoying this content?

Support TFP with a donation.

Give Support
I know it does not matter to some, but I love the way the Jandy equipment looks!

Agree, I really liked the look, also the handles on the filter, the fact it made of resin vs fiberglass, and the efficiency of the equipment. that was the tipping point, but I believe the CV series filter and versa plumb kit straight-thru design increases efficiency by quite a bit also looks really clean. They also painted all the exposed PVC Jandy grey, looks very sharp. I will post a photo of the eqipment set. Jandy, pentair, etc are all good.
 
I am also impressed with the equipment...That filter design looks great.

Perhaps I should become more familiar with Jandy

It looks like they plumbed your pool cleaner line so that it could also be used for a pressure cleaner?
 
Agree, I really liked the look, also the handles on the filter, the fact it made of resin vs fiberglass, and the efficiency of the equipment. that was the tipping point, but I believe the CV series filter and versa plumb kit straight-thru design increases efficiency by quite a bit also looks really clean. They also painted all the exposed PVC Jandy grey, looks very sharp. I will post a photo of the eqipment set. Jandy, pentair, etc are all good.

Thanks in advance for any other pictures of the equipment. What is the total width of both equipment pads? I'm playing with the layout for my yard right now and since you have the versa plumb kit, it would be handy to know how much real estate I need to carve out.

Given how much supervision you have to give to the whole process, I'm convinced I'm going the owner-builder route now.

.
 
The pad is 8x2 feet. Here are some photos, not sure about all the details, the actuators for the valves still need to be installed when the electrical crew gets here. They did put a back wash valve that is plumbed to the clean out. They plumbed the main drain to the skimmer, while not optimal, I have a sump pump and will use that drain when the time comes, the clean out is about 30 feet from the pool. Not sure if I can drain below the skimmer using the backwash?
C28D4662-12BA-4B56-B880-CC0C48E2ABBD_zpssd6zeah2.jpg


- - - Updated - - -

Brian, what do you think? Not sure what that capped 3" pipe on the far left is??
 
Plumbing looks great, you should be pleased.

The cap is to access your cleanout and they created an air gap for the back wash line so that there is no chance of sewer gasses backing up into your pool system if the trap was to dry out.

Overall, a very quality job with the exception of the main drain tied to the skimmer :pth: 
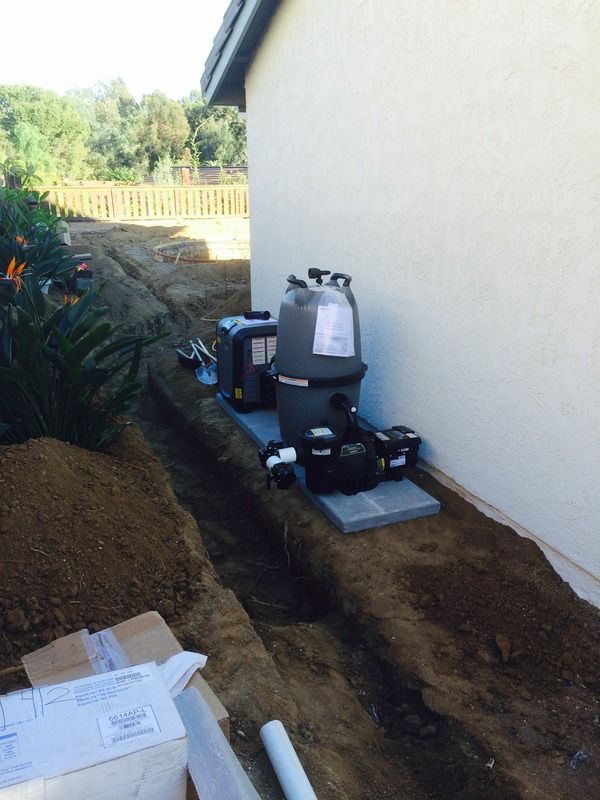
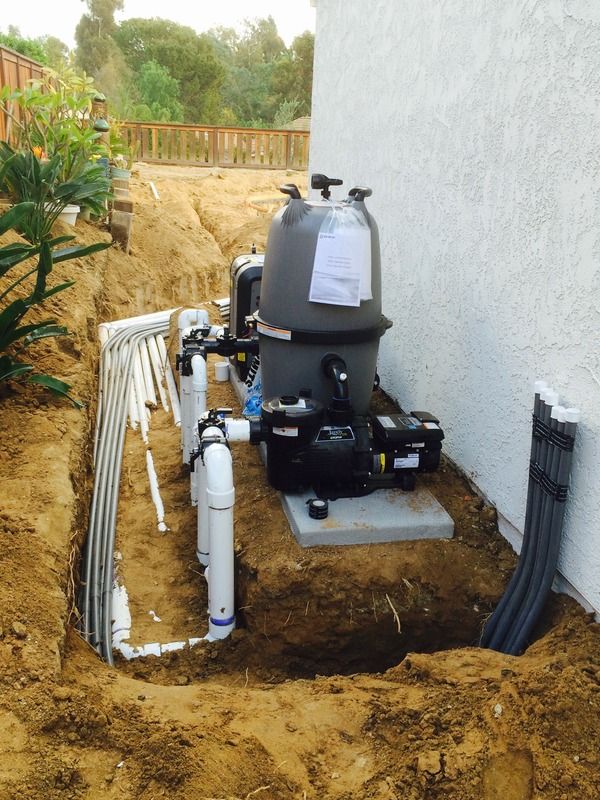
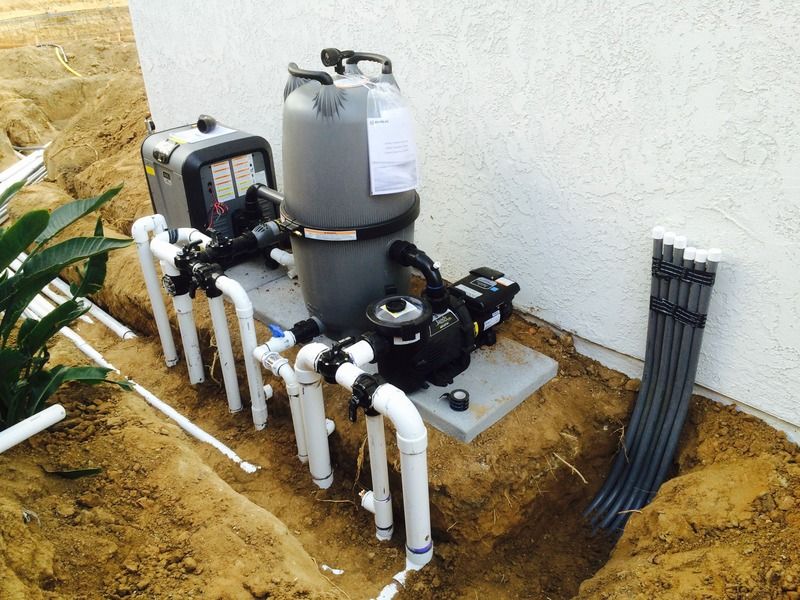
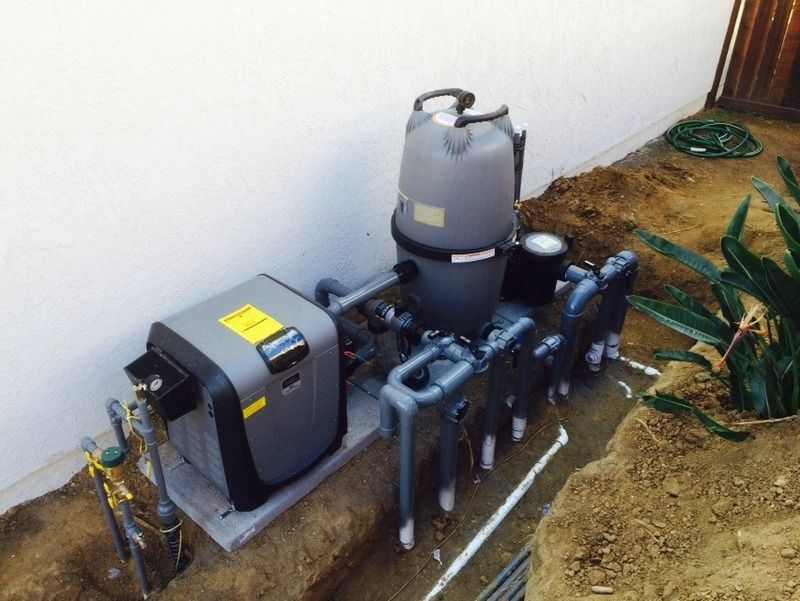
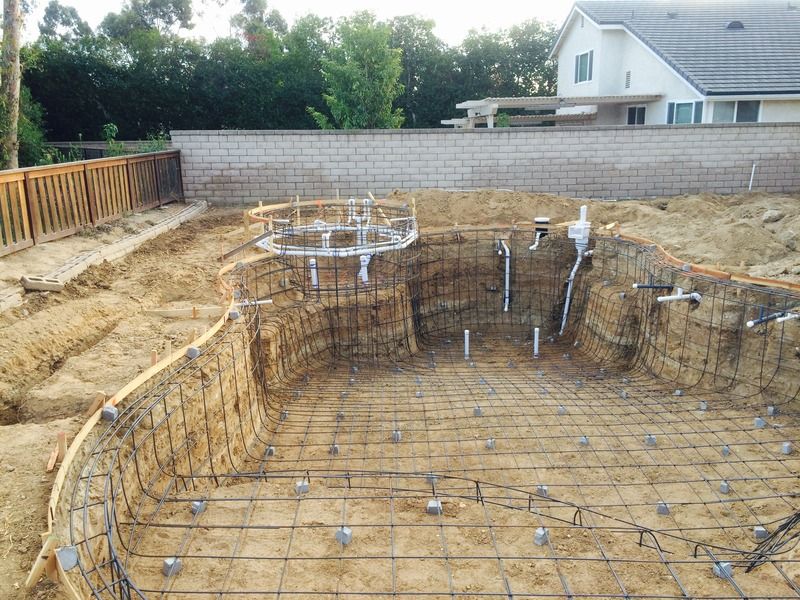
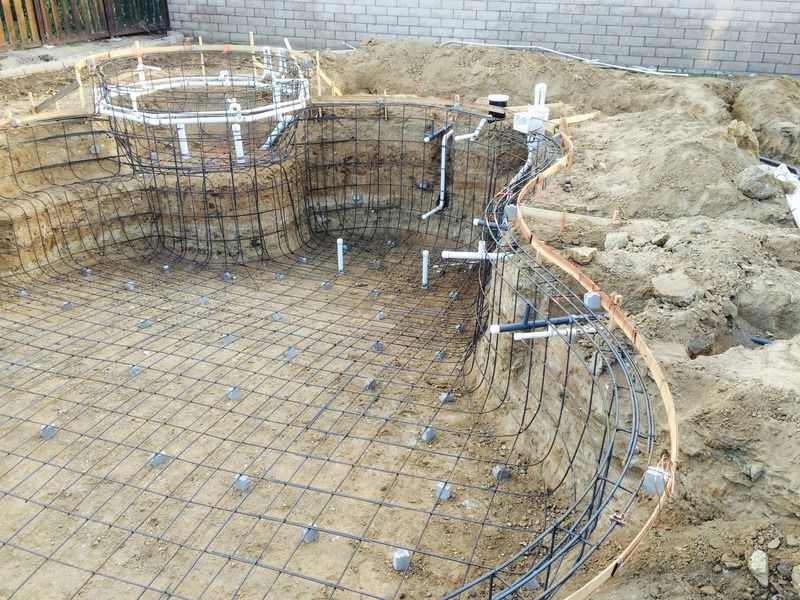
You will not be able to use the pool pump below the skimmer mouth without some plumbing ingenuity in the skimmer or cleaner line, both of which are possible but not necessary since you have a sump pump.
 
Thanks, they told me I could drain using the pool pump, not sure why they did not plumb main drain separate, I will ask the PB about that, but I would rather not have them tear anything apart now. Plus I believe the sump pump is a better option for draining. i think I can still use the circulation pump to drain below the skimmer as you said. They do this great job and then try to save $30 in PVC. I believe most PB feel you will just use a sump pump.?
The rest:

928CB6B5-C15D-47EE-BAB9-6278772D9903_zpsukohsbz6.jpg

A263C87B-5AB9-49BD-9FA2-3CE50B15D296_zpsyukyl3gz.jpg

53372C45-195D-4E9E-AEDE-4C4A88B41858_zps0lpsqcbu.jpg

E59F40B8-C8C7-4137-94B1-23B96D8ADD24_zpspriek5xc.jpg

B71D6979-A6D6-49BE-8796-6BC790881183_zps4ne82vfi.jpg

CDD4E7D5-A30F-44F6-8CF4-21AE894BD978_zpsnjf7fagl.jpg
 
Talk to them about encapsulating the autofiller into the gunite shel (similar to your skimmer and how the forms look around it). The way it is set up now could cause a crack in the plumbing if the deck moves from expansion/contraction.
 

Enjoying this content?

Support TFP with a donation.

Give Support
Thread Status
Hello , This thread has been inactive for over 60 days. New postings here are unlikely to be seen or responded to by other members. For better visibility, consider Starting A New Thread.