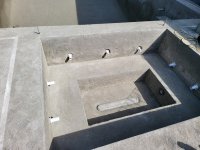
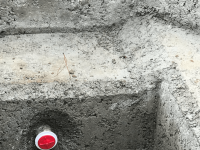
05 May Update - More progress, still a lot left to finish tile

Ok, I have to keep reviewing the plans as the pool is quite unusual and I get lost on the details.

I think that the weir wall is 32 feet.

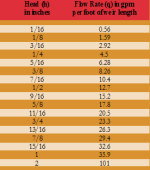
If you have a 32 foot long weir wall, then the amount of flow depends on the height you want to get over the weir.

If we assume 5 GPM per linear foot of weir, that comes to 160 GPM.

If we want 3/8" of lift, that comes to 264 GPM.

If you have (2) 3" lines for suction, then you can do up to 276 GPM.
1709819985951.png

Pipe Size and Flow Rates.​

You want to keep the water velocity below 6 ft/sec on the suction and below 8 ft/sec on the pressure side of the pump.[7]

Pipe Size6 ft/sec8 ft/sec
1.5"38 GPM51 GPM
2"63 GPM84 GPM
2.590 GPM119 GPM
3.0"138 GPM184 GPM
4.0"235 GPM312 GPM
 
Sorry, yes the system I'm doing is definitely unusual and it's difficult to explain. Way back when you provided me the infinity wall weir calculations I at least started to understand that part. The part I'm still trying to finalize is the "zero edge" around the rest of the pool... This edge will get as close as I can make it to the exact same elevation as the infinity wall so in theory some water will fall into the gutter when the gutter valves are open at the ends. I plan to make this a 2 1/4" grate over top of the 2" gutter. Just trying to verify how much capacity this will have. From NDS catalog that appears to be about 3 gpm/Ft of drain for their channel drain which is as close as I can get to estimating my concrete gutter with a 21/2" cover installed. I'll try to sketch this out later today to clarify.

Thanks in advance for your help on this.

Chris
 
  • Like
Reactions: JamesW
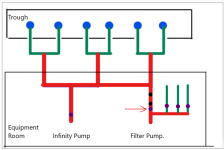
I would have done either 6 regular round main drains or 3 "Unblockable" Channel or Ring Drains with (3) 3" lines going to the filter room.

This would allow up to 414 GPM GPM.

In any case, it should work well enough.

The main issue on the suction is to keep the head loss below 17 feet.

If we assume 6 feet static, that gives you 11 feet dynamic.

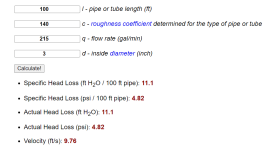
You could do up to 215 GPM per 3" PVC Pipe assuming a 100' long run.

The channel drains are ok at 215 GPM each.

1709824575956.png


1709824220013.png

1709824652272.png

1709824822111.png
 
  • Like
Reactions: setsailsoon
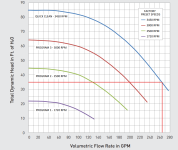
The key to the 5 HP IntelliFloXF Commercial Pump is to keep the total head loss below 35 feet, which gives you about 17 feet on the suction (6 static and 11 dynamic) and 18 feet on the return.

If there is a lot of head loss, then the 5 HP actually performs about as well as the 3 HP IntelliFlo.

1709826296109.png


Attachments

  • whisperfloxf-vs-pump-brochure.pdf
    594.4 KB · Views: 1
  • Like
Reactions: setsailsoon
I do not understand what this means.

Can you diagram the plumbing with pipe sizes and length?
James,
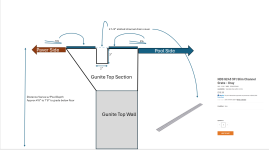
Here's a quick sketch of the wall section that I hope will help. This section forms the wall on all edges around the pool and the spa and sun deck on both ends:

1709827380552.png
 
In the last picture provided of the catch basin is the single pipe running through the wall your overflow?
Yes it will go straight down the hill to a drainage ditch behind the house about 4' below and 26' back. If we have a massive overflow water will burp over the wall. The basin is pretty large at 3'x'3'x32' which should handle any normal operation. I'm thinking this will come into play when a level switch sticks so I'll have a separate, independent hi/hi switch that will over-ride the others to shut down the pump. This will most likely be implemented locally at the switch with smart switches used all the time in chemical plants and still pretty cheap. So no additional programming required for the control system. This way it takes more than 2 simultaneous failures before we spill onto the ground.

Chris
 
The key to the 5 HP IntelliFloXF Commercial Pump is to keep the total head loss below 35 feet, which gives you about 17 feet on the suction (6 static and 11 dynamic) and 18 feet on the return.

If there is a lot of head loss, then the 5 HP actually performs about as well as the 3 HP IntelliFlo.

View attachment 557055


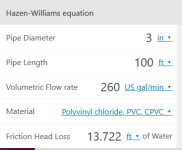
Now I see why you said we may need 4" up to the pump at 260 gpm for 100' I'm getting 13.7' of loss using the Omni calculator
1709829017192.png

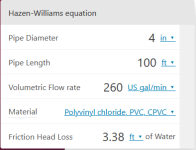
4" is much more reasonable:
1709829161735.png

Add fittings plus static head this is a slam dunk. I will reduce down at the pump.

Thanks again @JamesW .

Chris

*** EDIT*** Ok now I see what you meant. Two 3" lines 100' to the pad not just one... duh! Or I could combine to a single 4" at the pool. Any advantages you see to either approach?

Chris
 
Last edited:
08 March Update - Uh Oh almost disaster but backup plans saved the day!

Folks,

Since we started the excavation work this job has gone amazingly well. Only glitch was after we got below the water table in the deep end our electric trash pump popped breaker and failed. We had a backup electric and gas and just switched to the gas to suck the rock sub floor down then put the backup electric in service. This pump worked flawlessly running continuously next several days so I quit checking on it every couple hours. Gunite operations are very loud so you really have to check the hose end to see the trickle of about 1 gpm that seeps in. After we shut down yesterday I got in to do my inspection and noticed the deep end was still wet and water was rising in the weep hole. It was getting dark and looking around couldn't find the spare pump. Turns out the steel sub accidentally loaded it on his trailer and was now an hour away. My backup, backup plan was my "TFP sump pump" that I bought years ago to do water exchanges etc on the previous pool. Other than massive mosquito attacks while setting up the old pump I call my TFP pump we sucked it down in no time and pumped all night long. This morning all looked good. They are barely up to the rebar mat in quite a few areas so when the walls are finished they will add about 3" to most of the bottom and set the final level at that point.

They should finish this morning with all gunite work and in next few days we'll let the pool equalize that will result in a couple inches in the deep end. Then I'll hook up a temporary sprinkler zone to keep it wet for 7 more days. There is clear evidence this creates up to 50% stronger concrete than concrete that drys out and starves the hydration reactions in the curing concrete. It's so easy to do this and so far I haven't seen a single builder of pools or houses that make sure this is done. Some tell the owner to do it but that's as far as they go.

Next few days we'll remove all the forming materials, line up the fill and compaction work and start the trenching operations to get all the plumbing and electrical runs to the pad. I still have a decision to make on plaster sub but plenty of time since the concrete won't be ready for about a month. Also, it looks like I'll be starting the pool on well water so I need to get materials set up for that. I plan to do the bicarb start up that @onBalance invented here. Hopefully I'll be able to sign up a plaster sub that understands the science on this. Next week or so we should have all equipment delivered and I'll have the mock up for my control system up and running on the bench.

Chris
 
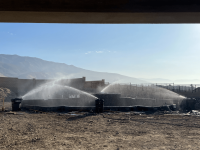
Your goal for hydration of the shell is Saturated Surface Dry, the surface feels damp, but water is not picked up on your hand. During summer months this is harder to achieve and temperatures can reach high enough to deform plumbing pipes. Keeping the shell over hydrated is far better than under hydrated. Picture provided is hydrating a shell withIMG_5326.png daytime temperatures over 100 degrees.
 

Enjoying this content?

Support TFP with a donation.

Give Support
Your goal for hydration of the shell is Saturated Surface Dry, the surface feels damp, but water is not picked up on your hand. During summer months this is harder to achieve and temperatures can reach high enough to deform plumbing pipes. Keeping the shell over hydrated is far better than under hydrated. Picture provided is hydrating a shell withView attachment 557211 daytime temperatures over 100 degrees.
Great information and photo! Thanks much. I'm planning to run a line later today on east or west side of the pool. 3 over-lapping heads should do it. And I can watch with security cameras. Weather this time of year hear varies a lot and we almost always get a cold snap sometime in March. But we're still in S Florida so lows are never below 50. I think the worst we'll have to deal with is mid 80's and windy. Not usually much rain. Planning to soak in mornings and afternoon. Seem reasonable to you? I can get my neighbor to do the "damp to touch" test.

Chris
 
Update 08 March 2024

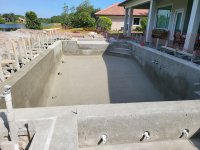
Pump issue last night worked out well with my "TFP pump" so work resumed this morning and we're all good. Another big accomplishment with important milestone accomplished. Initial spot check on edge level is +/- 1/8" - not bad!

Crew very proud of their work
1709913555581.jpeg
1709913586838.jpeg
1709913676903.jpeg
 
Those tight 90 degree angles in the spa where the seats meet the wall to the floor I like to see cut at a 45 degree angle so when the plaster is installed over that area it will accept more product and be stronger, as you can see in the photo of the finishing tools typically used for radius's.
You could also ask for a thicker surface in that area if the tight angle is left.IMG_5335.pngIMG_5336.png
 
That is one of the cleanest shells I have seen so far! As you know I have seen almost all of the shells shot here on TFP for quite some time so that is saying something! NICE JOB GUYS!
Wow! With your background that means a lot! Great to hear. This is my first gunite job and it's a LOT different from concrete. One thing I had heard about on here was to control rebound so we made it clear we wanted it out and not "accidentally incorporated" so there's quite a bit of it piled up outside the pool. I think it will make good base material for the pavers. But all the credit for this quality needs to go to the sub contractor Prestige Gunite. I'd strongly recommend them to anybody in Florida that is within their service area.

Chris
 
Those tight 90 degree angles in the spa where the seats meet the wall to the floor I like to see cut at a 45 degree angle so when the plaster is installed over that area it will accept more product and be stronger, as you can see in the photo of the finishing tools typically used for radius's.
You could also ask for a thicker surface in that area if the tight angle is left.View attachment 557365View attachment 557366
More great suggestions, thanks!
 
09 March 24 Update - Finalizing infinity Edge Questions

Folks,
I'm at that point where I'm thinking about finalizing the edge elevations around the pool. I recall a post that @ajw22 highlighted previously and @bdavis466 indicated it was a good idea to fill before plaster and tile to check the levels since they need to be +/-1/16". Couple questions around this:

  • We'll be back filling and compacting next week. I know concrete normally takes 28 days to achieve full rated strength so I'm planning to wait that long. But most PB's around here wait way less than that. What say you experts?
  • For the infinity edge I've seen many that are level and quite a few that slope down toward the basin and these seem to have a lot of different angles. I think some slope would be good and pretty easy to do with a concrete blade right now. Any suggestions on this?
Chris
 
I normally wouldn’t worry about the backfill, but given the amount of over excavation that you have to do in your area, waiting a week is probably a good idea.

You can slope it either way, but I would avoid level. Lately it’s more common to have the slope of the edge go down into the pool, since it provides a uniform look on perimeter edges. This way is also quieter under normal operation match the slope of the rest of your pool.
 
  • Like
Reactions: setsailsoon

Enjoying this content?

Support TFP with a donation.

Give Support