Since you are adding some bicarb while filling , if the pH is 8.2 or higher, add a little acid just prior to the addition of bicarb.
Newb OB with BYOP in Buckeye AZ - pebble and tile touch up suggestions
- Thread starter Schwimmbad
- Start date
You are using an out of date browser. It may not display this or other websites correctly.
You should upgrade or use an alternative browser.
You should upgrade or use an alternative browser.
- Jul 21, 2013
- 52,854
- Pool Size
- 35000
- Surface
- Plaster
- Chlorine
- Salt Water Generator
- SWG Type
- Pentair Intellichlor IC-60
I would start with Prep Step 3 and get the hoses filling into the pool.
Once the hoses are running you have plenty of time to unplug the skimmer.
I would not fool with your auto leveler until there is water in the pool. I don’t know how it is setup but I don’t want any water dribbling on your new plaster and staining it. I would leave it for later.
Once the hoses are running you have plenty of time to unplug the skimmer.
I would not fool with your auto leveler until there is water in the pool. I don’t know how it is setup but I don’t want any water dribbling on your new plaster and staining it. I would leave it for later.
- Sep 4, 2022
- 324
- Pool Size
- 15400
- Surface
- Plaster
- Chlorine
- Salt Water Generator
- SWG Type
- Pentair Intellichlor IC-40
Just learning the chem mgmt here so apologize if this is a silly question, but how much is a “little acid”? I’m guessing your point is see what the pH is and add enough based on pool math and approx gallons to get pH just below 8. Since I’ve got flow rates from both fill hoses running simultaneously (16 GPM) I can estimate gallons based on how long the fill has been going for pool math to give me a decent idea of how much.Since you are adding some bicarb while filling , if the pH is 8.2 or higher, add a little acid just prior to the addition of bicarb.
Good point with unplugging the skimmer. I keep thinking I want stuff done and ready before filling but it’s more like, put hoses in, wait, wait, wait, wait, repeat.I would start with Prep Step 3 and get the hoses filling into the pool.
Once the hoses are running you have plenty of time to unplug the skimmer.
I would not fool with your auto leveler until there is water in the pool. I don’t know how it is setup but I don’t want any water dribbling on your new plaster and staining it. I would leave it for later.
My “prep to fill pool section” wasn’t labeled well. It was actually prep prior to plaster day. I didn’t think about dripping from the auto leveler, another great point! Auto leveler line comes off backflow preventer off line to spigot. It has a valve before and after the backflow. I already flushed the line and shut the valve Friday and they plastered Saturday. The short stub running from the canister to the pool shot out some nasty stuff that got cleaned up when they pressure washed. I turned off both valves to the leveler and it has been dry since, dumb luck I didn’t have any water dripping onto the plaster.
Last edited:
- Sep 4, 2022
- 324
- Pool Size
- 15400
- Surface
- Plaster
- Chlorine
- Salt Water Generator
- SWG Type
- Pentair Intellichlor IC-40
Once I lifted the lid on the leveler and saw the junk in it I immediately grabbed the shop vac. Once I turned on the water line to leveler and saw the junk coming out I’m glad I was 25 feet+ away.Plan on the auto leveler being disgusting. Clean the bucket really well before hand and it might not be a bad idea to turn it on slowly and use a wet dry vac to clean out the nasty before it makes its way into the pool.
Your plan looks good
Be prepared to go through a lot of acid and be mindful that aeration from the water features with a high TA will quickly raise the pH.
After the three weeks of the elevated TA, just target a lower pH (7.5-7.8) and the alkalinity will slowly drop on its own. There’s no reason to do it aggressively.
Congrats!
This makes me wonder about all the plumbing lines that had water in them for about 6 months and what other nasties are in there. Is there any good ideas on dealing with whatever comes out? I’m just thinking have the pole and net ready to grab the chunkies and let the filter do the rest.
Thanks for the thought to let TA drop on its own as I work to get pH down.
Your planning is very solid with the tweaks from the others. You don't need me for all of this. I am just waiting to see pics of what you have created!
Schwimmbad, to answer your question to me, yes, estimate the amount of water entering the pool and use pool math to guide you on the adding of acid.
Not really, but you get to watch the clouds of muck blow into the pool. The suction and return lines usually aren’t too bad since they were already cut and drained for plastering.Is there any good ideas on dealing with whatever comes out? I’m just thinking have the pole and net ready to grab the chunkies and let the filter do the rest.
pcollins22
Well-known member
- Sep 4, 2022
- 324
- Pool Size
- 15400
- Surface
- Plaster
- Chlorine
- Salt Water Generator
- SWG Type
- Pentair Intellichlor IC-40
Polish and acid wash done! Funny that the guy couldn't start his weed wacker and he said "I started it first thing in the morning before I left", uhhuh  .
.
He went at it for about 5 minutes and I said I smell gas, you've got it flooded. He agreed and decided to wait. I got to see a little of the polishing before having to head down the block for a neighborhood cornhole tournament (we somehow came in second). Anyway, I was keeping a little bit of an eye on things from the camera and came back right when they finished and able to get the hoses in, taped on the deck so they don't get kicked into the pool during one our thousand times going out to look at it.
I started the fill at 1:04PM today and has about 7,000 gallons as of 7:29PM.
My first set of test results right at 5000 gallons (plan to test again around 10,000 gallons)
Additions
Pressure washing
Applying second coat of plaster on the wall after scratch coat
Working plaster tight to the tile line.
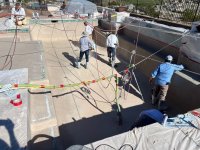
Down from 7 guys to 4 guys working the plaster, approaching the finish line
Polishing on the baja ledge
Had to chip out a little shotcrete to get the chiller return plug at a lower elevation
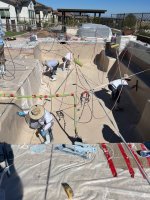
Ready to go, had 7 guys in the pool working the plaster, one was not in picture
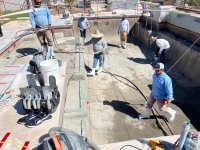
Putting on 1st/scratch coat
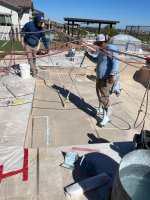
Sponging up water on the baja
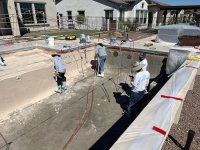
All plaster applied, working it. They used some plastic sheet to keep the water being brushed off the baja from running down that wall. Seemed like a nice practice.
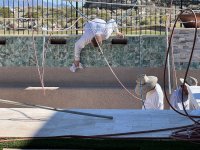
His second time around the tile line. This time with a towel to wipe of the plaster. Not sure what he used the first time but it seemed to be stiffer than a towel.
Shallow wall done, starting to pull up the plastic off the travertine.
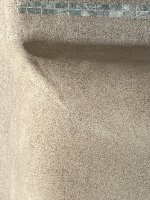
While I am generally pleased with their work, I did notice both shallow end corners at the bottom of the wall had a slight grove like the guy pressed a little too hard near the bottom. Picture is standing on the coping looking straight down that corner. Hopefully the plaster isn't too thin here. I brought it to his attention, and he agreed it had a slight grove. He felt it was ok (what else would he say). At the time I noticed it the plaster had already sat a while.
Day is done and cleaned up and outa there.
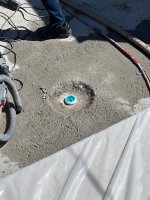
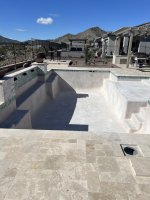
Darker colored plaster circle under skimmer where its return is had lots of hydraulic cement packed in as there was a larger cavity around that return, not sure why it has a larger cavity. Anyway, they said to expect the color difference and it will look like the rest of the plaster after some time, will it?
That is all for now. Interested in any and all comments.
He went at it for about 5 minutes and I said I smell gas, you've got it flooded. He agreed and decided to wait. I got to see a little of the polishing before having to head down the block for a neighborhood cornhole tournament (we somehow came in second). Anyway, I was keeping a little bit of an eye on things from the camera and came back right when they finished and able to get the hoses in, taped on the deck so they don't get kicked into the pool during one our thousand times going out to look at it.
I started the fill at 1:04PM today and has about 7,000 gallons as of 7:29PM.
My first set of test results right at 5000 gallons (plan to test again around 10,000 gallons)
- pH 8 (guessing it was 8, color was in-between 8.2 and 7.8.)
- CH 300 (is this a testing error? Was thinking it wouldn't change from prior two tests at 275.)
- TA 120
- Temp 69 (took sample from about a foot below water and used an accurate kitchen thermometer right after pulling water from pool)
- This gave me a CSI of 0.49. Felt kinda good with this.
Additions
- Since pH looked to be at 8 I didn't bother with muratic acid before the baking soda.
- I added 5lbs of baking soda. Put in 5 gallon bucket and used wife's hand power mixer to try to get it suspended. Immediately poured it in the deep end and brushed it around a little. Found out it doesn't stay suspended very long as I had quite a bit sitting at the bottom of the bucket. Added more water to the bucket, mixed it some more, walked out to the pool and could see it starting to drop to the bottom of the bucket. Started swirling it around in the bucket and poured it in and brushed some more. Please tell me there is a better way to add baking soda. Also, I brushed the bottom of the deep end where I poured the baking soda for about a minute. Is that necessary and if so should I be brushing it around a little more?
- Added 10 oz HTH Metal, Stain, and Scale Control by pouring it in the deep end in front of one of the hoses. Just let the water flow from the hose push it around.
Pressure washing
Applying second coat of plaster on the wall after scratch coat
Working plaster tight to the tile line.
Down from 7 guys to 4 guys working the plaster, approaching the finish line
Polishing on the baja ledge
Had to chip out a little shotcrete to get the chiller return plug at a lower elevation

Ready to go, had 7 guys in the pool working the plaster, one was not in picture

Putting on 1st/scratch coat

Sponging up water on the baja

All plaster applied, working it. They used some plastic sheet to keep the water being brushed off the baja from running down that wall. Seemed like a nice practice.

His second time around the tile line. This time with a towel to wipe of the plaster. Not sure what he used the first time but it seemed to be stiffer than a towel.

Shallow wall done, starting to pull up the plastic off the travertine.

While I am generally pleased with their work, I did notice both shallow end corners at the bottom of the wall had a slight grove like the guy pressed a little too hard near the bottom. Picture is standing on the coping looking straight down that corner. Hopefully the plaster isn't too thin here. I brought it to his attention, and he agreed it had a slight grove. He felt it was ok (what else would he say). At the time I noticed it the plaster had already sat a while.

Day is done and cleaned up and outa there.

Darker colored plaster circle under skimmer where its return is had lots of hydraulic cement packed in as there was a larger cavity around that return, not sure why it has a larger cavity. Anyway, they said to expect the color difference and it will look like the rest of the plaster after some time, will it?

That is all for now. Interested in any and all comments.
Last edited:
Turbo1Ton
Gold Supporter
- Dec 26, 2019
- 1,839
- Pool Size
- 14500
- Surface
- Plaster
- Chlorine
- Salt Water Generator
- SWG Type
- Pentair Intellichlor IC-40
This looks fantastic!Polish and acid wash done! Funny that the guy couldn't start his weed wacker and he said "I started it first thing in the morning before I left", unhuh.
He went at it for about 5 minutes and I said I smell gas, you've got it flooded. He agreed and decided to wait. I got to see a little of the polishing before having to head down the block for a neighborhood cornhole tournament (we somehow came in second). Anyway, I was keeping a little bit of an eye on things from the camera and came back right when they finished and able to get the hoses in, taped on the deck so they don't get kicked into the pool during one our thousand times going out to look at it.
I started the fill at 1:04PM today and has about 7,000 gallons as of 7:29PM.
My first set of test results right at 5000 gallons (plan to test again around 10,000 gallons)
- pH 8 (guessing it was 8, color was in-between 8.2 and 7.8.)
- CH 300 (is this a testing error? Was thinking it wouldn't change from prior two tests at 275.)
- TA 120
- Temp 69 (took sample from about a foot below water and used an accurate kitchen thermometer right after pulling water from pool)
- This gave me a CSI of 0.49. Felt kinda good with this.
Additions
Attaching some pictures and short videos from plaster yesterday, polishing, and filling.
- Since pH looked to be at 8 I didn't bother with muratic acid before the baking soda.
- I added 5lbs of baking soda. Put in 5 gallon bucket and used wife's hand power mixer to try to get it suspended. Immediately poured it in the deep end and brushed it around a little. Found out it doesn't stay suspended very long as I had quite a bit sitting at the bottom of the bucket. Added more water to the bucket, mixed it some more, walked out to the pool and could see it starting to drop to the bottom of the bucket. Started swirling it around in the bucket and poured it in and brushed some more. Please tell me there is a better way to add baking soda. Also, I brushed the bottom of the deep end where I poured the baking soda for about a minute. Is that necessary and if so should I be brushing it around a little more?
- Added 10 oz HTH Metal, Stain, and Scale Control by pouring it in the deep end in front of one of the hoses. Just let the water flow from the hose push it around.
Pressure washing
Applying second coat of plaster on the wall after scratch coat
Working plaster tight to the tile line.
Down from 7 guys to 4 guys working the plaster, approaching the finish line
Polishing on the baja ledge
Had to chip out a little shotcrete to get the chiller return plug at a lower elevation
View attachment 556464
Ready to go, had 7 guys in the pool working the plaster, one was not in picture
View attachment 556465
Putting on 1st/scratch coat
View attachment 556466
Sponging up water on the baja
View attachment 556467
All plaster applied, working it. They used some plastic sheet to keep the water being brushed off the baja from running down that wall. Seemed like a nice practice.
View attachment 556468
His second time around the tile line. This time with a towel to wipe of the plaster. Not sure what he used the first time but it seemed to be stiffer than a towel.
View attachment 556469
Shallow wall done, starting to pull up the plastic off the travertine.
View attachment 556470
While I am generally pleased with their work, I did notice both shallow end corners at the bottom of the wall had a slight grove like the guy pressed a little too hard near the bottom. Picture is standing on the coping looking straight down that corner. Hopefully the plaster isn't too thin here. I brought it to his attention, and he agreed it had a slight grove. He felt it was ok (what else would he say). At the time I noticed it the plaster had already sat a while.
View attachment 556471
Day is done and cleaned up and outa there.
View attachment 556472
Darker colored plaster circle under skimmer where its return is had lots of hydraulic cement packed in as there was a larger cavity around that return, not sure why it has a larger cavity. Anyway, they said to expect the color difference and it will look like the rest of the plaster after some time, will it?
View attachment 556473
That is all for now. Interested in any and all comments.
I wouldn't sweat the darker colored circle. Likely be hard to tell once you have water in.
--Jeff
AQUA~HOLICS
In The Industry
Circle under the skimmer is most likely from the hydraulic patch having a moisture content higher than the Shotcrete shell around it so in turn the moisture level is higher in the plaster, very common and should blend in with time.
- Sep 4, 2022
- 324
- Pool Size
- 15400
- Surface
- Plaster
- Chlorine
- Salt Water Generator
- SWG Type
- Pentair Intellichlor IC-40
@Turbo1Ton thanks a lot, we really like the way it looks so far. Not honestly sweating much of anything, just relief the end is in plain sight. Only asking lots of questions.
Hey @AQUA~HOLICS thanks for the comments. That is pretty much what they said too. Glad to hear their statement corroborated.
Here are latest testing results at very near 10,000 gallons (along with loads of questions)
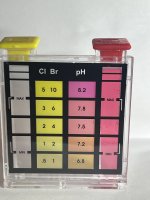
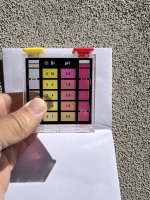
pH 8.3 really a guess, what do others see from the picture below? To me it the color is more red/darker than 8.2 which seems it is lighter, more like a shade of purple. I haven't gotten comfortable judging the color gradations yet. Picture is with a bright LED shining on the paper behind the test block (no sunlight at 11pm). By the way, very nitpicky question here, but is my pH test tube ok? If you take a look, it seems like the plastic on the left side actually angles in at the bottom.
TA 130 up a little if my testing is ok. Was 120. I think I read should stop adding when the color doesn't change and use your last drop count of the R-0009. Is that right? Also, test directions say to swirl between each drop. I'm assuming it's ok to let the smart stir happily spinning away while I add drops. I'm following the directions to wipe the tip with a damp cloth, I've been using a paper towel. Is that ok?
Temperature 66
Gives CSI of 0.79 I'm thinking I should knock pH down a tad.
Given all this it seems like some muriatic acid is in order.
With pool math I entered 14,000 gallons, target pH of 8, and 14.5% muriatic acid and it said to add 3 cups 1 oz. In it went (diluted in about 2 gallons of water in a 5 gallon bucket)
Edited: I was thinking of adding another 5lbs of backing soda but it got after midnight and I woke up at 3:30 am so I decided to hold off on any other chemical additions.

Last edited:
In between 8.2 and 7.8. Use a thumb from each had to block off above and below what you want to compare. Only look at one at a time and you'll see it's not quite purple enough for 8.2, yet darker than 7.8.pH 8.3 really a guess, what do others see from the picture below?
No biggie. This is the only test you can make up your own drop amount. The color range is the important thing, not the drops or ml. I often have to use 4 drops or even 3 to get back on the right color scale with high FC.If you take a look, it seems like the plastic on the left side actually angles in at the bottom.
For most tests it's one extra drop to prove no further change, then remove the extra drop. You'll have a better feer for it after a while and just know when it's good.I think I read should stop adding when the color doesn't change and use your last drop count of the R-0009.
Also, one drop won't change the price of beer on any test. We want to know the TA is a 130/120 and not a 50 or 200. Yes we strive for accuracy but a 125 might hit either way, or Taylor's one drop inaccuracy may get you? so don't drive yourself nuts over it.
Looks great!
The small calcium rise is not a surprise and shouldn’t be of concern.
Keep at it
The small calcium rise is not a surprise and shouldn’t be of concern.
Keep at it
- Sep 4, 2022
- 324
- Pool Size
- 15400
- Surface
- Plaster
- Chlorine
- Salt Water Generator
- SWG Type
- Pentair Intellichlor IC-40
Fertig! Finito! Finished! Yeah baby yeah!

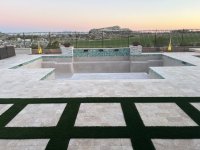
A few pictures around noon today.
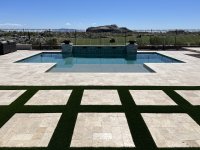
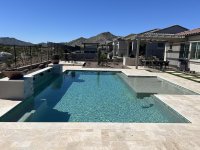
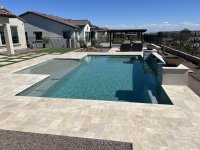
It was on pace to fill in 14 hours but I turned off the fastest hose to slow it down, I needed to get some sleep. I got up around 4:30am and turned on the fast hose and it wrapped up at 5:45am. I took meter readings at 14 points (12 were meaningful elevations to steps, benches, lights). I think I overdid it a little.
Pool was a lot less gallons than shown on the design. I overfilled it a bit (about 1" above centerline). Raw meter reading gave me 15,824 gallons. Subtracting the overfill 364 gallons and an estimated minimal home usage (I assume 60 gallons) I have my pool at 15,400 gallons, design was estimated at 20,164 gallons, I've heard that design estimates tend to be overstated, but by nearly 33%, seems ridiculous.
Thanks @Newdude and @bdavis466. Just finished starting up the equipment. I have a lot to learn and will have loads of other questions but I got everything flushed out and confirmed every valve and labeled everything. That took about 3 hours (whose hairbrained idea was it to put a valve on every line?). Everything seems to be working fine.

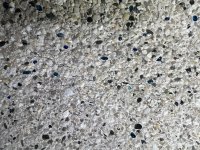
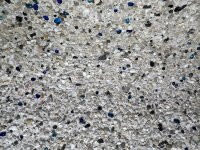

A few pictures around noon today.


It was on pace to fill in 14 hours but I turned off the fastest hose to slow it down, I needed to get some sleep. I got up around 4:30am and turned on the fast hose and it wrapped up at 5:45am. I took meter readings at 14 points (12 were meaningful elevations to steps, benches, lights). I think I overdid it a little.
Pool was a lot less gallons than shown on the design. I overfilled it a bit (about 1" above centerline). Raw meter reading gave me 15,824 gallons. Subtracting the overfill 364 gallons and an estimated minimal home usage (I assume 60 gallons) I have my pool at 15,400 gallons, design was estimated at 20,164 gallons, I've heard that design estimates tend to be overstated, but by nearly 33%, seems ridiculous.
Thanks @Newdude and @bdavis466. Just finished starting up the equipment. I have a lot to learn and will have loads of other questions but I got everything flushed out and confirmed every valve and labeled everything. That took about 3 hours (whose hairbrained idea was it to put a valve on every line?). Everything seems to be working fine.

- First up on the agenda for this afternoon fun is to run the initial set of tests with a full pool (and hopefully get some guidance on chem additions).
- Next I'll brush and clean up some sand that came out of the baja return (strange that is the only one, unless it just spread out from other returns since they are so much higher above the floor).
- Then make the chem additions.
- If I still have the energy I'll tackle why the 4 microbrites don't show up in intellicenter (I'm pretty sure they used to, I remember the electrician turning them on to test them shortly after being installed). I haven't had time to figure that out yet, so if anyone has some quick checks or to-do's I'd appreciate it. I don't have the microbrite lights show up in intellicenter.


Last edited:
I'm not saying that PBs inflate the volume to make the astronomical cost seem more reasonable.I have my pool at 15,400 gallons, design was estimated at 20,164 gallons, I've heard that design estimates tend to be overstated, but by nearly 33%, seems ridiculous
I'm also not, not saying it.
- Sep 4, 2022
- 324
- Pool Size
- 15400
- Surface
- Plaster
- Chlorine
- Salt Water Generator
- SWG Type
- Pentair Intellichlor IC-40
For those keeping score here are my test results so far
Fill water 1st time: pH - 8.2, TA - 130, CH - 275 (1/22/24)
Fill water 2nd time: pH - 7.8, TA - 120, CH - 275 (2/27/24)
@ 5,000 gallons: pH 8.0, TA - 120, CH - 300, Temp 69, CSI 0.49 (3/3/24)
Addition: 5lbs baking soda and sequestrant
@ 10,000 gallons: pH 8.3, TA - 130, Temp 66, CSI 0.79 (3/3/24) @Newdude felt pH was between 7.8 and 8.2
Addition: 3 cups 14.5% Muriatic acid
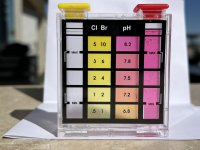
@ full (15,400) gallons: pH 8.0, TA - 130, Temp 67, CSI 0.51 (At least seams similar to last one at between 7.8 and 8.2 so I split the baby and went with 8.0. Thoughts?)
Next:
I'd like to get TA up to 200 as mentioned in the bicarb startup. In order to do that pool math says I need to add 16lbs of baking soda. I'm not that confident in my testing yet, so I'm planning on 8lbs. What would you do?
Also, I'll add the remaining sequestrant to match pool volume.
Anything else I should do or add?
I'm off to brush and clean up some of the gunk.
Fill water 1st time: pH - 8.2, TA - 130, CH - 275 (1/22/24)
Fill water 2nd time: pH - 7.8, TA - 120, CH - 275 (2/27/24)
@ 5,000 gallons: pH 8.0, TA - 120, CH - 300, Temp 69, CSI 0.49 (3/3/24)
Addition: 5lbs baking soda and sequestrant
@ 10,000 gallons: pH 8.3, TA - 130, Temp 66, CSI 0.79 (3/3/24) @Newdude felt pH was between 7.8 and 8.2
Addition: 3 cups 14.5% Muriatic acid
@ full (15,400) gallons: pH 8.0, TA - 130, Temp 67, CSI 0.51 (At least seams similar to last one at between 7.8 and 8.2 so I split the baby and went with 8.0. Thoughts?)

Next:
I'd like to get TA up to 200 as mentioned in the bicarb startup. In order to do that pool math says I need to add 16lbs of baking soda. I'm not that confident in my testing yet, so I'm planning on 8lbs. What would you do?
Also, I'll add the remaining sequestrant to match pool volume.
Anything else I should do or add?
I'm off to brush and clean up some of the gunk.
If you guess correctly, it'll be a clear 7 after it mixes for 15 mins. Recheck and repeat if necessary. Above range could be higher than it looks and need multiple doses.At least seams similar to last one at between 7.8 and 8.2 so I split the baby and went with 8.0. Thoughts?)
Also, it looks too red to me. Try 4 drops and see if the color lines up better.
- Jul 21, 2013
- 52,854
- Pool Size
- 35000
- Surface
- Plaster
- Chlorine
- Salt Water Generator
- SWG Type
- Pentair Intellichlor IC-60
- Sep 4, 2022
- 324
- Pool Size
- 15400
- Surface
- Plaster
- Chlorine
- Salt Water Generator
- SWG Type
- Pentair Intellichlor IC-40
Did pH again with 4 drops. Looks much more like 8.2. Am I honing in. Curious why the need to deviate from the test instructions. I might be sorry I asked, but curious nonetheless. Also, it seems odd to me that when you look near the bottom of the vial the color looks different, maybe more transparent since the plastic angles in (narrows towards the bottom).If you guess correctly, it'll be a clear 7 after it mixes for 15 mins. Recheck and repeat if necessary. Above range could be higher than it looks and need multiple doses.
Also, it looks too red to me. Try 4 drops and see if the color lines up better.
Thanks for the reassurance!Those spider cracks are normal shrinkage and nothing to worry about.

