Screw for bonding lug broke off inside booster pump

Option

0
Bronze Supporter
Feb 2, 2017
103
Sacramento/CA
Hello,

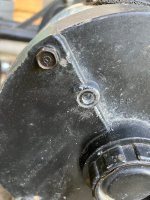
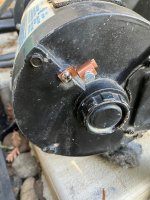
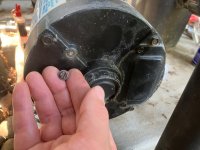
While trying to run the bonding wire to my booster pump (Polaris PB-4), I noticed that the bonding lug was broken so I tried to remove the screw that attached the lug to the pump. Unfortunately, the screw head sheared off leaving the threaded section inside the pump. Can anyone tell me if it is okay to use one of the other screws for attaching the bonding lug or was that one special in some way?
 

Attachments

  • IMG_2465.jpg
    IMG_2465.jpg
    347.9 KB · Views: 25
Last edited:
Try a screw extractor in a reversible drill after using a shot of thread penetrant.
Thanks for the suggestion. Does that mean you believe that specific screw should be used? I'm not super handy so I'd hate to drop $20 on a set of extractors and penetrant if another screw on the pump can be used instead. Especially considering those extrators don't seem to have a high rate of success based on the reviews I'm reading.
 
Well, I tried going the extractor route but, considering the screw was in there tight enough to shear off its head, I don't think there was ever much hope for an extractor to work. So back to my original question:

Would attaching a cable lug to another screw on the pump's body sufficiently bond the pump? Or is there something special about that screw's location?
 
Electrically, any bolt head will do. You'd need to get a lug that fits.

Unfortunately the bolts in the picture are probably motor stator through bolts. They like to break off, too. And if one of them does, your motor is probably done.

I know it may too late, but the best approach with a small screw like this is to carefully drill down the exact middle with the tap drill size. If this is an 8-32 screw, then that's #29. Run a tap in. If it's a blind-bottom hole, you want a bottoming tap. Use a T-handle tap wrench, oil, and work very slowly: in a fraction of a turn, then back a full turn. Most of the time the tap will "find" the old threads and peel out the remains of the screw. Success depends on precise drilling and careful patience for about 10 minutes.

Finally, if you end up with a crooked hole, it's often possible to fix things up by drilling + tapping the next bigger size. For 8-32 that would be 10-32. The drill size is #21.

Oh, now that is a very interesting idea. Thank you for sharing your thoughts/experience!

I actually drilled all the way though the screw while trying to use the extractor and can confirm that it is not a blind-bottom hole. Regarding the sizing, I have no idea how to determine the size but my local hardware store does have this kit in stock which has both a 8-32 and 10-32 size so I'm guessing that's a good place to start?

However, before I go and spend more money, I've found that the screw circled in the image below can be removed but it's a bit smaller and I'm guessing it just holds that little panel in place. Do you know if that would be acceptable to use with a cable lug? The panel is made of plastic but I'm thinking that if I replace the screw with a stainless steel version then maybe that would be sufficient?

Untitled.png
 
Last edited:
You can use one of the screws on the back that holds the wiring compartment cover on or one of the screws that hold the capacitor cover on or use a bonding clamp on the back part or maybe drill and tap a small hole in the side close to the back where the metal is thick.

Don't get metal shavings in the pump if you drill a new hole and don't do it above half way up or it might eventually leak water into the motor.

Don't put the clamp on too tight or it might damage the back part.


1659413238247.png
 
A ground connection with plastic anywhere in it is probably not code compliant and for good reason. A life can depend on that being 100% reliable. I wouldn't take a chance.

The Irwin set looks fine, but Bosch sells tap/drill combos for about $7. The wrench is another $6 or so.
 
Thanks for all the great suggestions!

I like the idea of using the clamp on the back protrusion athough, I assume that there is some kind of paint on the exterior of the pump. Would that interfere with the bonding connection if I used a clamp rather than a screw which threads inside the pump?
 

Enjoying this content?

Support TFP with a donation.

Give Support
You can use sandpaper or a flat file to remove the paint on a spot so that the clamp makes a connection to the metal.

Be careful about drilling as it can cause damage inside the motor if you hit anything.
 
Oh, now that is a very interesting idea. Thank you for sharing your thoughts/experience!

I actually drilled all the way though the screw while trying to use the extractor and can confirm that it is not a blind-bottom hole. Regarding the sizing, I have no idea how to determine the size but my local hardware store does have this kit in stock which has both a 8-32 and 10-32 size so I'm guessing that's a good place to start?

However, before I go and spend more money, I've found that the screw circled in the image below can be removed but it's a bit smaller and I'm guessing it just holds that little panel in place. Do you know if that would be acceptable to use with a cable lug? The panel is made of plastic but I'm thinking that if I replace the screw with a stainless steel version then maybe that would be sufficient?

View attachment 442542
Electrically, that is the safest as the ground wire is attached to the other side of the rear end bell. Get a slightly longer screw. Clean the paint off that area of cover for a better connection.
 
Thank you to everyone who replied on this thread. I ended up boring out the sheared-off screw, cleaning up the threads with a tap and then threading in a slightly longer stainless steel screw. I was able to determine from the sheared-off portion of the original screw that it was a #10-32 (probably 3/8" long) so I bought a drill bit/tap combo for that size. It took freaking forever to drill out the old screw but once I did, I found that the hole is very deep and threaded in as far as I could see so even if you mess up the threads near the opening while drilling, you can still make it work with a long enough screw. Hopefully that helps anyone else with a similar issue who finds this thread.
 

Attachments

  • IMG_2475.jpg
    IMG_2475.jpg
    531.7 KB · Views: 9
  • IMG_2476.jpg
    IMG_2476.jpg
    473.5 KB · Views: 11
Thread Status
Hello , This thread has been inactive for over 60 days. New postings here are unlikely to be seen or responded to by other members. For better visibility, consider Starting A New Thread.