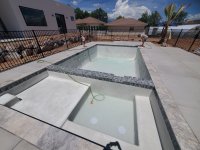
This photo shows that the floor was made up of a lot of material that came off the walls while shaping. Am I correct in understanding this is rebound? And should have been removed?
Rebound is the stuff that bounces off during spraying and doesn't stick. Slightly different from material carved off during shaping, but they're equally bad, and yes should be removed to the extent that it's practical.
They did shoot the floor with the nozzle as well. But it would have been the pressurized material on top of what you see here.
I'm actually not sure how a crew could effectively remove all that extra cement; a good deal is carved off of the walls when shaping and would be really hard to shovel out from under the rebar.
The rebound under the rebar on the floor is very difficult to remove, but should be a small enough quantity and at the very base of the layer so isn't usually a big deal. The floor adjacent to the walls should have been shot before carving material off the walls, so that it would be easy to shovel the carved material off of the floor into buckets and removed. Large volumes of material shot onto the walls, then carved off the walls, then placed loosely on the floor, will create a much weaker area, which will also be more prone to shrinkage cracks.
You would really need a gunite expert to do an on-site evaluation to get a good answer.
They might be able to tell by a visual inspection or they might need to do some sort of testing.
I do QA/QC of shotcrete as part of my job (though nothing to do with pools). A visual inspection is not going to tell them much of anything.
View attachment 425569
Note that the person doing a compression test seems to be directly exposed to the sample being tested, which is super stupid since it will explode when it fails.
Lol. You can see the lexan door to protect the operator has been replaced with plywood, and is wide open instead of being closed. And to top it off he's not wearing any eye protection either. While concrete samples rarely "explode" during UCS testing, it's still very dumb. Small chips do occasionally fly off, and could easily hit the operator in the eye.
The foreman who ran the nozzle was very experienced. I'm unsure of the other laborers. None of them seemed new. But that's of course hard to really know.
I can't recall the psi, but the foreman was proud of their applications. It was in the high thousands, like 5-8k unless I'm mistaken.
The engineering sheet shows the floor to be 6" total. 3" under and over the rebar.
It didn't really 'sit', or at least it didn't seem to. The trucks all came on time and they were able to keep moving pretty steadily. But I also don't know what 'sitting' would constitute. Whether 5 minutes is too long or if we're talking hours.
Depends on the concrete mix and the ambient conditions, but in general you want it to be placed within 90 minutes of the first time water touches the dry cement. In the hot dry conditions you've described, it would ideally be less than that, maybe 60 minutes. There are some plasticizers and other admixes that can be used to extend this time slightly.
I'm not sure that's a variable in this case. It was a ready/site mix truck. Square bodied. The concrete was mixed real-time as it came out of the shoot wet, into the Shotcrete crews pump trailer.
The mix is always a huge variable, regardless of where it happens. Asking for the recipe/mix and records would still be a very good idea, especially since they used an admix they're not accustomed to using (flyash). In particular you will want to note the water to cement ratio, and also note any additional water that's added later, like in the shotcrete hopper or during shaping/troweling. A common mistake I've seen is adding a little extra water when it's really hot and dry out, thinking that it'll counteract the evaporation and rapid curing. Unfortunately adding more water only ends up reducing the end strength and increasing the quantity and severity of plastic shrinkage cracks. The proper solution to hot dry conditions is adding a plasticizer to increase the working time. I'm a bit confused why they prefer a mix with no fly ash though, especially given the location. Fly ash used in appropriate quantities slows down the cure time, which is exactly what you want when it's super hot and dry out, and it also has the benefit of increasing the strength of the final product.
In the end, I wouldn't lose too much sleep over it. The plaster is what makes a pool waterproof, not the concrete shell. Yes, it sucks that the quality of the shell doesn't appear to be ideal or up to par, but it's unlikely to cause any serious issues given the soil/bedrock situation you've described, and I'm guessing that the builder is providing some sort of warranty on the shell construction in the case that issues do come up. I would document everything as thoroughly as possible, collecting as much data and information to back up the claims that the shell quality may have been compromised, just in case something bad happens down the road. You may even try to use this to negotiate a stronger or longer warranty from your builder.
Keep watering the shell religiously for the next 10-14 days, get your builder to fill the wider cracks with hydraulic cement to help ease your mind about it, and don't worry about it too much. Worry more about your upcoming pool start up and what kind of pool toys and deck furniture to buy. Just my $0.02.