Aquacal SQ145 Heat pump (im swiming on halloween in NH)

Davegnh

Bronze Supporter
Jul 31, 2021
299
Southern NH
Pool Size
11000
Surface
Plaster
Chlorine
Salt Water Generator
SWG Type
Pentair Intellichlor IC-40
Ok after several years of delays and planning Im close (I hope) to ordering my heat pump (nat gas and propane not an option). I have decided to go with an Aquacal model SQ145 for the following reasons:
1) it looks to be very quiet as it is located about 8 feet from the pool deck
2) Has RS-485 that will talk with mt Pentair automation.
3) on the higher side for COP (4.2-7.1).
4) Has a very low PSI increase 2 PSI at 45 GPM other I have seen are 8-10 PSI this will translate to lower pump speeds
5) Available from a local dealer so hopefully support will be good if needed.
6) only needs 6" clearance in rear it needs to fit close to my house (I know more is better but space is tight)

Does anybody have this model or a similar one and what are your experiences?

I plan to do the install my self

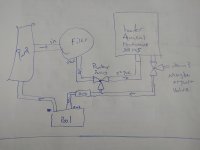
I have attached my plumbing diagram does this look ok am I missing something. I have a SWG so I don't think I need a check valve? Also I do want to be able to isolate the heater so included a couple 3 way valves. I also may automate one of the valves to bypass the heater is there any down side of only running water through heater in use? I assume it will put less stress on the heater. I am toying with using one of the 3 way valve to provide a method to drain the pool using the pump. I also don't think I need any sort of flow bypass when my pump is at max speed( I never run it there) the flow tops out 76 GPM the max rated on the heat pump is 70 I assume the added flow restriction of HP and new plumbing will bring it down below 70 and don't ever plan of running the pump at max speed anyway.

The cardboard on the ground is the approximate size of the heater.

1727811887009.png
 

Attachments

  • 20241001_152457.jpg
    20241001_152457.jpg
    163.1 KB · Views: 25
  • 20241001_171154_HDR.jpg
    20241001_171154_HDR.jpg
    706.7 KB · Views: 17
Last edited:
I plan to put a 3 way valve in place of the check valve. What purpose would adding a check valve in addition to the three-way valve? I could understand it if I had an inline chlorinator that could potentially leak highly chlorinated water into the heater if there is no flow but I don't see this happening with a salt water chlorine generator.
 
I plan to put a 3 way valve in place of the check valve.

Why?
What purpose would adding a check valve in addition to the three-way valve?

Two valves to turn creates the possibility that someone will only turn one valve and dead head the pump. It is a bobby trap waiting for someone to set a valve in the wrong position and damage the equipment.

A check valve automatically opens and closes the heater output pipe as necessary,

You have one valve for the heater bypass which can be automated using an actuator.
 
  • Like
Reactions: pjt
Has RS-485 that will talk with my Pentair automation.
I don't see any automation in your signature. What do you have? I have IntelliCenter, and control of my AquaCal HP never worked right. I operate the HP in standalone mode. Pentair and AquaCal are both aware of the RS-485 problems, but I'm not holding my breath that the problem ever gets fixed.

Does anybody have this model or a similar one and what are your experiences?
I have a positive view of AquaCal. My first HP from them was a lemon, and they ended up replacing the whole unit. Their customer support has been superb in my experience.

I have a SWG so I don't think I need a check valve?
You won't need a check valve for the SWCG, but you should have one (on the output of the HP) as part of the bypass.

Also I do want to be able to isolate the heater so included a couple 3 way valves.
A 3-way as depicted in your diagram will work. Change out the other 3-way with a check valve.

is there any down side of only running water through heater in use?
When I'm not using my HP, the diverter is in the neutral position. This allows full water flow through both the HP and the bypass (most of the water will flow through the bypass).

I am toying with using one of the 3 way valve to provide a method to drain the pool using the pump.
Install that 3-way diverter between the pump and the filter. You'll be able to vacuum to waste or lower the water level. If you're completely draining, use a standalone pump.
 
Ill remove the 2nd 3way and just put in the 2nd 3 way only put it there as a simple way to add a drain. Ill just continue to use my current method of move my deck jets away from the pool (its much more fun to shoot water 30 feet up in the air).

I have easytouch for automation. I did come across this video in my research not sure if its the issue you had.

Pentair IntelliCenter / Aquacal Disaster - EASY FIX!​

 
Here is the cost for ref
Aquacal sq145-$5600
Whip (18ft 3x8awg wire, 1/2" conduit)- $75
Pentair 3way, check, SWG/filter fittings - $175
PVC joints and pipe 2in - $55
Pad plastic 36"x36" - $45
Thermal sensor - $20
Bonding wire - free ( yippee I had this)

Not in the budget and hopefully not. Throwing out back moving 300 lbs Heat pump into place.

Can't wait to be swimming in October...... Current pool temp temp 65. Future 85 Freedom degrees.
 
Last edited:
Does anybody know if I can see output temperature when connected to pentair easy touch automation? I want to be able to calculate my COP and I will have input temperature which is my pool temperature but I'm not sure if AquaCal displays the output temperature? @pjt
 
AFAIK, I can't see the output temperature from the HP. You can put a thermal probe in a return to get a rough number.
 
That is my plan I will add a temperature sensor to the output and wire it into "spa" temperature probe spot on the easy touch then I will be able to see it in Screen logic. Then I will able to calculate how efficienty of the heat pump is at different temperatures.
 
Last edited:

Enjoying this content?

Support TFP with a donation.

Give Support
Well I guess I cant add a temperature sensor to the spa because there is no separate sensor for spa. I have to add a 10K sensor to the solar to get the heat pump to work anyway no clue why but this was is the setup manual. Unfortunately the only place I think you can see the solar temp is on the actual control panel for the easy touch and not in screen logic anywhere.


1728571105960.png
 
So I got the pad for the heat pump today. I ended up going with a plastic one it was rated for up to 1300 lb so hopefully it works for my 300 lb heat pump.

I was thinking a drilling some holes in the bottom of the plastic base to allow drainage. Anybody see any concerns we doing that? Underneath the pad I have about a foot of crushed stone then nice sandy soil so I don't think you'll be any issues with water.

I will also be moving my filter about 6 in further away from where it is now. I don't think it'll affect the airflow too much.

Heat pump comes on Monday and I'll continue to document the install very excited.
 

Attachments

  • 20241011_174903.jpg
    20241011_174903.jpg
    511.8 KB · Views: 9
  • 17286837120392597356830376190953.jpg
    17286837120392597356830376190953.jpg
    476.4 KB · Views: 10
I would not drill any drainage holes. I think holes will weaken the pad.
 
I was thinking a drilling some holes in the bottom of the plastic base to allow drainage.
I would consider draining the water away from your pad.

 
I would opt for the SQ225. It's not much more money, is more efficient, and will have to work much less to maintain heat. It will heat the pool quicker when needed, and will keep the pool heated in lower temps than the SQ145.

I have a 7K pool and my heater is 144K BTU. If I could go bigger, I would. I would never buy a lower output heat pump.
 
I started at that one but the extra 1000 watts limited what else I could add to pool house. Without adding another 2k to upgrade my electric run. Also it did not perform that much better at low temps and it's cop was lower overall. Most of the summer just want 3-4 extra degrees which this HP should do no problem.
 

Attachments

  • Screenshots_2024-10-13-20-00-55.png
    Screenshots_2024-10-13-20-00-55.png
    23.7 KB · Views: 5
Heat pump arrived in the rain today next step move it the 6 ft to the pad. I was surprised it just needed a hand dolly to move it to the backyard.
It was easy to move around on the pallet with help from my 11 yr old son
 

Attachments

  • 20241014_164146_HDR.jpg
    20241014_164146_HDR.jpg
    606.7 KB · Views: 9
  • 20241014_171245_HDR.jpg
    20241014_171245_HDR.jpg
    570.9 KB · Views: 9
  • 20241014_171653_HDR.jpg
    20241014_171653_HDR.jpg
    548.9 KB · Views: 9
Last edited:
  • Like
Reactions: pjt
First impressions. The all plastic housing makes the product feel very cheap but should avoid a lot of rattling that can happen with sheet metal. A little worried if something hits the side that I could damage the heat exchanger. The control panel is also attached to plastic and again feels very cheap when you press the buttons. However I like the plastic due to no chance of corrosion and assuming they use the right UV protectors should look great for years.

The overall construction looks good I didn't see anything that concern me from a wiring or workmanship. There was a little bit of water in the plumbing that makes me believe they actually tested it which is good to see. The fan motor is made by Nidec which is the high quality manufacturer. However the fan capacitor was made in China but the main compressor motor capacitor was made in the USA which was nice to see.

The default wiring location was on the right side of the heat pump and all the documentation said the connection could be made from the left or right which is true but they have holes already made on the right side for the electrical. My setup it's better to make it from the left side. So I will have to move the bonding nut and make a couple holes in the left side of the unit.

I was also struggling to find some non-purple pipe primer. I then stumbled on a primer and adhesive product called fusion by oatley it's a clear product and based on the reviews it works pretty well. I don't have any codes the require the purple dye for pool plumbing.

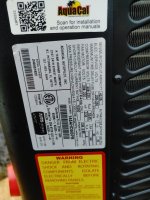
Attached a few pictures of the heat pump.
 

Attachments

  • 20241014_182219.jpg
    20241014_182219.jpg
    373.9 KB · Views: 11
  • 20241014_175736.jpg
    20241014_175736.jpg
    268.2 KB · Views: 10
  • 20241014_175532_HDR.jpg
    20241014_175532_HDR.jpg
    318.3 KB · Views: 11
  • 20241014_175451.jpg
    20241014_175451.jpg
    431.3 KB · Views: 11
  • 20241014_175445.jpg
    20241014_175445.jpg
    433.1 KB · Views: 11
  • 20241014_175443_HDR.jpg
    20241014_175443_HDR.jpg
    368.5 KB · Views: 11
  • 20241014_174841.jpg
    20241014_174841.jpg
    470.9 KB · Views: 11
These short days are fun.... tonight planned to get HP into Final location and wire up electrical and communication wires. I quickly ran out of sunlight I now get why you're supposed to put a light above your pool equipment. I had 1/2" conduit however the premade holes are for 3/4" which I figured out after I knocked out the smallest hole in the panel and my conduit was too small. I ended up making a smaller hole using a unibit for the 1/2-in conduit. Wearing a nylon sweatshirt not the best option when hot steel is falling on to you ( embedded steel shards). I got conduit hole drilled and the wires pulled through it and the heat pump in its final place then I ran out of sunshine. Oh and I was trying to repurpose some old phone line from my house for the rs 485 communication but it ended up being too short it's hard to find in 22 gauge yellow and green cable (I have other wire that will reach but trying to keep the colors consistent)

I know the heater is close to the filter but I plan to move the filter to the left when I redo the plumbing. It will still be about 6 in away at the closest point. Hopefully that doesn't hurt the efficiency too much.

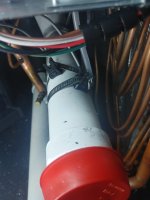
It looks like there are two temperature sensors on the water input anybody know why?
 

Attachments

  • 20241015_185605_HDR.jpg
    20241015_185605_HDR.jpg
    381 KB · Views: 10
  • 20241015_183828_HDR.jpg
    20241015_183828_HDR.jpg
    359.6 KB · Views: 11
  • 20241015_180119_HDR.jpg
    20241015_180119_HDR.jpg
    513.5 KB · Views: 11
  • 20241015_184413_HDR.jpg
    20241015_184413_HDR.jpg
    274.6 KB · Views: 12
Last edited:

Enjoying this content?

Support TFP with a donation.

Give Support