Hayward SWG dripping

Jer34

Active member
Jun 25, 2021
28
Stoney Creek, ON
Pool Size
50000
Surface
Vinyl
Chlorine
Salt Water Generator
SWG Type
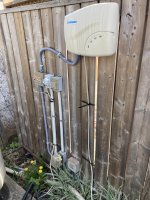
Hayward Salt & Swim 3C
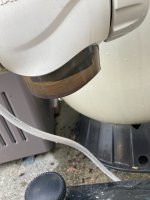
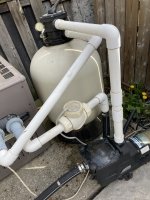
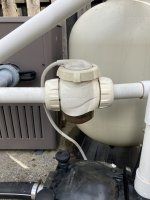
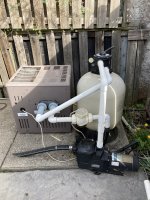
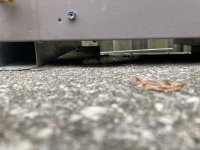
Just opened the pool a few days ago, and the SWG between heater and return pipes has been dripping. It started off with a slow drip, then stopped for about a day. It has now started dripping again a bit faster. I’ve cleaned the pump and backwashed the filter. I’ve tightened the unions by hand as best I could (getting a strap wrench tomorrow). There is also an occasional drip out of the pipes between filter & pump. Any advice would be great thank you
 

Attachments

  • CBA231FE-F4CD-49F7-B13D-EBF8D5766EF9.jpeg
    CBA231FE-F4CD-49F7-B13D-EBF8D5766EF9.jpeg
    272.4 KB · Views: 17
Show us pics of your equipment pad and the cell with the unions.
 
See below thanks
 

Attachments

  • 54AB3925-BE5B-467B-83A9-6F41847AB290.jpeg
    54AB3925-BE5B-467B-83A9-6F41847AB290.jpeg
    528.8 KB · Views: 11
  • E26A3556-00A1-4B6B-B568-418727A6C17D.jpeg
    E26A3556-00A1-4B6B-B568-418727A6C17D.jpeg
    345 KB · Views: 11
  • 1542E7D1-364B-4D91-A35A-9162F8D430F7.jpeg
    1542E7D1-364B-4D91-A35A-9162F8D430F7.jpeg
    609.1 KB · Views: 10
  • 94433A26-7F69-4F67-9A08-885530A7A9BE.jpeg
    94433A26-7F69-4F67-9A08-885530A7A9BE.jpeg
    665 KB · Views: 10
Your manual is at https://www.hayward-pool.com/assets/documents/pools/pdf/manuals/AquaRite100_owners-manual.pdf

Page 5 says - Install the included rubber gaskets on the Cell Vessel then install the Cell Vessel into the plumbing by hand tightening the unions.

Check the integrity of the rubber gaskets and that they were installed.

Put some Pool Lube on the rubber gaskets to help them seal - Pool Lube - Further Reading

Do not use a strap wrench on it. You will just deform the rubber seal. You may have the leak becasue the union was over tightened.
 
I removed them and cleaned up, retightened everything and the drip stopped. But then it started 15 minutes later, this time out of the bottom of the heater. Seems like the water is trying to find somewhere to escape
 
I removed them and cleaned up, retightened everything and the drip stopped. But then it started 15 minutes later, this time out of the bottom of the heater. Seems like the water is trying to find somewhere to escape
Yes...of course water is trying to find a way out. It doesn't like to be confined and pressurized. It will ALWAYS find the weakest point.

Pascal...its not just a good idea, it's the law.
 
Yes...of course water is trying to find a way out. It doesn't like to be confined and pressurized. It will ALWAYS find the weakest point.

Pascal...its not just a good idea, it's the law.
Ok thanks, it didn’t drip at all last year (my first year), now there is suddenly multiple weak spots for the water to drip?
 
I removed them and cleaned up, retightened everything and the drip stopped. But then it started 15 minutes later, this time out of the bottom of the heater. Seems like the water is trying to find somewhere to escape
So after some investigating this morning it is definitely now dripping from the pressure switch in the heater. I tried to tighten and loosen it but it made the drip worse. There are 2 wires connected to it that get tangled when I try to tighten the switch. Is this something relatively easy I should be able to disconnect and re attach myself or should I call a professional? Lots of wires inside the heater obviously and I’m no electrician
 
Is this something relatively easy I should be able to disconnect and re attach myself or should I call a professional?

You can disconnect the wires from the Water Pressure Switch and try and tighten it. The wires are a low voltage 24 volt circuit.

I think though you will need a new WPS.

What model heater?

Post a pic of the leaking WPS.
 
You can disconnect the wires from the Water Pressure Switch and try and tighten it. The wires are a low voltage 24 volt circuit.

I think though you will need a new WPS.

What model heater?

Post a pic of the leaking WPS.
It’s a Hayward H250ED2C. I was only able to disconnect one of the wires, can’t seem to get the other one off. And when I try to tighten it, it just keeps turning and twisting the other wire
 

Attachments

  • 34D05C60-C2A1-4418-9644-FD791239388A.jpeg
    34D05C60-C2A1-4418-9644-FD791239388A.jpeg
    284.6 KB · Views: 9

Enjoying this content?

Support TFP with a donation.

Give Support
Both wire are spade lugs and pull off.

You should not be screwing it while the wires are connected.

Something is loose that should not be. Someone needs to look deeper into how the WPS is connected.
 
Just got both wires off, but when I try to tighten the WPS it just keeps spinning and spinning, doesn’t tighten. Picture below of drip under the heater
 

Attachments

  • 113356DD-C8BF-43E1-9CE7-35B2CAC8F857.jpeg
    113356DD-C8BF-43E1-9CE7-35B2CAC8F857.jpeg
    299 KB · Views: 5
Maybe one of these folks has been hands on in that area - @swamprat69 @1poolman1 @Pool_Medic @JamesW
Thank you, appreciate the help. I just opened up the entire unit and I’m not sure if the drip is coming from the pressure switch. I tighten the end on the side and turned the pump on, no drip from the switch. But can see the water running out near the bottom, can’t tell where it’s coming from though
 
I believe those are compression fitted cells, a major PITA.

Insure the o rings are properly fitted then tighten with hand, you can also use a oil filter wrench. The fact that it didn’t leak last year means a small piece of dirt might be stopping it from being properly sealed.
 
I believe those are compression fitted cells, a major PITA.

Insure the o rings are properly fitted then tighten with hand, you can also use a oil filter wrench. The fact that it didn’t leak last year means a small piece of dirt might be stopping it from being properly sealed.
I had forgotten to reply sorry!! It ended up being the pressure switch inside the heater which was dripping after I had tightened the SWG with the oil filter wrench. Took the heater apart and tightened everything, it’s all working now. Appreciate it
 
  • Like
Reactions: Freddypop
Just some advice/caution about how a lot of water connections work. Many of these connections have rubber O-rings or gaskets in them. Cranking them down tighter does not help. All it does it deform (and possible ruin) the O-ring or gasket. If you have a leak, take the joint apart. look and feel the gasket material for cuts, nicks, and debris. Do the same for the mating surfaces. Once every thing is verified to be undamaged, and free of debris, apply pool lube - not Vaseline, not cooking oil, not random caulk from the drawer in your kitchen. Lube that is made for pools, and the rubber seals used in pools. Other stuff can (and likely will) eat the seals. Apply a nice coat of the lube to the surfaces and gasket material and assemble the joint hand tight. If you feel you have to, because you cannot get a good grip, or you feel you don't have the strength get it tight with your hands, go 1/4 turn to snug it up - but not more. Cranking down on the fitting will only damage the seals, and maybe the fitting itself.
 
  • Like
Reactions: Newdude
Thread Status
Hello , This thread has been inactive for over 60 days. New postings here are unlikely to be seen or responded to by other members. For better visibility, consider Starting A New Thread.